PHANTASY STAR ONLINE · EPISODE 2
Challenge Mode
Know the route. Share the tasks. Clear together.
Map legend
- Main route
- Split route
- Solo route
- Optional pickup
- Start
- Exit / next map
 Same colour: a switch and its barrier
 Timed switch
 Light switch
 Healing
 Barrier / trap
 Boxes (number = supply count)
 Warp pair (A → A′)
- Local instructions (linked to their position)
Clear principles
- Only fight what you must: EP2 enemy and switch layouts are fixed, and many rooms only need their "gatekeeper" enemies killed. Move on as soon as the door opens instead of clearing unrelated waves.
- Agree on roles first: before splitting up, confirm the routes, switches and meeting points. Each group handles only its own switches and fixed pickups, so nobody runs the same route twice.
- Traps are your main resource: use Freeze Traps on high-threat targets, Confuse Traps on packs in tight spaces and Damage Traps on enemies weak to fire. Do not waste Freeze Traps on ordinary enemies.
- Ranged weapons come first: from C3 on, guns matter for setting off traps, handling Seabed enemies and the bosses. Pool Mags, accuracy units and guns according to who meets the equipment requirements.
- Survive before you greed: FOs and RAs should not lead the party. Back off from lethal attacks, do not wait for an FO to cross the room to save you, and heal as soon as you need to.
This page is checked against the original Ephinea Wiki maps and room-by-room guides, Sakura's (PSOびより) C1–C4 guides and historical material. There is no hard requirement on class line-ups; routes, switches and resource sharing are what clear the stages.
STAGE 01
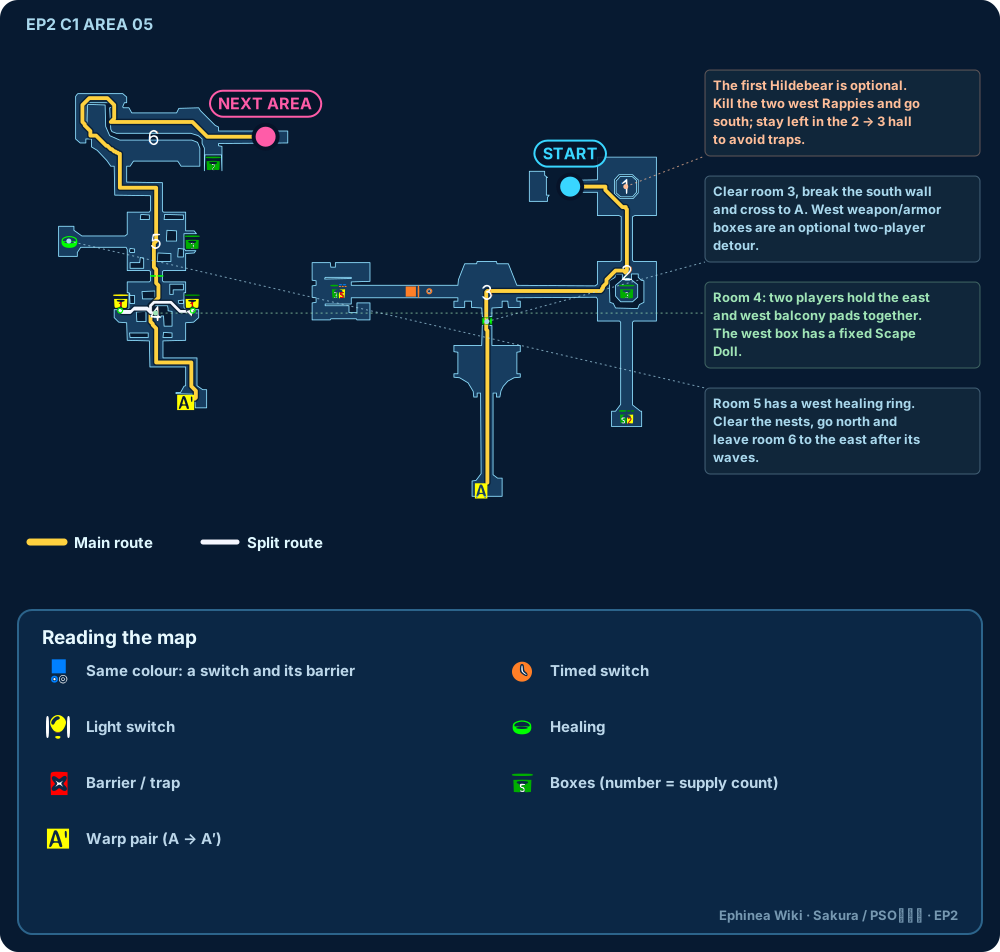
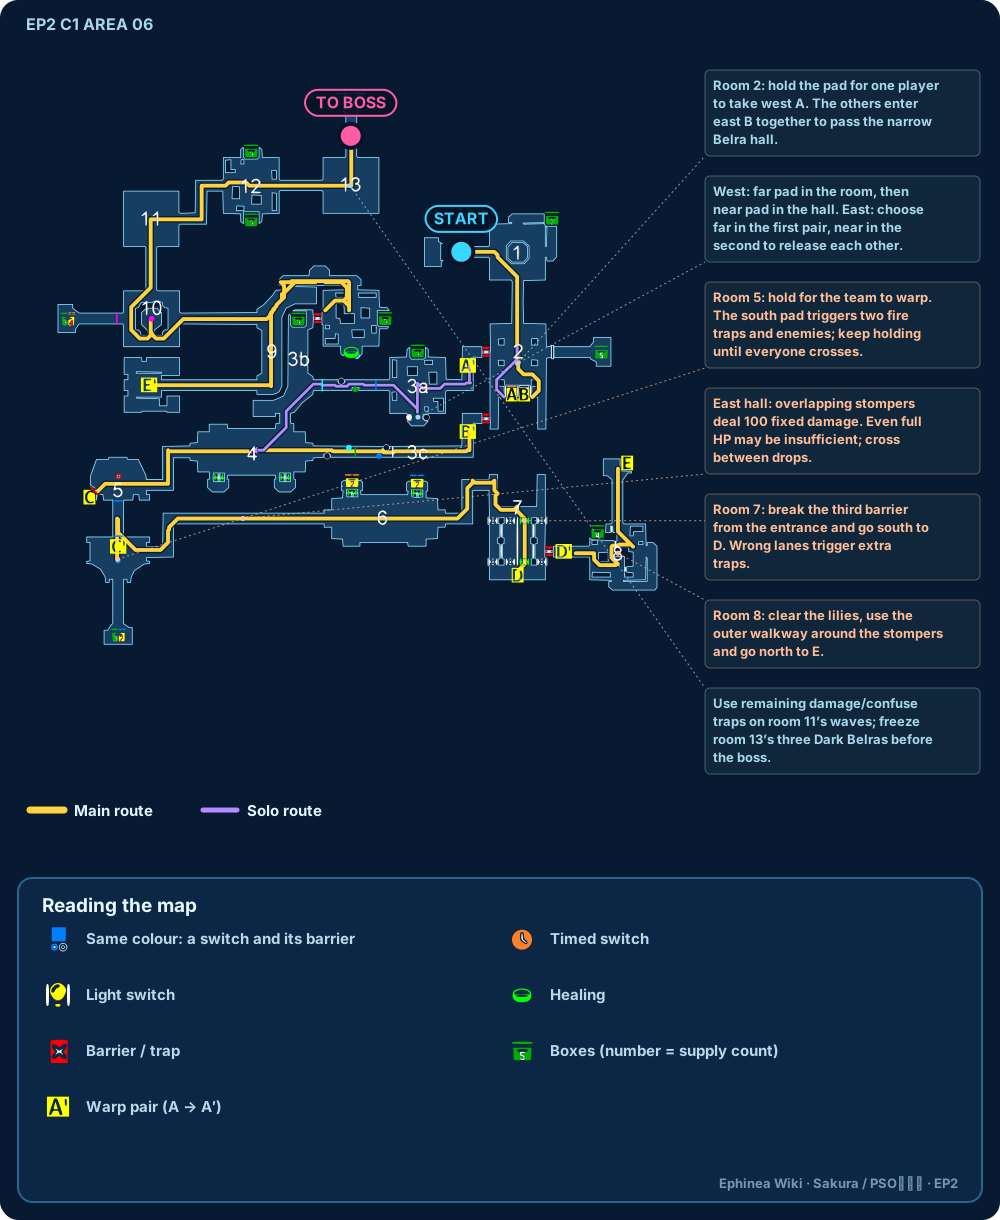
C1 Areas 01–06
Stage strategy and roles
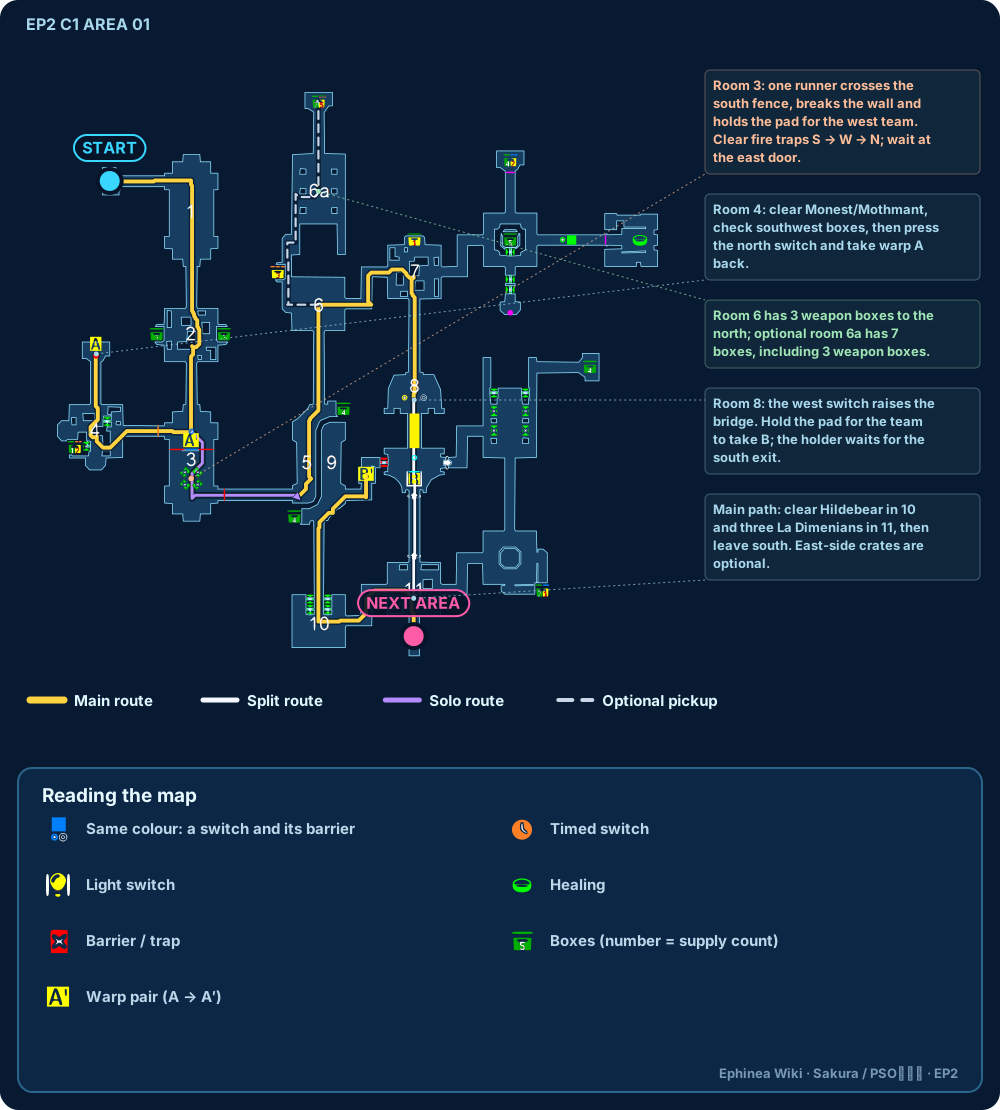
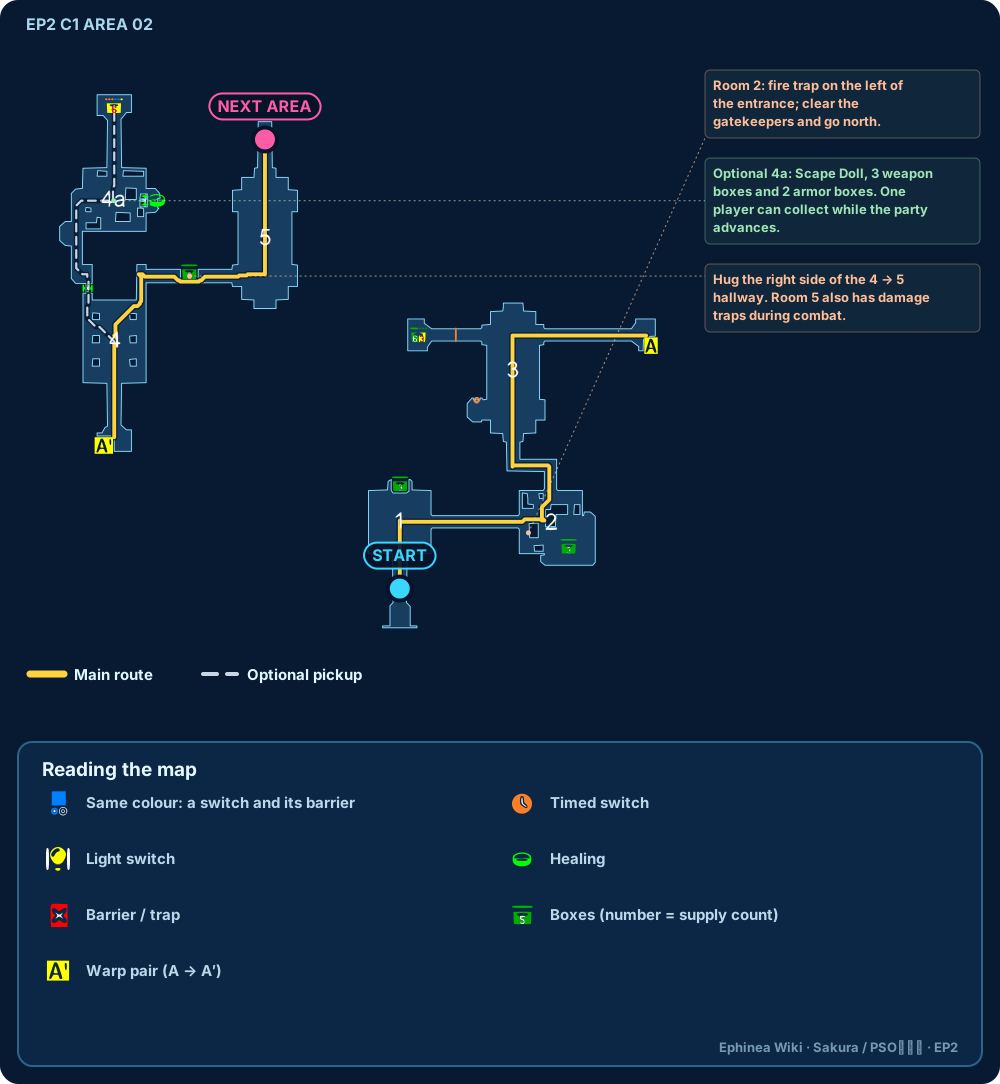
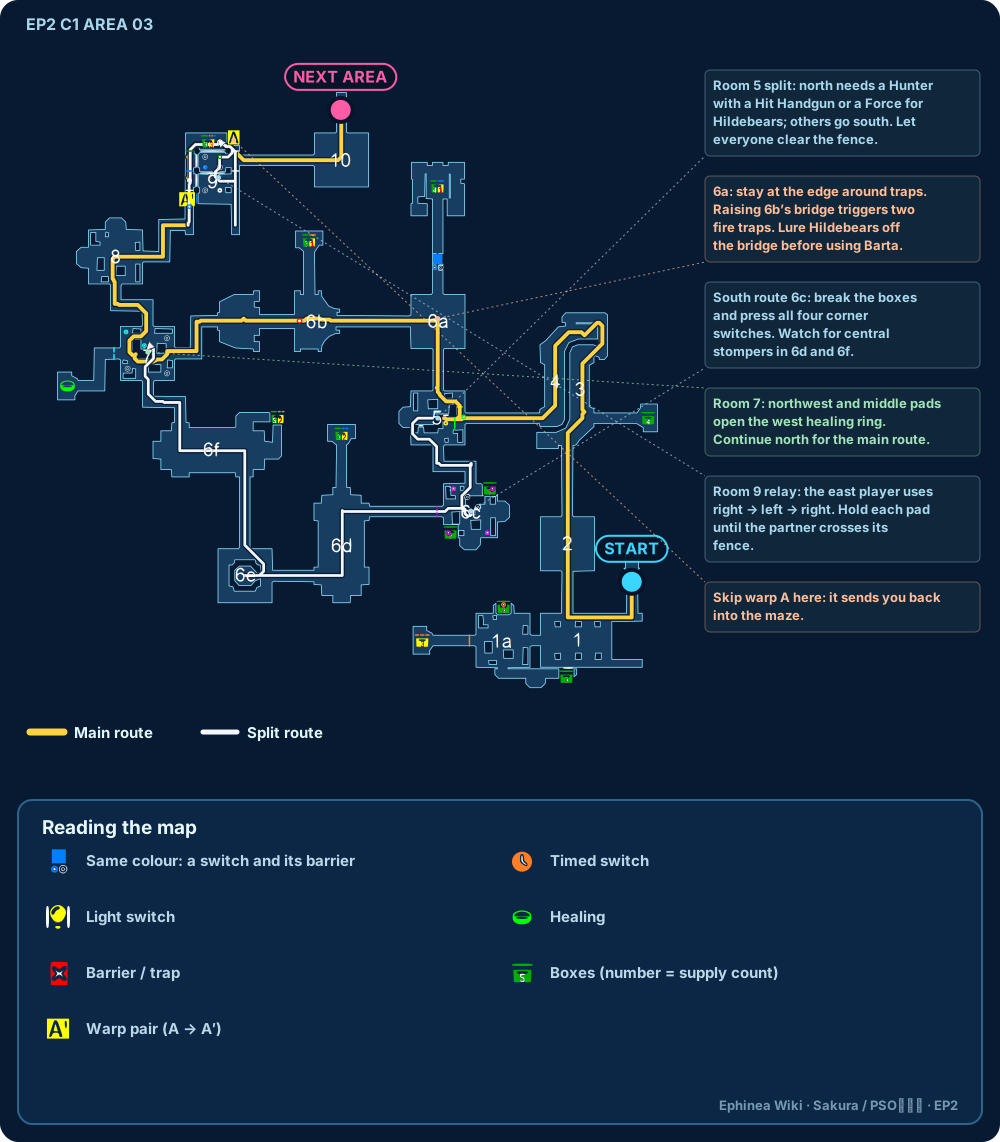
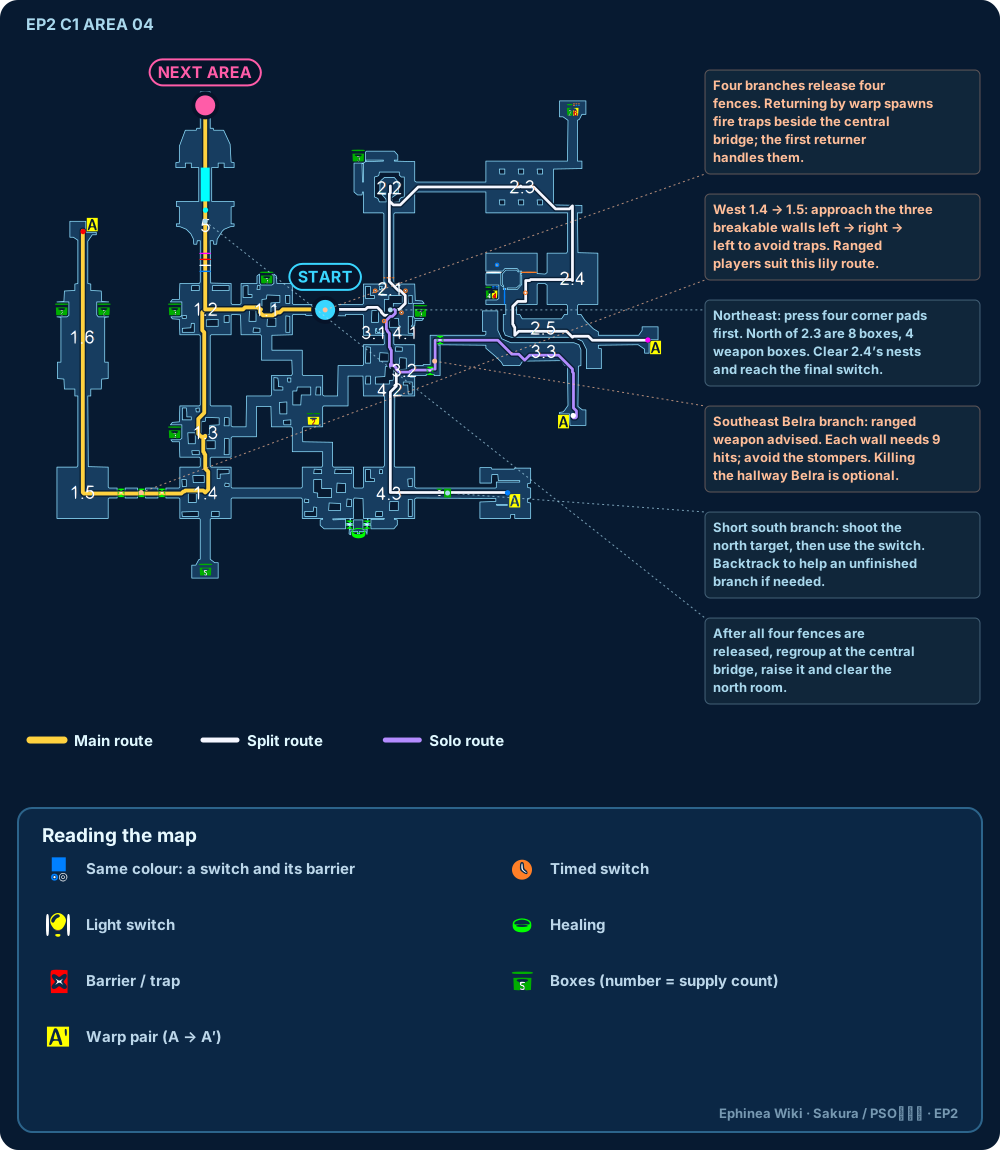
Stage overview: the VR Temple is about split routes and switches. The enemies are not very threatening, but a wrong switch slows the whole party. On a first clear, make sure all four players know their own route.
- Advance in map-number order; split members finish their own switches before regrouping. Players who do not know the switches should not try unmarked ones.
- Areas 2 and 5 each have a Scape Doll to collect; whether to take the side route depends on the party's remaining Scape Dolls and time.
- Each falling hammer deals a fixed 50 damage; in Area 6, the two hammers that drop together deal 100 in total. Check your HP and the hammer timing before crossing.
- Before the boss, sort out daggers, recovery items and Scape Dolls. Hit Barba Ray's head together when it comes ashore, keep moving while it is in the water, and do not line up with other players.
Experienced parties: assign the switches to fixed players while everyone else moves ahead to the next section; do not break the split for ordinary boxes.
Switches and roles
- Area 1: in room 3 the solo switch player first lets the others through to the west, then handles the fireball traps south → west → north, and finally waits for the east door. In room 8 one player must stay on the switch while the rest take the warp; the one left behind waits for the south door to open.
- Area 3: the north group handles the Hildebears and the south group the four corner switches. In room 9 two players relay right → left → right as shown on the map; both must never leave the pressure plates at once.
- Area 4: all four branches must be completed. Northeast handles the hives and four pressure plates, southeast breaks two walls, and the south shoots the target to the north; then regroup in the centre.
- Areas 5–6: the balcony and bridge switches need someone to hold them. Confirm your teammates are across before leaving a switch; plan side-route pickups separately from the main route.
Room-by-room steps and class equipment requirements: Ephinea C1 Guide; switch positions checked against Sakura C1.
STAGE 02
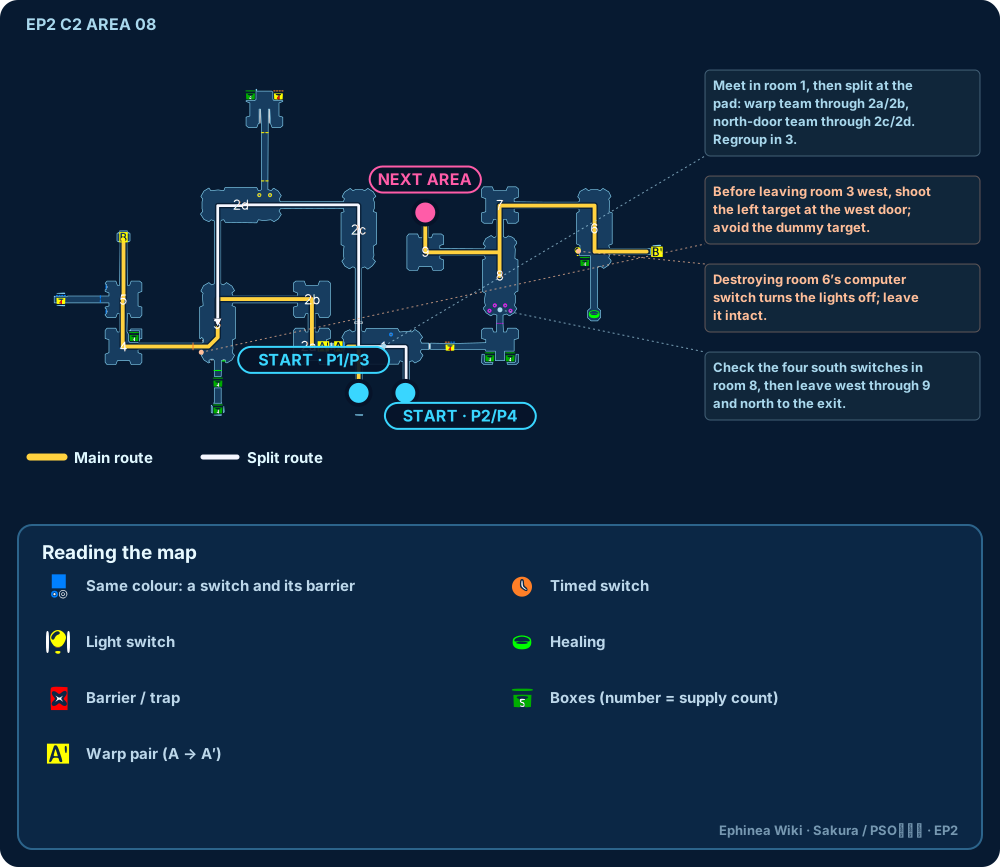
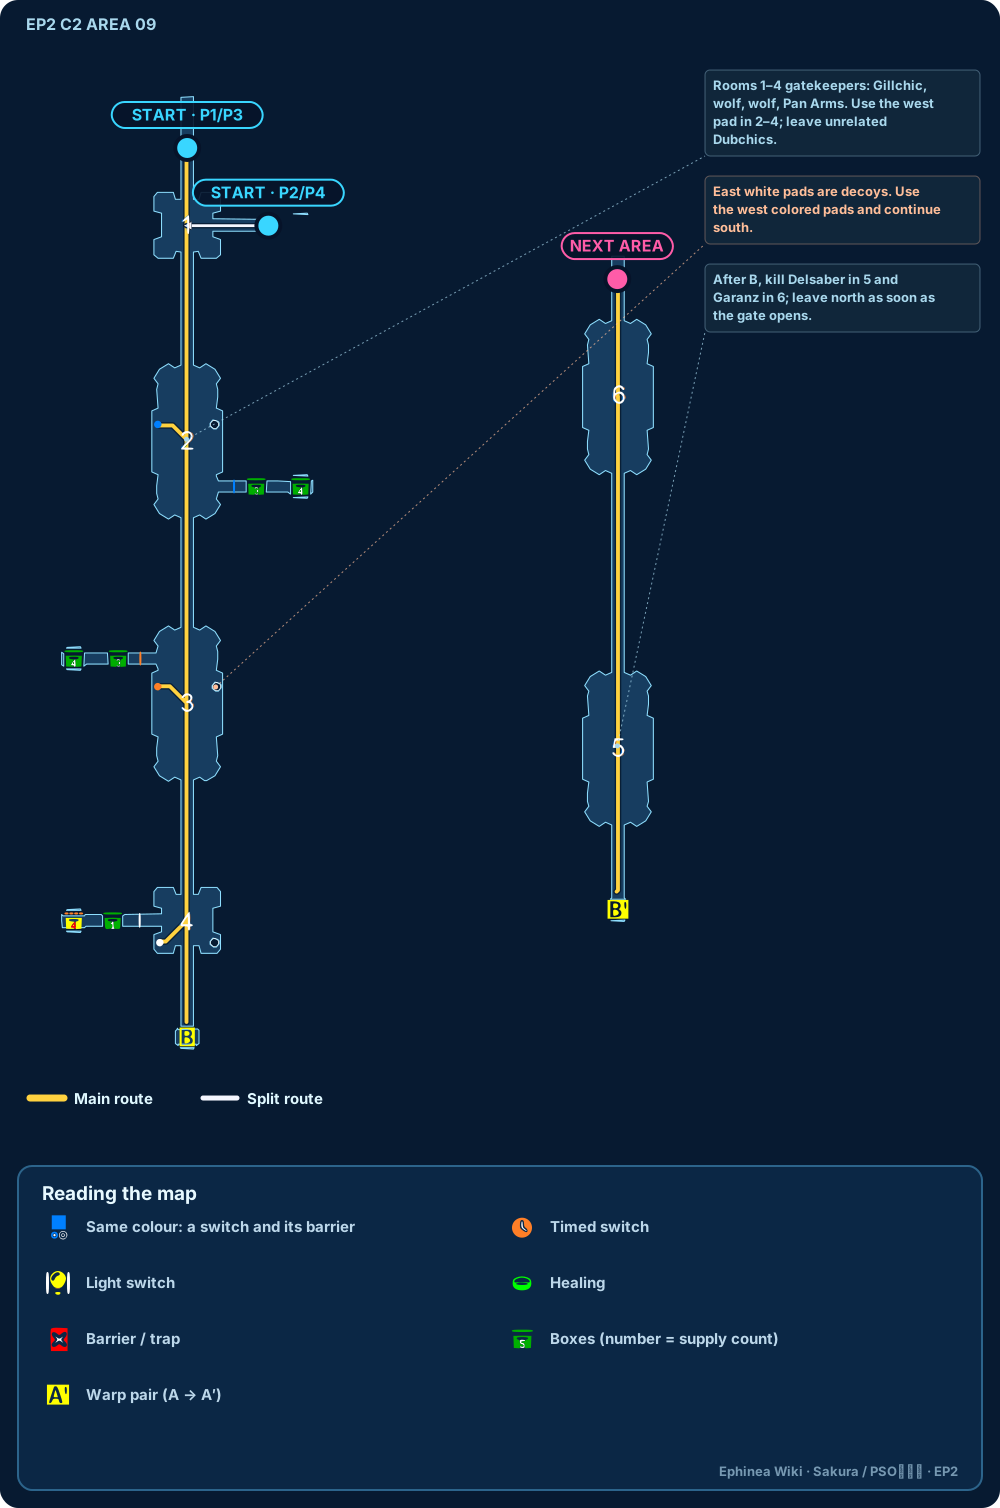
C2 Areas 08–13
Stage strategy and roles
Stage overview: the VR Spaceship is about recognising the "gatekeeper" enemies and advancing from several spawn points at once. Keep moving as soon as a door opens; you do not need to clear every wave.
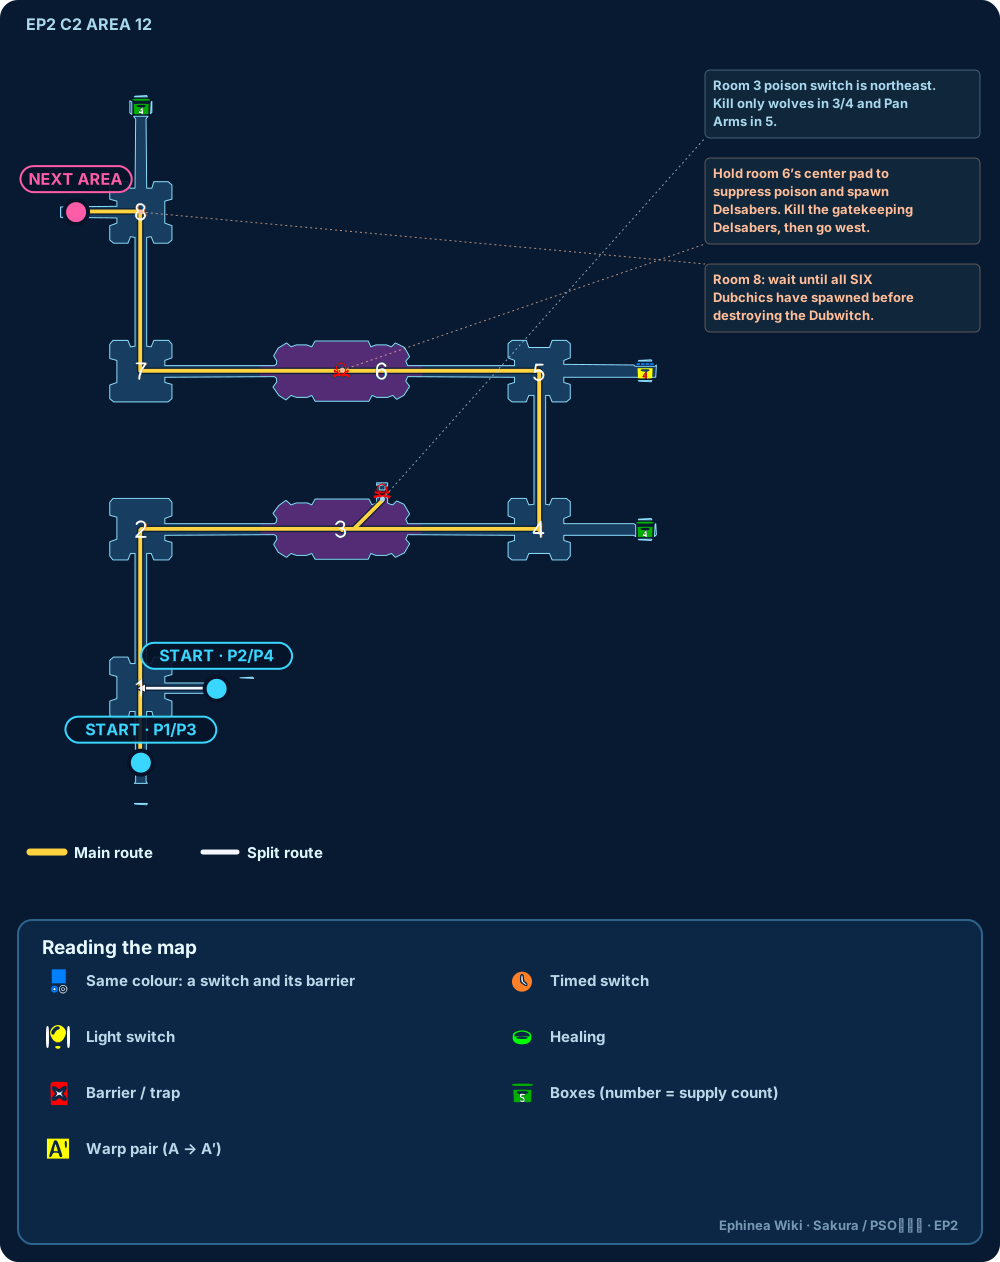
- Areas 9 and 12 have specific door-blocking enemies to find. In the last room of Area 12, wait until all six Dubchics have appeared before destroying the Dubwitch.
- Players with guns set off Freeze Traps from range. Pan Arms can be handled in melee; for wolf packs, use Damage or Confuse Traps first to wear down the whole group.
- Save recovery items and Scape Dolls for Gol Dragon. Redistribute weapons and materials found by each group at the meeting point instead of everyone keeping low-value gear.
- Gol Dragon: when it takes off, an earthquake follows, so move outward; when it roars and burrows, everyone moves towards the centre of the arena. Once the clones appear, find the real one before attacking so the four of you do not spread your damage.
Safety: do not stand in front of the dragon's head and take repeated freezes. Shake off freezes immediately and heal on your own according to your HP.
Switches and roles
- Areas 8–9: Area 8 splits into a warp group and a north-door group; after regrouping, shoot the switch left of the west door. In Area 9 handle the Gillchics, two wolf packs, Pan Arms, Delsaber and Garanz room by room, and do not miss the west switch in the first half.
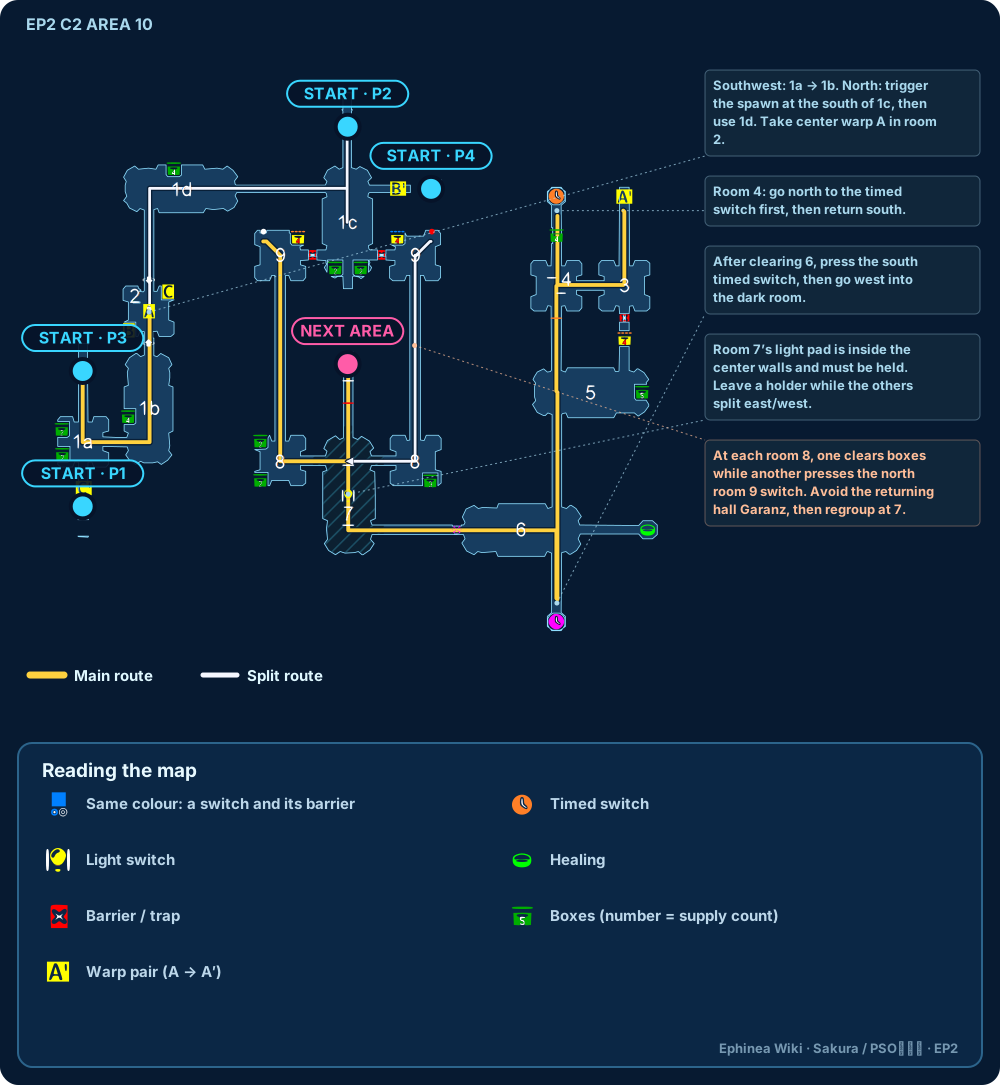
- Area 10: handle the timed switches to the north and south first; someone must stand on the lighting pressure plate in the middle of the dark room. On each wing one player handles the boxes while the other goes north to press the switch, then both return to the central exit.
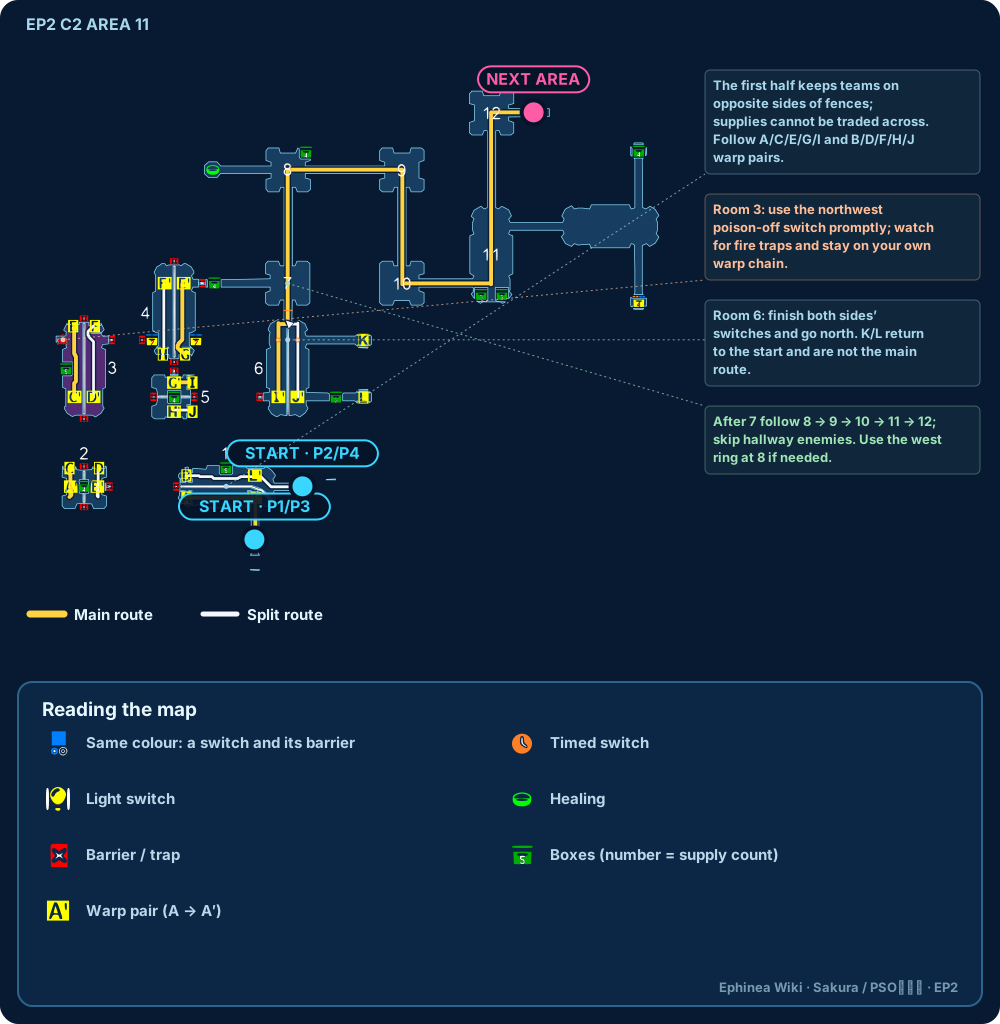
- Areas 11–12: each group takes the warps for its own letter. In Area 12 the second gas switch also triggers a Delsaber; in the last room, wait until all six Dubchics have appeared, then destroy the Dubwitch.
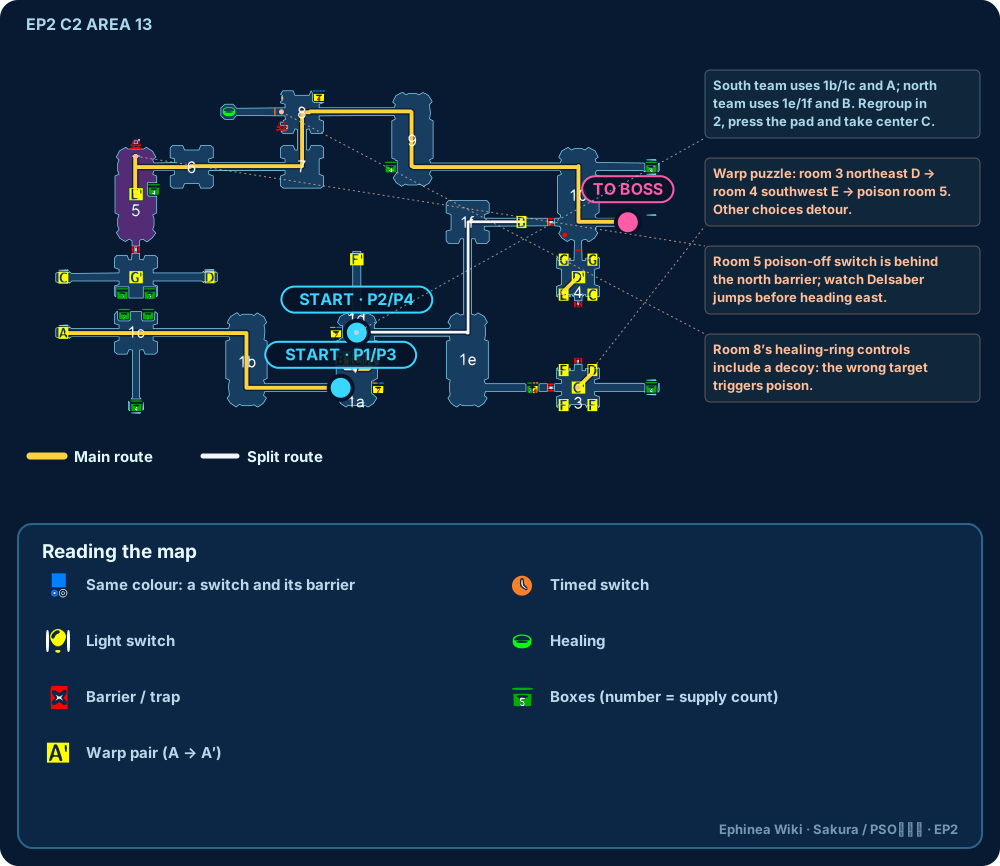
- Area 13: after regrouping, take the centre, northeast and southwest warps in turn. The gas switch is behind the north barrier; turn it off before clearing the room.
Room-by-room clear conditions: Ephinea C2 Guide; switches and warps checked against Sakura C2.
STAGE 03
C3 Areas 15–19
Stage strategy and roles
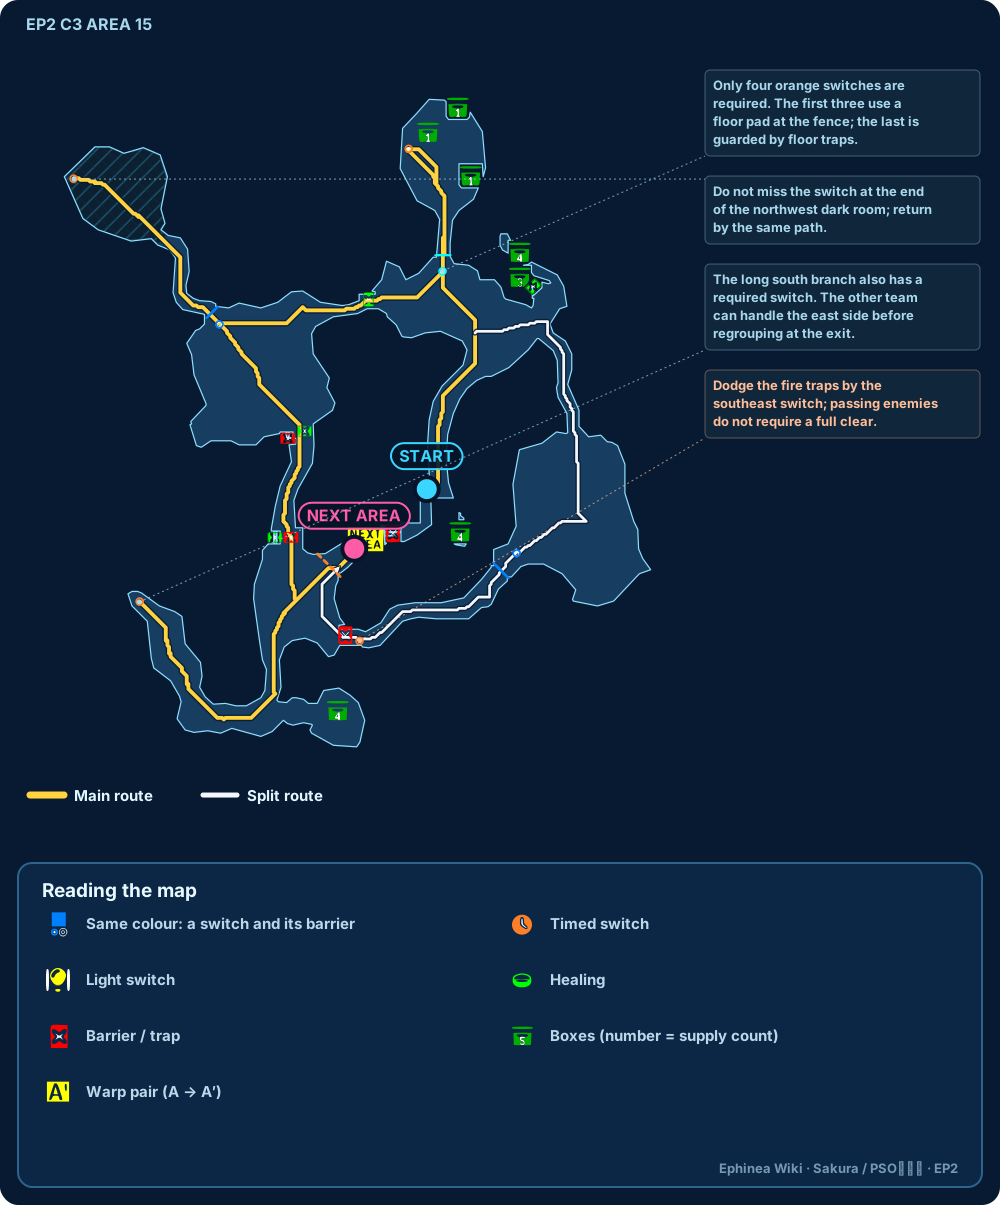
Stage overview: the Central Control Area has two groups working switches in parallel and leaves most of the fighting to the fixed mini-bosses and Gal Gryphon. Only fight ordinary enemies when they block the way or threaten the switch players.
Route and resources
- Area 15 only needs its four orange switches. At the first three, one player holds the pressure plate while the other goes through the door to press the switch; the fourth only has floor traps. Regroup at the exit when done; there is no need to clear the enemies.
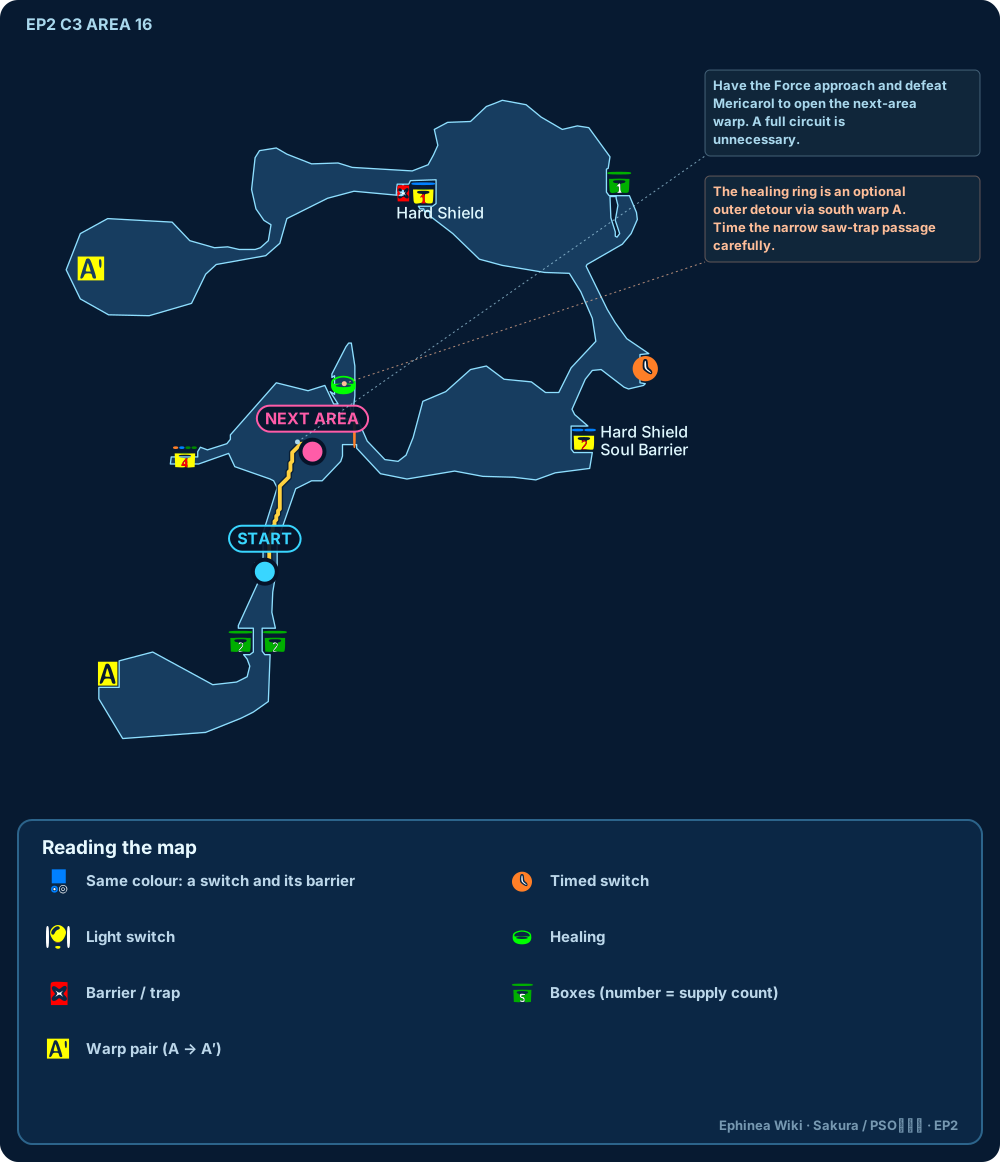
- In Area 16 you only need to defeat the Mericarol to move on. One player draws its missiles while the others attack from safe angles; when it shrinks and beeps, get away from the instant-kill attack at once.
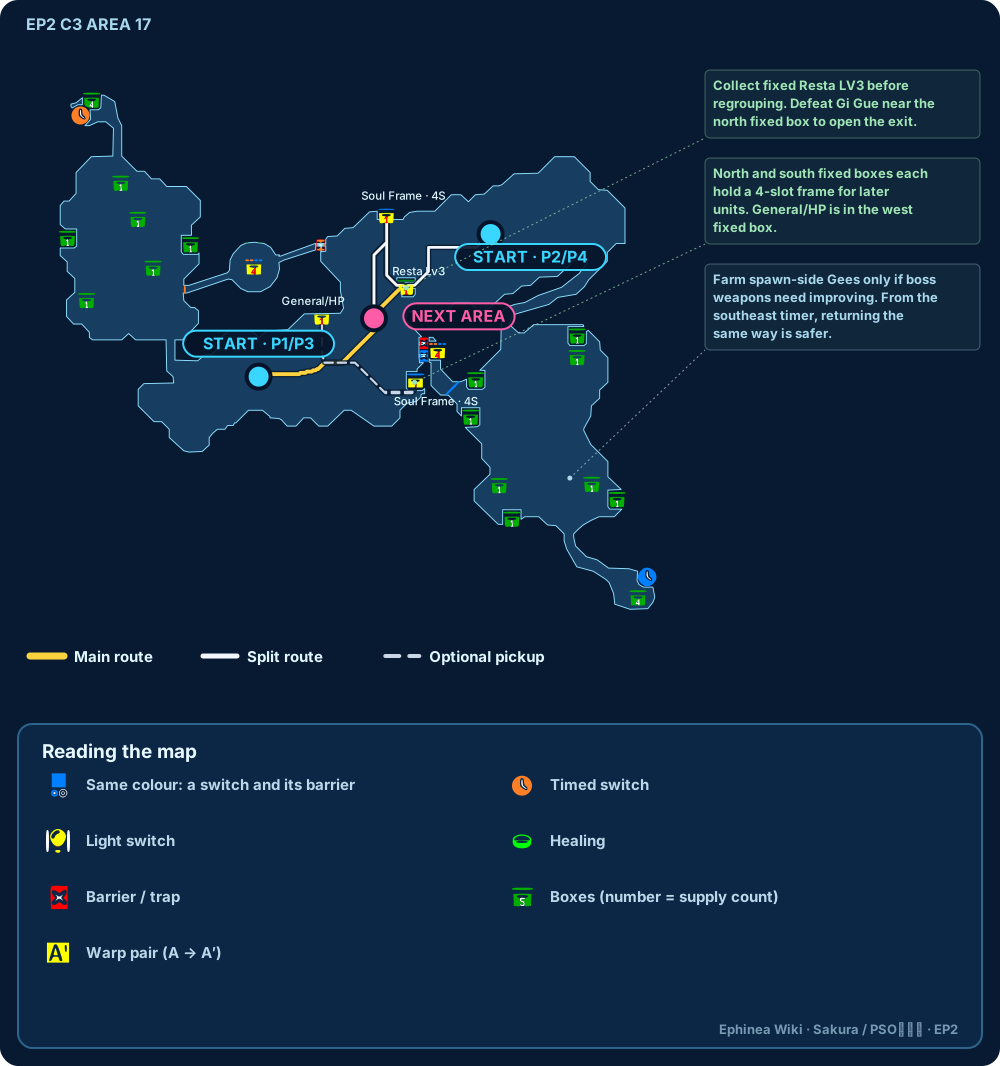
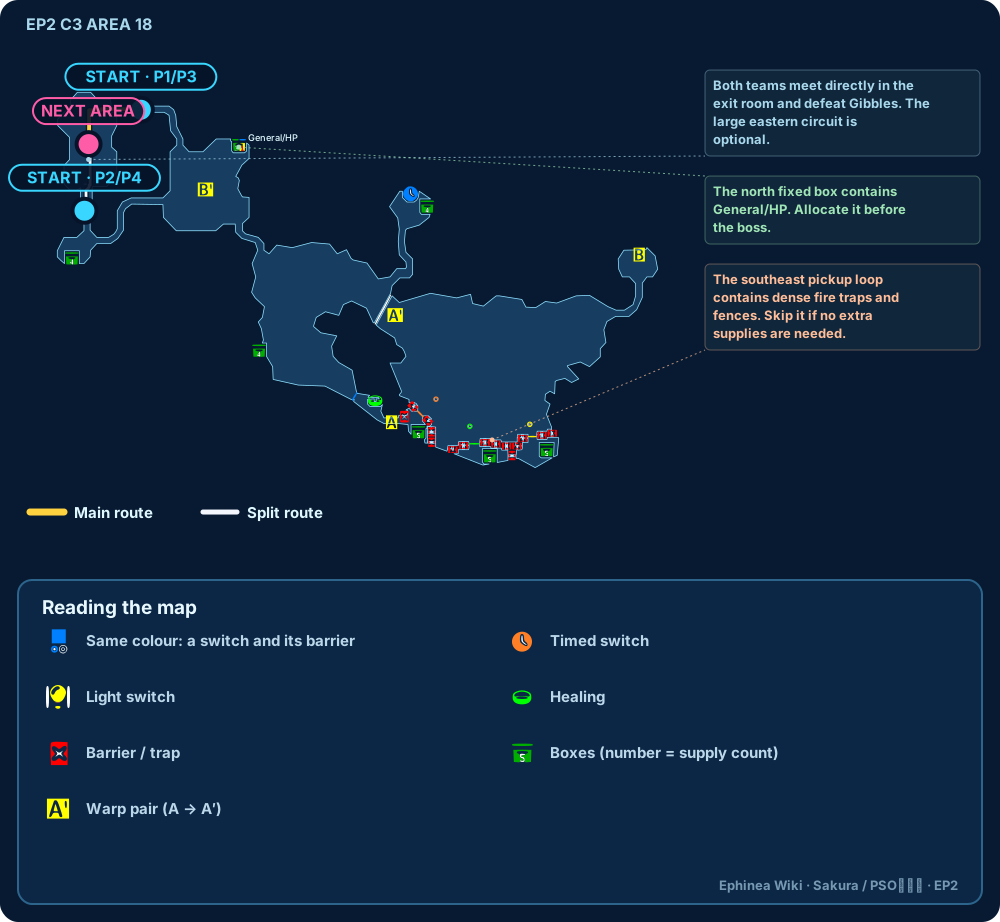
- Areas 17 and 18 start from different places. In Area 17 collect the fixed Resta LV3, a 4-slot armour and General/HP, then defeat Gi Gue together. In Area 18 you can regroup directly in the northwest exit room and defeat the Gibbles; the eastern detour is an optional pickup.
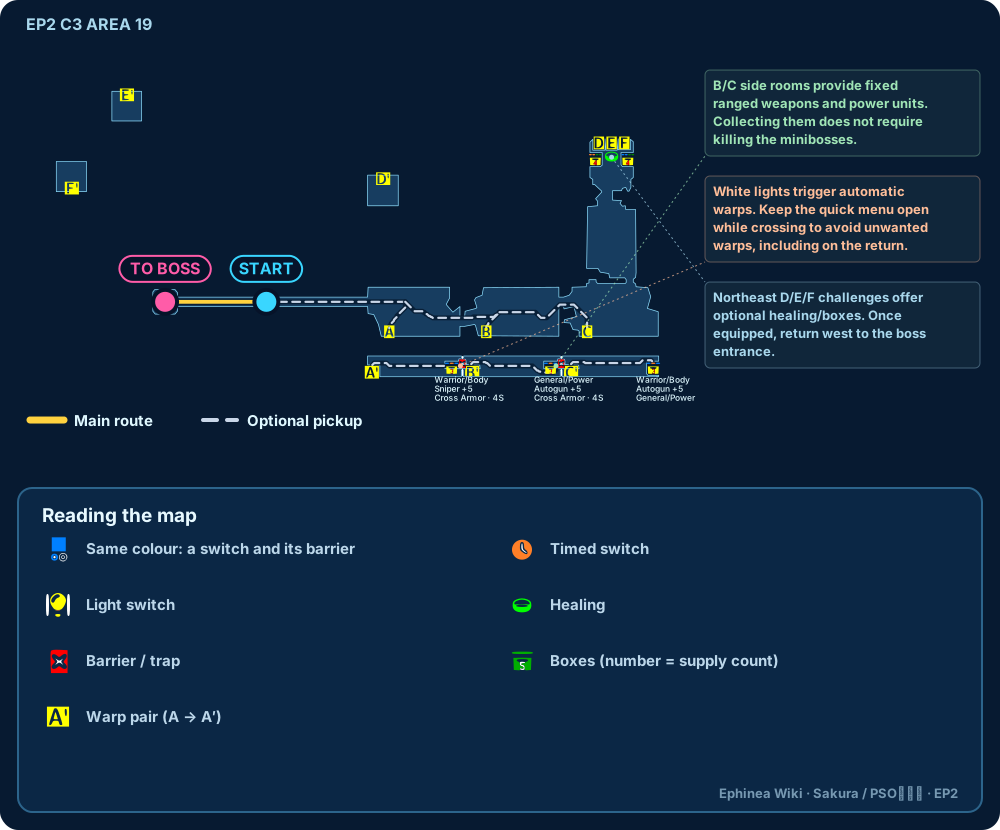
- Share the fixed guns in Area 19 according to equipment requirements. The pickups in rooms 5 and 6 can be reached through their warps and back. Open the shortcut menu when crossing the automatic warp belts to avoid being warped by mistake. The extra mini-boss branch is not required to clear.
Combat roles
- Dim-line (instant-kill) weapons do very little against this stage's main mini-bosses, and trying for instant kills usually is not worth the damage cancelling.
- Against targets such as Mericarol and Gi Gue, one player keeps its attention while the others attack from the side or behind. The targeted player puts survival first and does not try to attack while dodging.
- FOs handle Barta damage, Shifta/Deband and any needed healing. Other classes should not interrupt an FO's steady damage on a mini-boss with weak attacks.
Gal Gryphon
- In the air: a tornado is usually followed by a glide. Watch which way it leaves and move the other way; do not stand on a diameter of the round arena.
- On the ground: melee attacks the front legs; gunners stand to either side of its front and shoot the head or wings; FOs keep mid-range with Barta and keep up support and Zalure.
- Shockwave: the most dangerous attack. As soon as the boss finishes lying low or starts to rise, get clear; do not spend a Scape Doll on one more combo.
- Charging and electric discharge: circle to its side or rear. During the discharge, melee can hit the head from a safe angle; be ready to back off as soon as the move ends.
Reads from older guides, such as the Chinese community's "seven steps" rule, suit teams that already know the boss's attack cycle. On a first clear, only act on clear signals to back off; do not gamble on the boss's next move.
Main route and fixed supplies: Ephinea C3 Guide, Sakura C3. The Wiki text and map name Area 19's defence unit differently; this map follows the original image and labels it Warrior/Body.
STAGE 04
C4 Areas 21–26
Stage strategy and roles
Stage overview: the Seabed is the least forgiving EP2 challenge stage. Ranged weapons, trap management, forced splits and preparing for Olga Flow all matter equally.
Party and resources
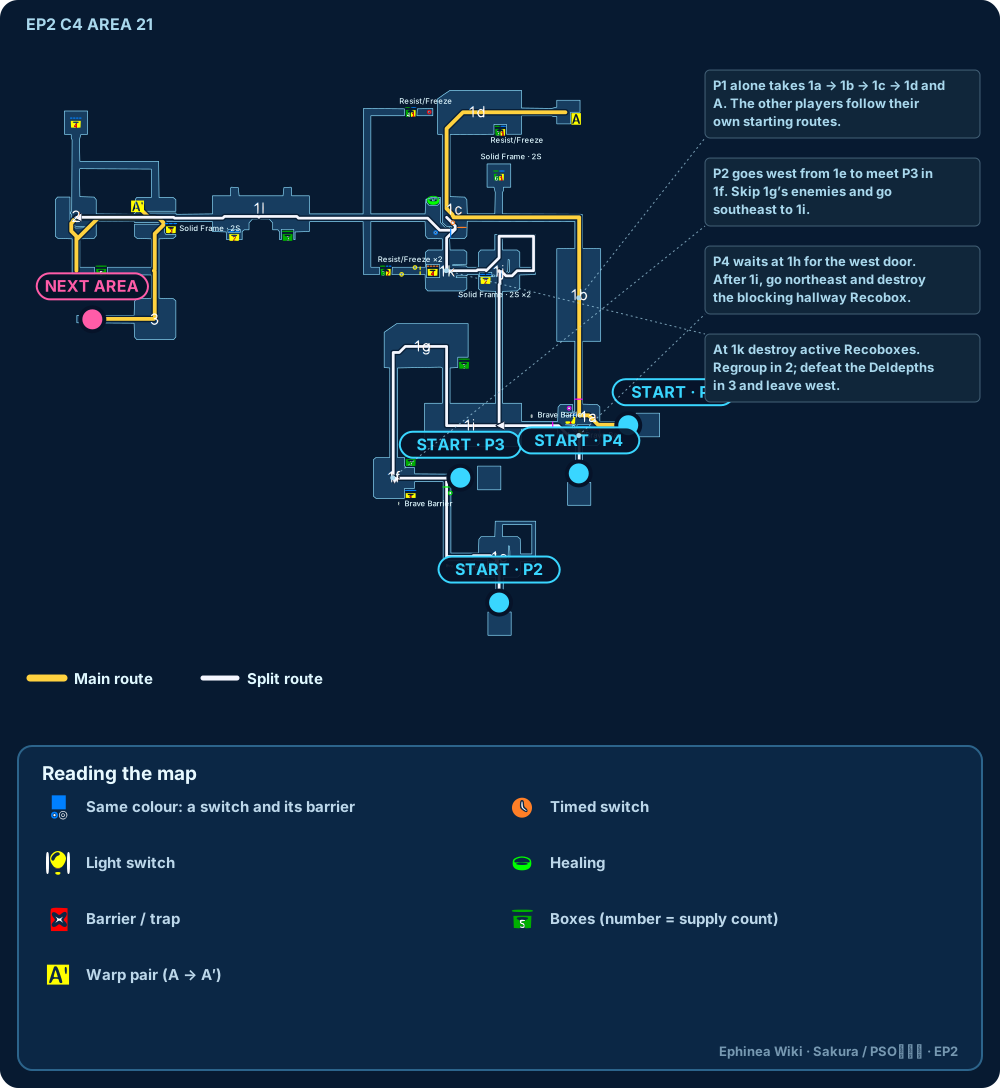
- 1P has the longest solo route in Area 21, so it should be the HU or RA who knows the map best and can survive alone. FOs are poor choices for 1P because it costs too much TP.
- Share guns, accuracy units and defensive gear first so non-FOs get reliable ranged damage early. Save grinders for the Pallasch used in the second form; grind guns only once the main weapon is maxed.
- The end of Area 22 and the hidden room in Area 26 each have a Scape Doll. The hidden room in Area 26 also has fixed materials and equipment; collect them on an ordinary clear.
Enemies and traps
- Deldepth: wait for the Freeze Trap to take effect before attacking. Knocking it back too early makes it burrow and avoid the freeze. Androids without Freeze Traps should tell the party.
- Sinow Zoa/Zele: keep your distance; after it teleports, leave where you were standing and turn to attack. If melee must get close, circle to the enemy's left and attack at most twice at a time.
- Delbiter: avoid it on the upper level where you can. When you must fight it on the lower level, control it from range first. Do not let FOs or RAs lead the party.
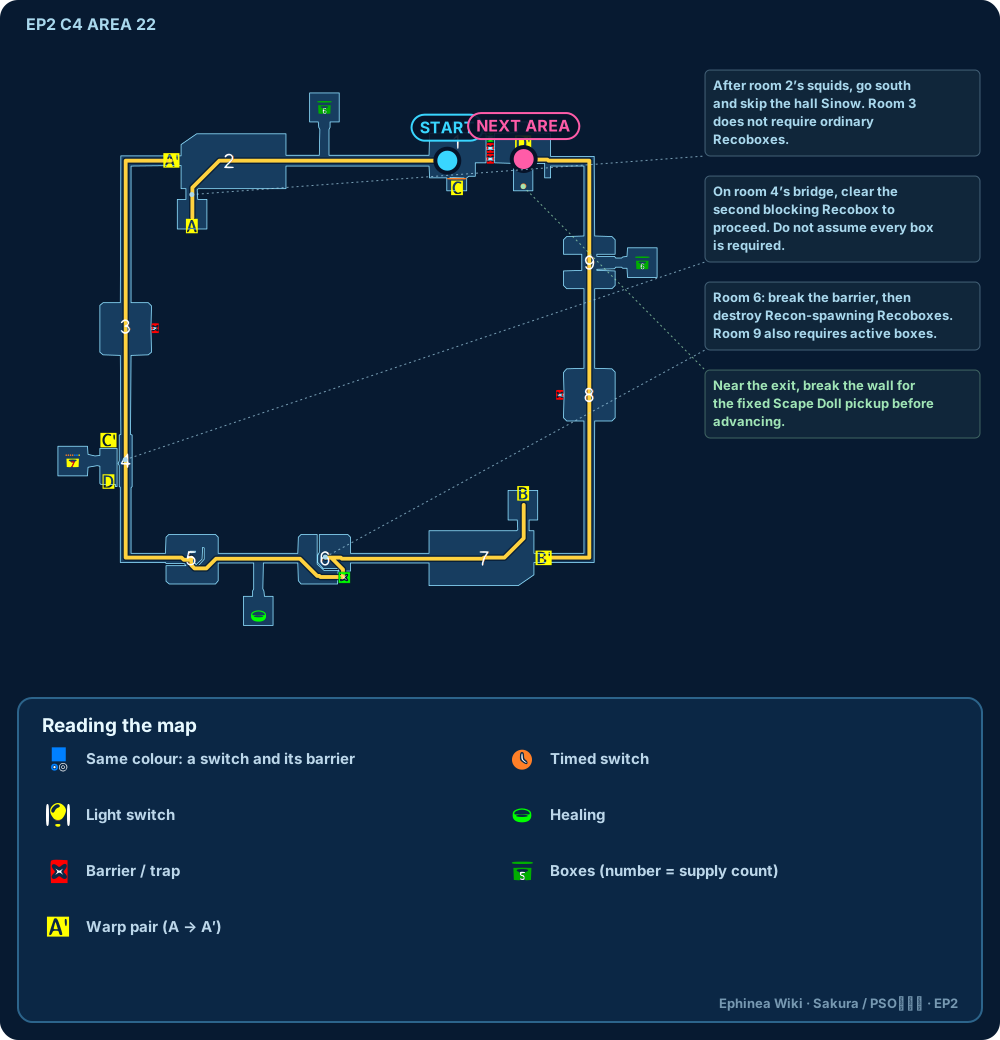
- Recobox: not every one needs destroying. Only kill those that spawn Recons or lock doors, with at most one or two players per box to avoid damage cancelling.
- Damage Traps suit groups of enemies and Confuse Traps tight rooms; finish with Freeze Traps once numbers are down. The fire traps on the floor take several hits; do not trigger them when you can walk around the laser fence.
Olga Flow
- Before the fight, redistribute guns, units, materials, grinders and Scape Dolls. Nobody should lower the party's damage to keep personal gear.
- First form: spread out and attack with ranged weapons. Do not block the FO's line of sight, and lead homing attacks away from the party.
- Second form: keep your HP full and watch the chain of energy slash, stomp and Divine Punishment. After the energy slash, judge at once whether a jump or Divine Punishment comes next; if unsure, get away from the boss and its two mags.
- Melee only closes in on the legs during safe windows. FOs put support, healing and Zalure first; heal yourself when teammates are too far away.
The old-guide trick of dodging Divine Punishment with the invincibility of a heel knockdown is a TA technique. Do not try it in Challenge until you can do it reliably in normal play.
Switches and roles
- Areas 21–22: 1P takes the north route alone while the others regroup from their own spawn points. On the Area 22 bridge the second Recobox must be destroyed; in the other rooms, tell active and inactive Recoboxes apart as the map shows.
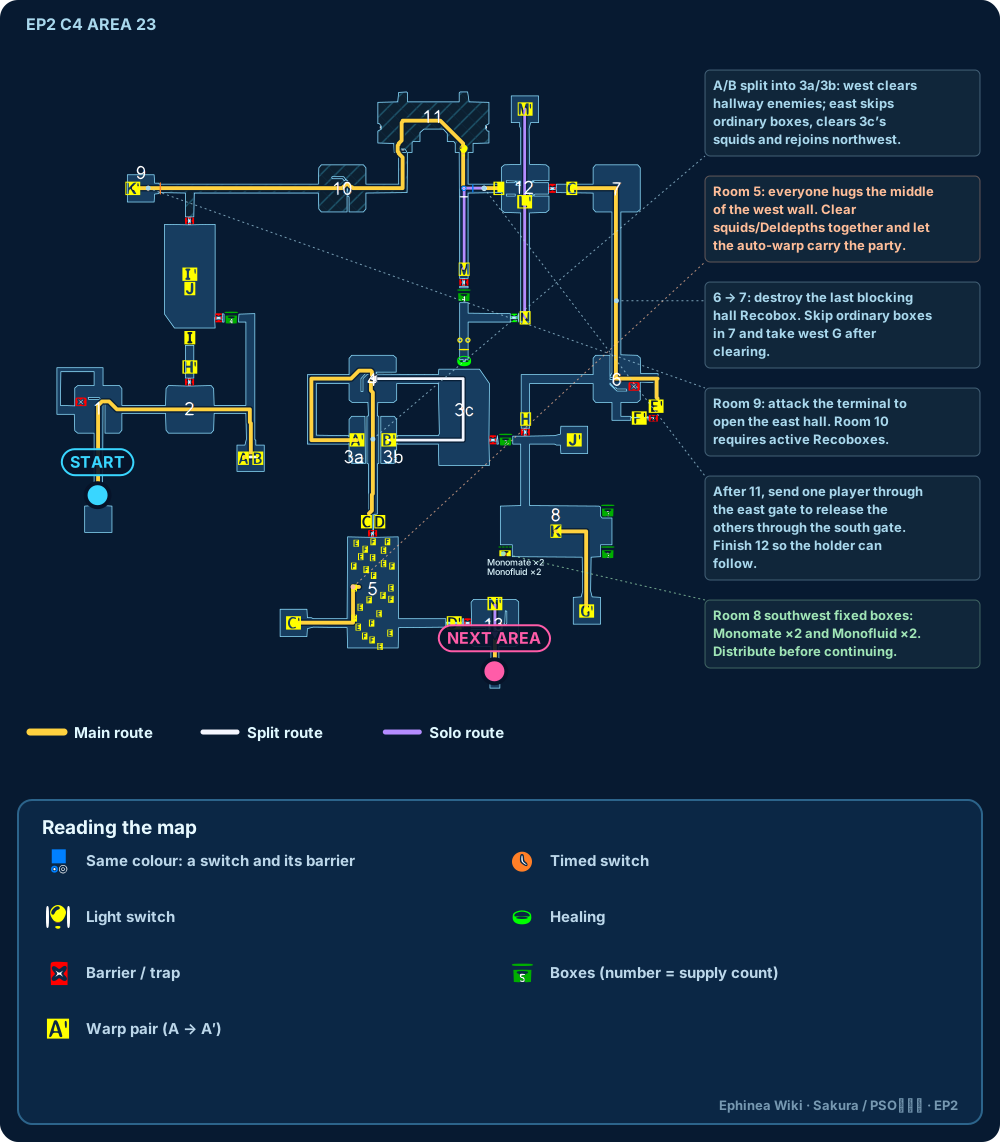
- Area 23: in room 5 the whole party finishes the fight hugging the middle of the west wall, which triggers the auto-warp; in room 9 attack the terminal to open the way. In room 11, first send one player through the east gate to let the others through the south gate, then regroup in room 12.
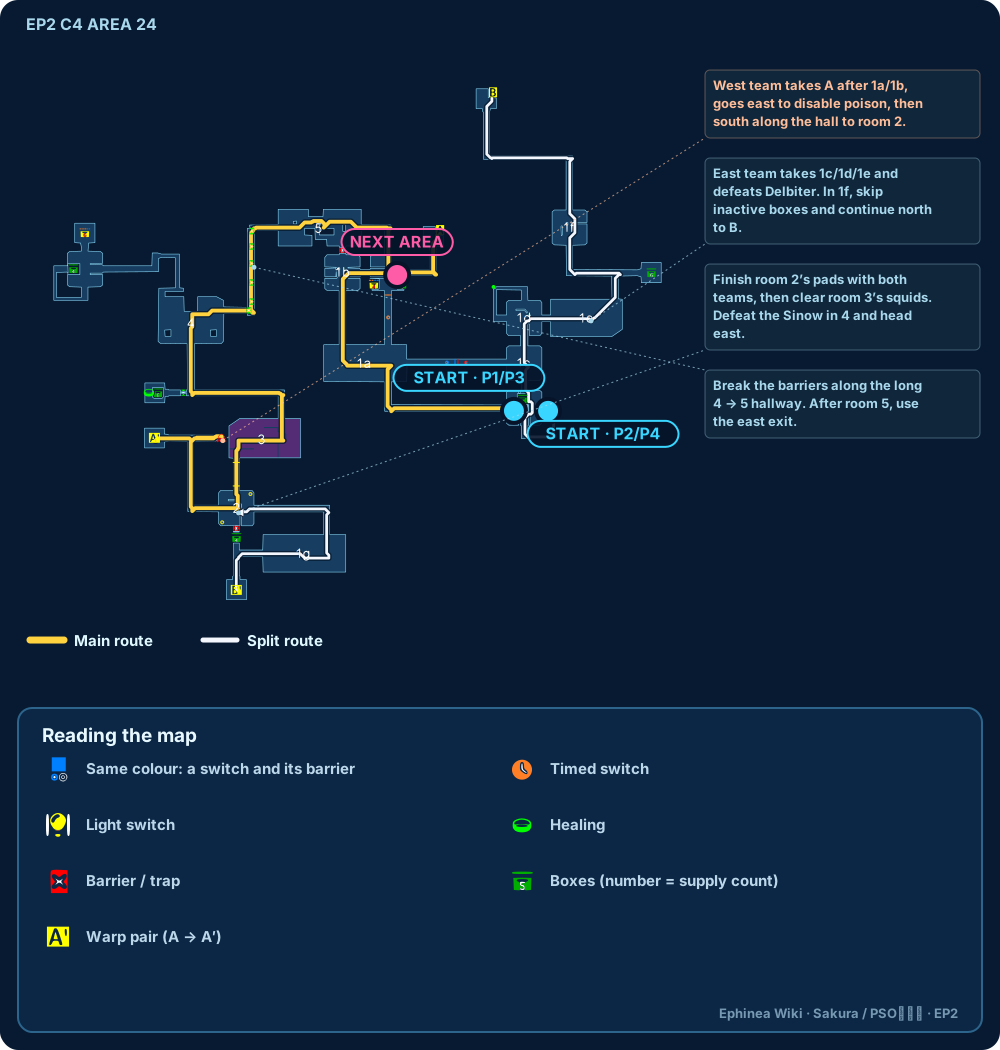
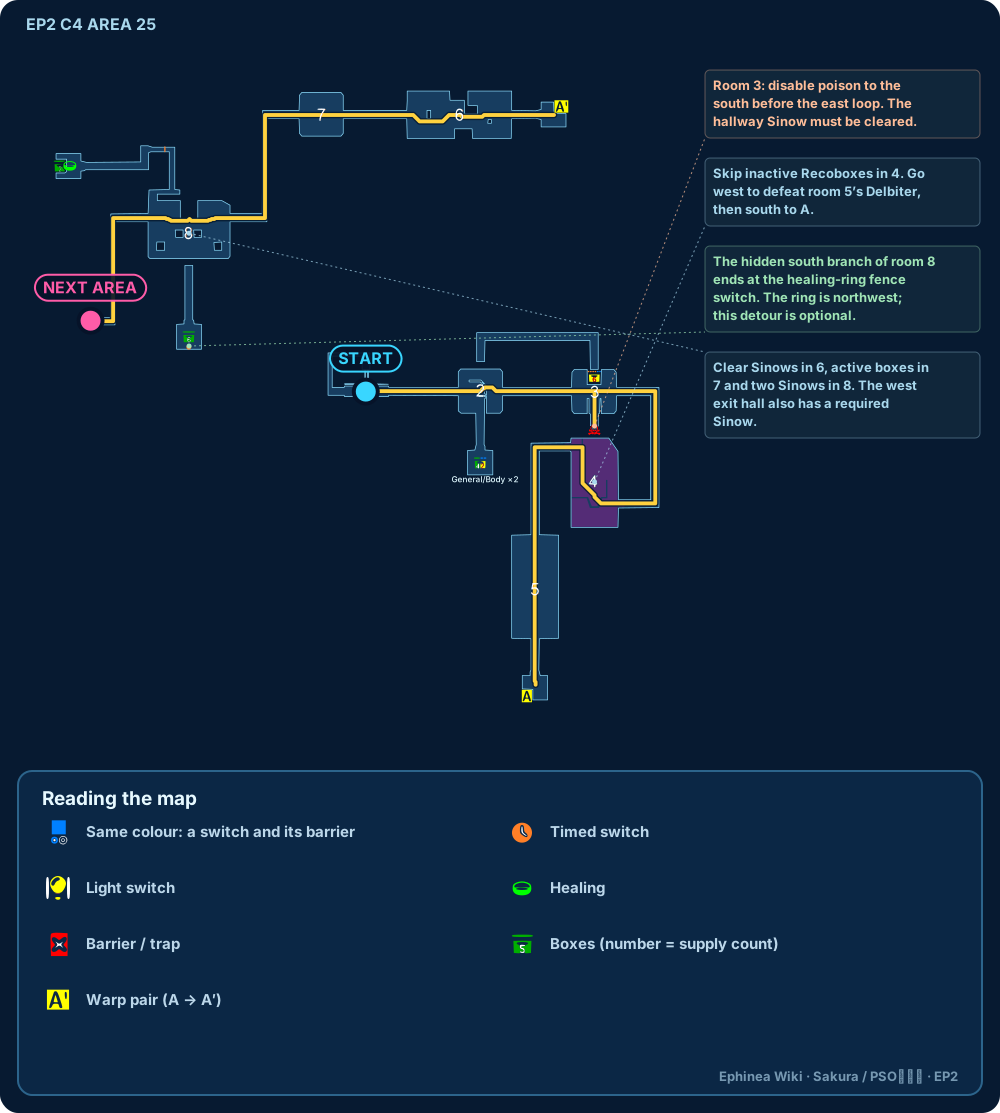
- Areas 24–25: in Area 24 the west group turns off the gas first while the east group handles the Delbiter; after regrouping, break the barrier on the way from room 4 to 5. Inactive Recoboxes in Area 25 can be skipped; take the recovery-ring branch as needed.
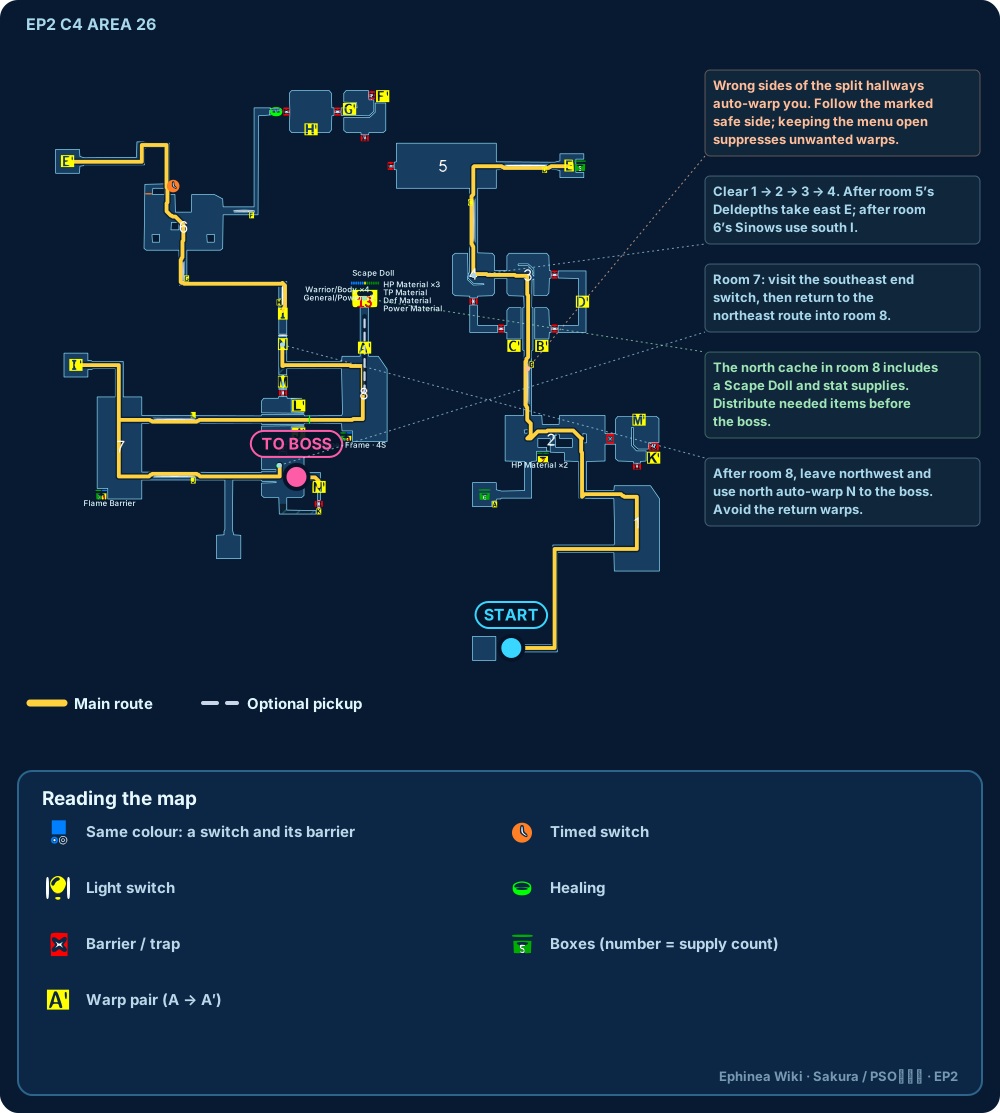
- Area 26: open the shortcut menu when crossing the ×/○ automatic warp lanes. In room 7 press the southeast switch first, then double back to the northeast. After restocking, take the north passage from room 8 to the boss.
Room-by-room conditions and gun equipment requirements: Ephinea C4 Guide; switches and hidden supplies checked against Sakura C4.
Area 23 · Room 5 warps and the two branches
Read the map marks first: E and F
Room 5 on the map above is marked E and F, which warp to E′ and F′ in room 6. The close-up below uses a different pair of group names: cyan group A = map E, orange group B = map F. "A/E" and "B/F" just pair the two sets of marks; they are not two warps in a row, and they have nothing to do with the A/B near room 2 on the map. A prime mark shows the matching landing point.
Recommended: the whole party finishes the fight hugging the middle of room 5's west wall, triggers an E-group auto-warp and heads north along the upper east side of room 6. This avoids the Delbiter room on the F route; no in-game timing shows that it is always faster.
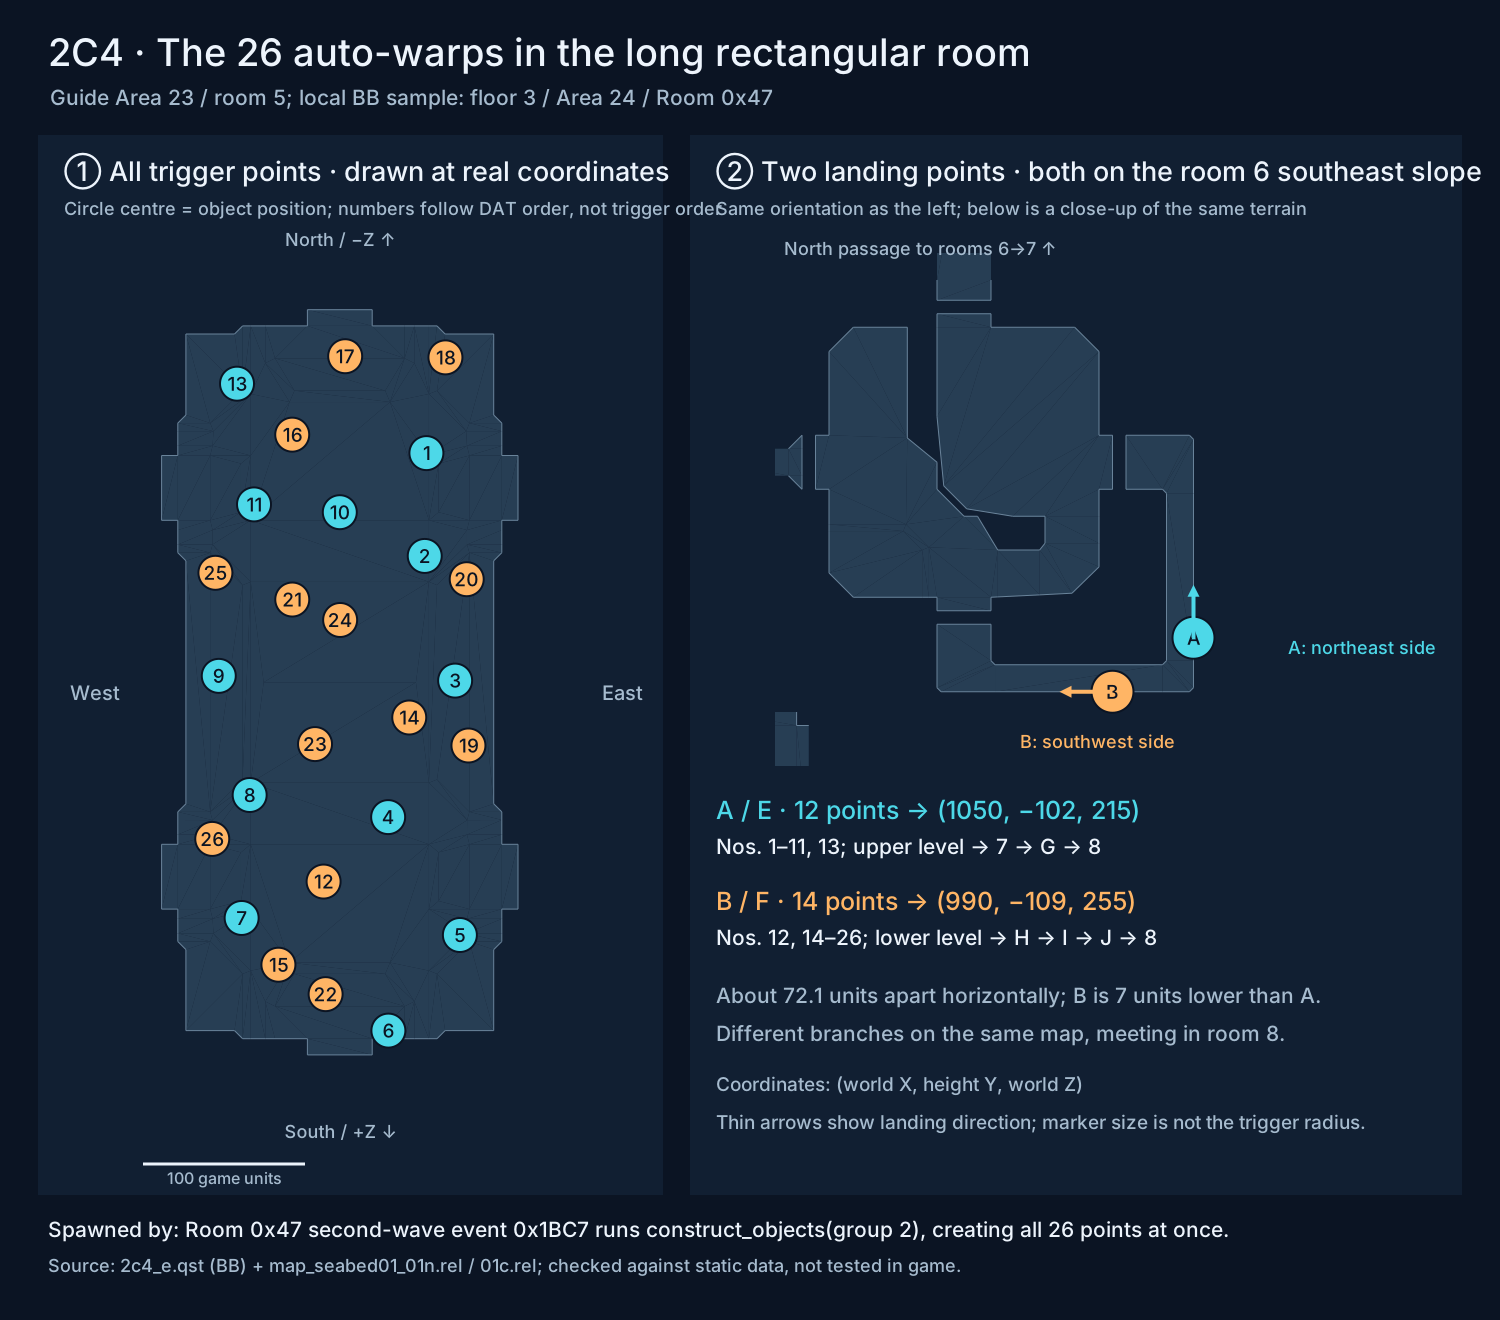
Room 5 has 26 auto-warps: 12 in group E and 14 in group F. The centre of each circle is the point's position; circle size is not the trigger radius, and the numbers are not the trigger order. Both groups land in room 6, but at different heights and facing different ways forward.
Where do the two routes differ?
- E route (cyan A in the close-up): E′ → upper east side of room 6 → north passage → room 7 → G → G′ → enter room 8 from the south.
- F route (orange B in the close-up): F′ → lower south side of room 6 → west passage → H → H′ → I → I′ → unnumbered long room on the left → J → J′ → approach room 8 from the north.
The two routes meet in room 8. This compares the routes you naturally follow after landing; it does not mean the landing point locks you into a route or that you cannot turn back.
| Enemy | E route | F route |
|---|---|---|
| Dolmolm / Dolmdarl | 4 | 0 |
| Deldepth | 3 | 3 |
| Sinow Zoa | 2 | 2 |
| Delbiter | 0 | 1 |
| Main fights in total | 9 | 6 |
| Recoboxes in addition | 6 | 4 |
Rooms 6 and 8, shared by both routes, are not counted; not every Recobox has to be killed, and the Recons they spawn are not counted. The E route has more enemies but avoids the Delbiter; the placement counts are not the number of required kills or the time to clear.
STAGE 05
C5 Areas 28–29
Stage strategy and roles
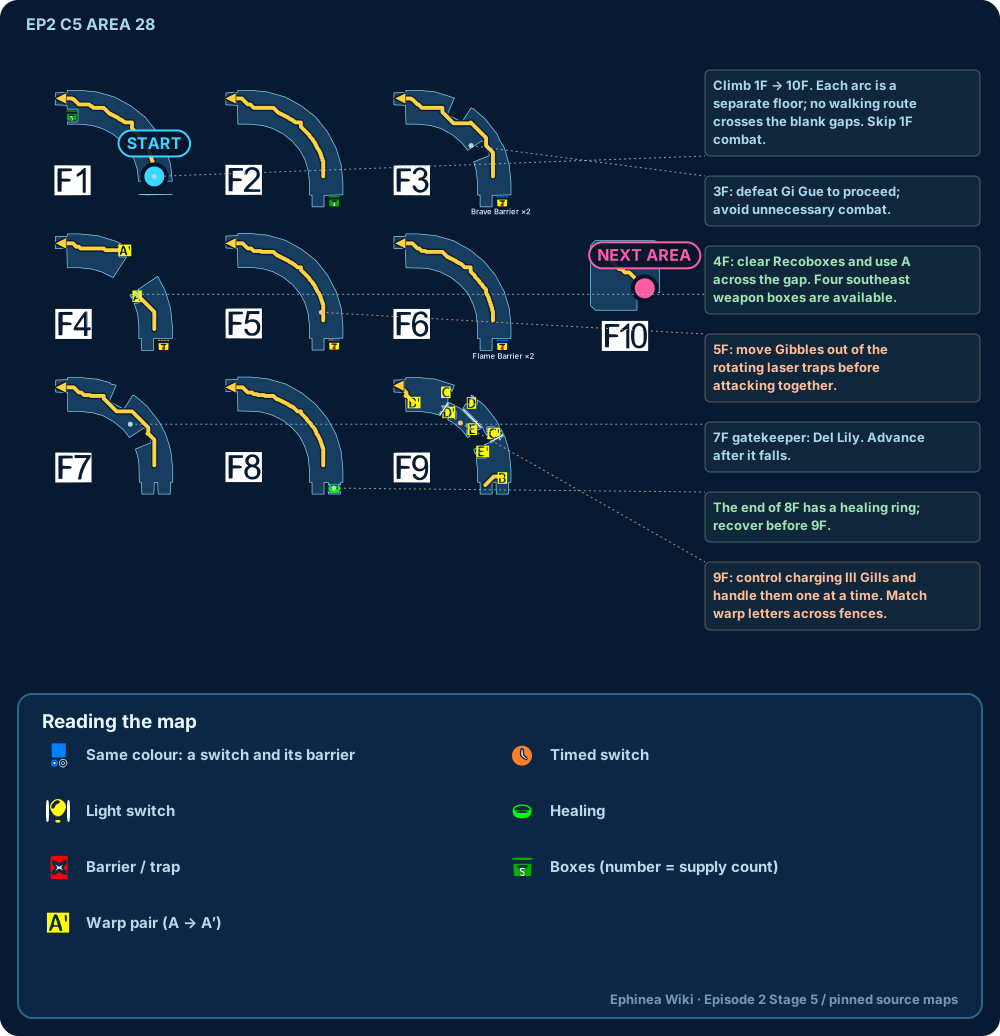
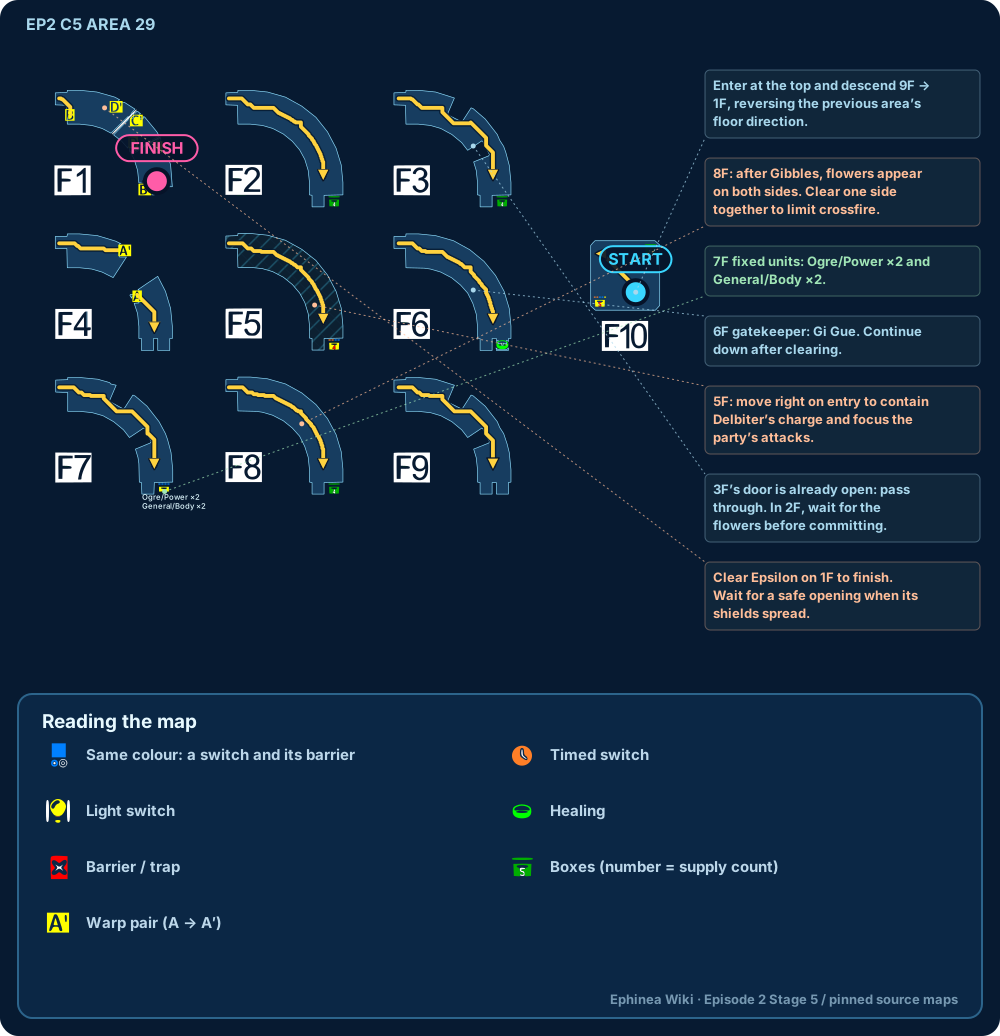
Stage overview: Area 28 climbs the East Tower from the bottom floor, and Area 29 descends the West Tower from the top. The maps are short but each floor's fight is intense; target priority and fixed resource sharing are what matter.
General strategy
- Suggested enemy priority: Ill Gill, Delbiter, Del Lily, Merikle, Gibbles, Mericus, Mericarol, Gi Gue, Recobox. Enemies you can get past do not have to be killed.
- FOs deal heavy damage but are under a lot of survival pressure. HUs hold and block enemies that close in, and RAs clear Recons and give ranged support, so the FO can keep casting.
- Floor warps work both ways, so you can go back to restock after reaching a recovery ring. Call out Pallasch, guns, HP/DEF materials and accuracy units as soon as you find them, and redistribute.
- Dim-line weapons are only worth using on Recoboxes. Ordinary boxes are worth little; do not let the party lose formation in a dangerous room to open them.
Key floors
- Door conditions: East Tower 1F and West Tower 3F can be passed straight through. East Tower: clear Gi Gue on 3F, the Recoboxes on 4F, Del Lily on 7F and Ill Gill on 9F. West Tower: clear Del Lily on 7F and Gi Gue on 6F, and defeat Epsilon on 1F to clear. Clear the other floors along the main route on the map.
- Levelling: this stage's EXP rate is high. Watch the EXP bar and use techniques and traps more freely when you are about to level up.
- East Tower: collect the weapon on 4F. On 5F dash forward on entry to avoid the rotating laser fence and draw the Gibbles out of the trap area before fighting. On 6F you can hit Ill Gill through the wall with Foie. On 9F hold a chokepoint and take the two Ill Gills separately.
- West Tower: collect Ogre/Power ×2 and General/Body ×2 on 7F. On 8F, lilies appear on both sides after the two Gibbles; clear one side first. On 5F move right on entry to pin the Delbiter. On 3F the door is already open, so go straight through. On 2F wait for the lilies to appear before entering the main fight.
- Against the Mericarol family, the targeted player concentrates on drawing its attention while the others attack from the side or behind. When the shrinking countdown starts, get away from the instant-kill attack at once.
Epsilon
- The boss's shield cycles red, yellow, blue, purple; the starting colour when it appears is random. Red is the best window for close-range damage; yellow can shock, and blue (freeze) and purple (dark) are the most dangerous.
- Check support, weapons and recovery items as a party before the fight. Do not rush in while the shield is up; wait for a safe colour and an attack window, then concentrate on the main body.
- FOs keep up Shifta/Deband and Zalure and use the techniques it is weak to. HUs who cannot get close safely use guns; do not spend a Scape Doll for one more round of damage.
References
- Ephinea Wiki · Challenge / Strategy: the index of every stage's guide. The per-stage links above are used to check routes, door conditions and fixed supplies.
- Ephinea C5 Guide: the targets required on each floor of the East and West Towers. The C5 maps use this site's saved copies of the original Ephinea Wiki images; no Sakura C5 guide was available to compare.
- Sakura (PSOびより) C1–C4: used to check pressure plates, traps, timed switches, hidden supplies and warp positions.
- The boss and positioning advice kept from the original page comes from historical Chinese guides and PSO-World material. The PSO-World site could not be read this time, so this advice is not marked as confirmed item by item against the current guides.