PHANTASY STAR ONLINE · EPISODE 1
Challenge Mode
Know the route. Share the tasks. Clear together.
Map legend
- Main route
- Split route
- Solo route
- Optional pickup
- Start
- Exit / next map
- Warp (n → n′)
- Switch and door (same colour act together)
- Trap / turret
- Box
- Dark room
- Numbered note (listed below the map)
Clear principles
- Avoid damage cancelling: do not have all four players attack the same enemy. By default each player takes one target, and whoever holds the strongest weapon handles the high-HP enemies.
- Concentrate resources: give Power/HP materials, high-attribute weapons, arm units and Mags to the player who can meet the equipment requirement first instead of splitting them evenly.
- Scape Dolls protect the FO first: experienced teams can let the FO die to refill TP; for an ordinary clear, keep them as a safety margin for the boss fights.
- Follow the team if you do not know the switches: timed doors, fake switches and forced splits waste a lot of time when triggered by mistake. Check the numbers and routes on the maps first.
- Treat a clear and a TA differently: a first clear should collect the key weapons, armour and dolls; only a time attack considers skipping side-path boxes, fighting in the dark or special shortcuts.
This page combines the historical PSO World maps, older TA guides and existing Chinese material. Party compositions and target times from older sources are route ideas only, not requirements for Ephinea teams.
STAGE 01
C1 Areas 01–02
Stage strategy and roles
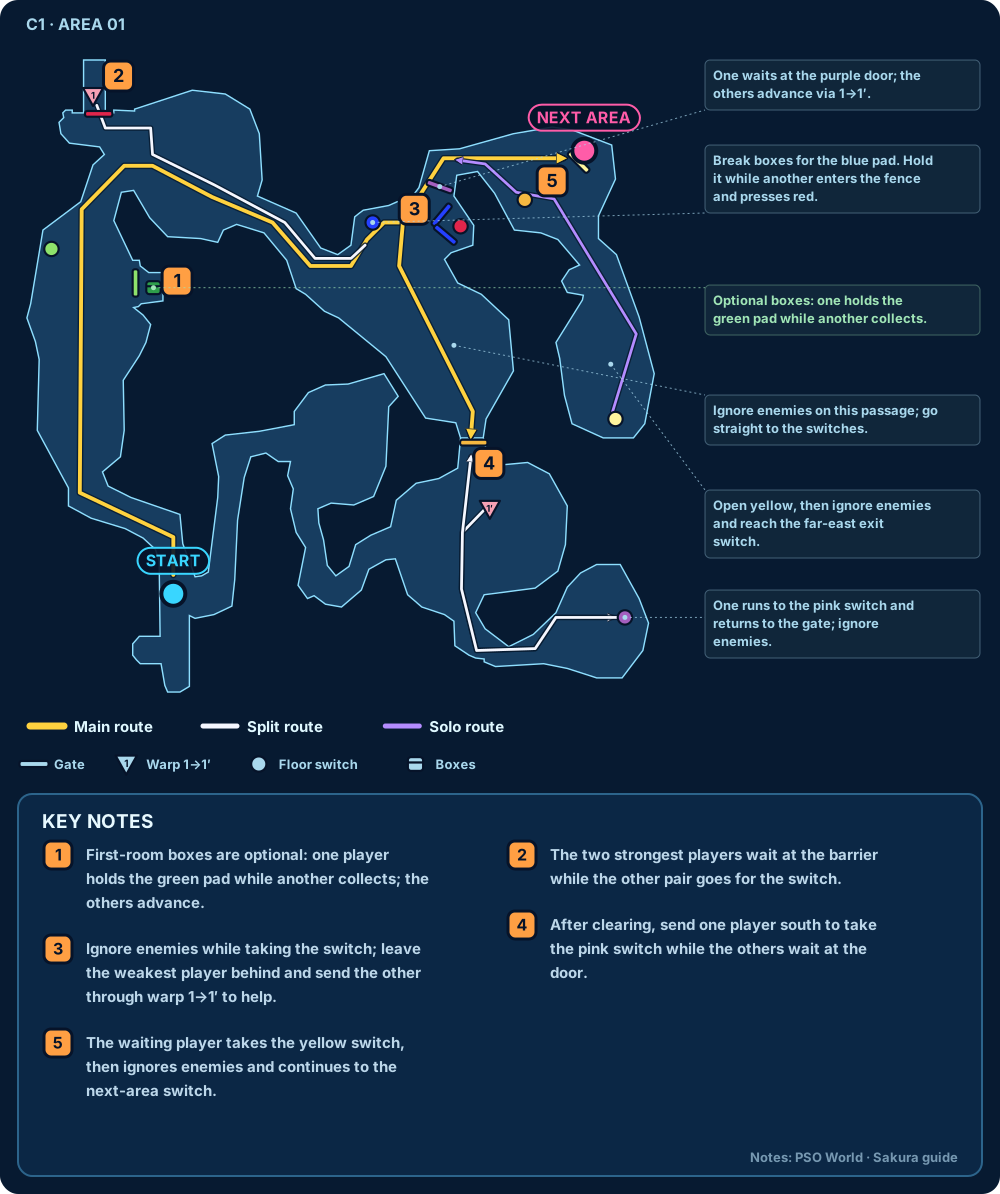
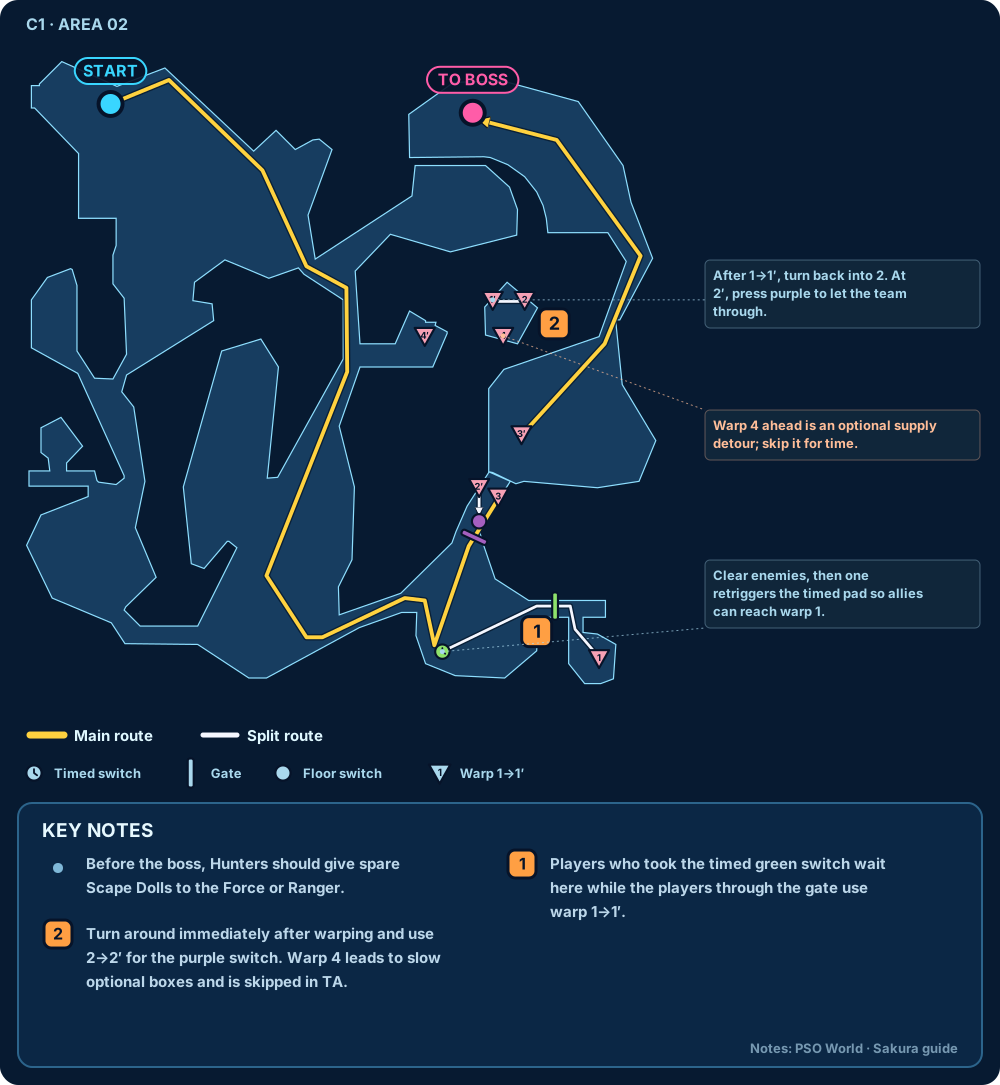
Stage goal: learn to split enemies, timed switches and positioning against the Dragon. Keep to one enemy per player where possible, and avoid being surrounded or attacking the same target twice over.
- Split the switches by the numbers on the maps; players waiting at a timed door must stay in place.
- Give Power Materials first to the HU most likely to equip daggers or high-attribute weapons.
- Dragon: the three melee players take the head and each leg; the FO uses Barta while it is on the ground and Zonde while it flies. Move out of its landing spot before it comes down, especially without a doll.
STAGE 02
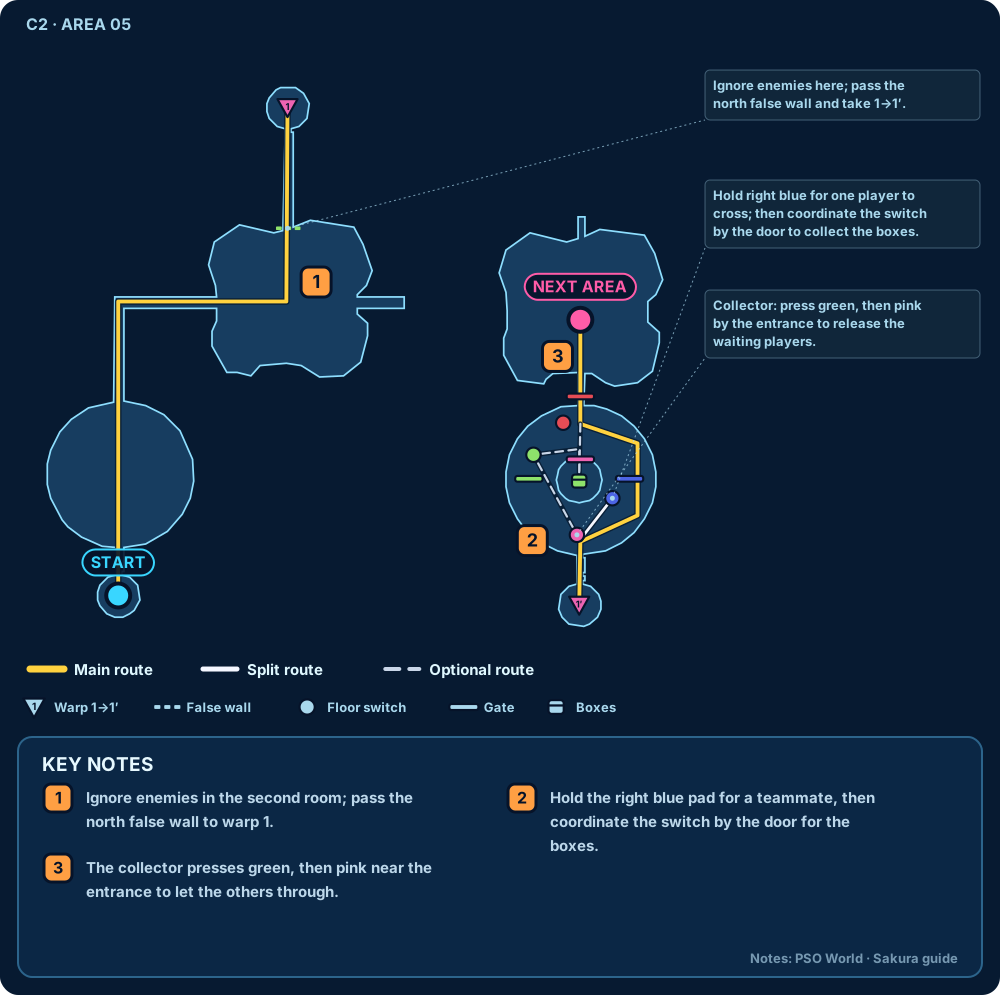
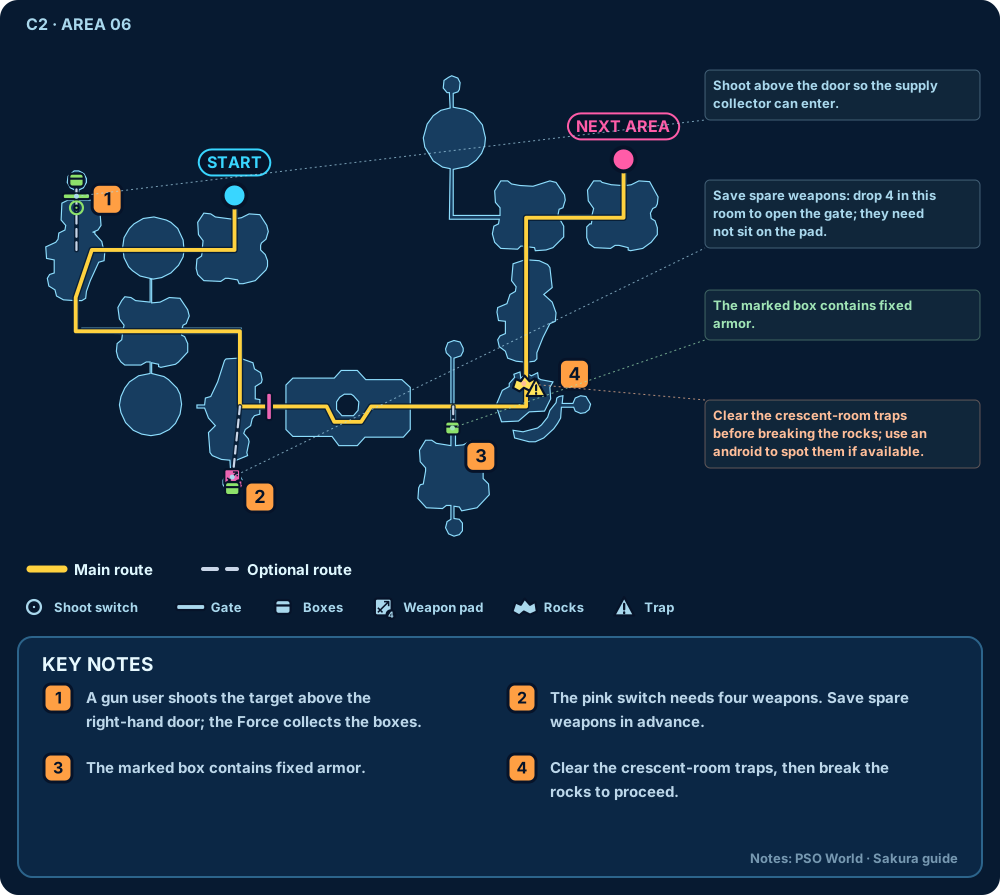
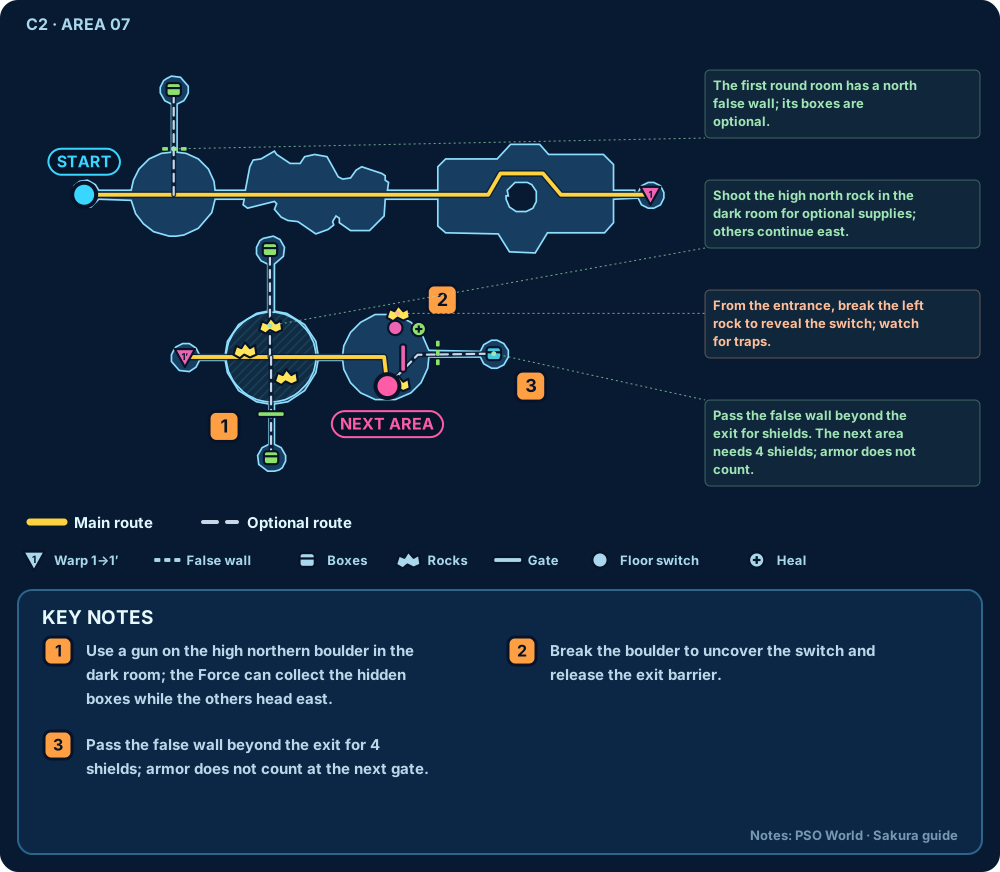
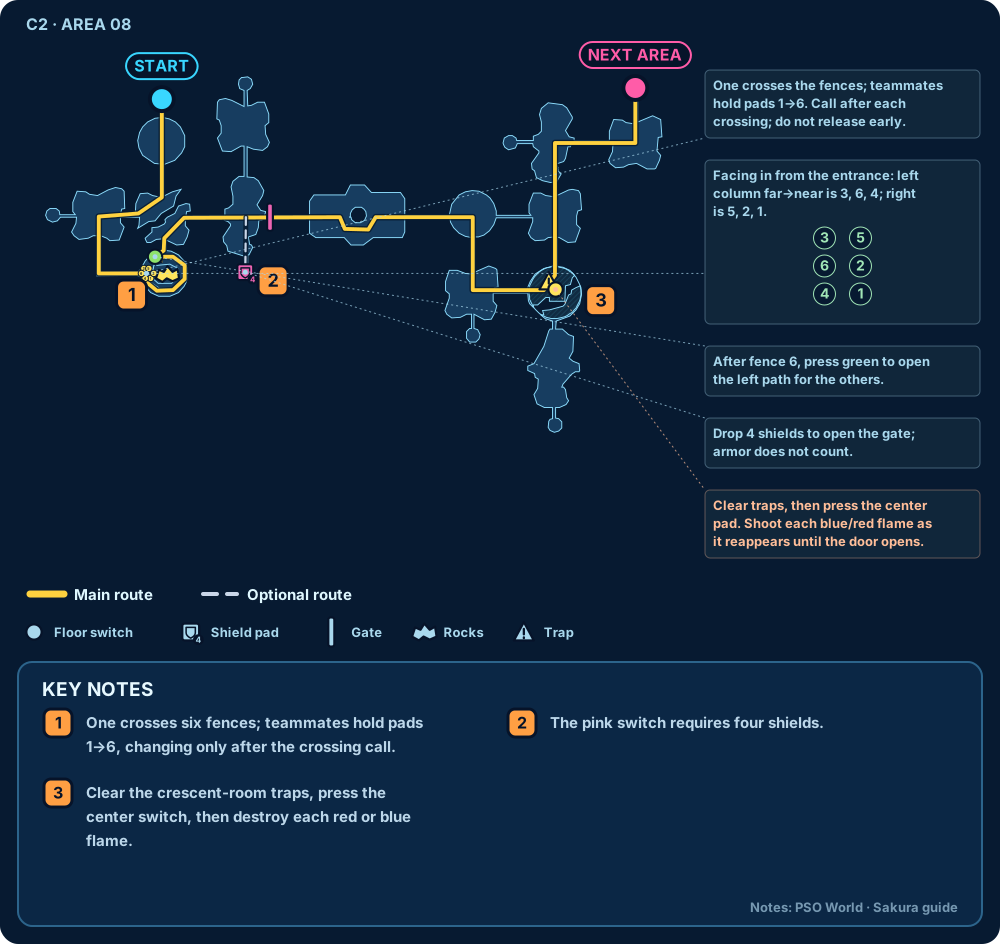
C2 Areas 04–08
Stage strategy and roles
Stage goal: keep control while ATA is still low, and turn the FO's TP into forward progress.
- Early on, HUs use a safe combo and switch to
NHHonce their hits are reliable; take out Nano Dragons and Grass Assassins first. - When lilies or Nano Dragons are near the FO, leave them to the FO alone; HUs should not trigger damage cancelling with weak attacks.
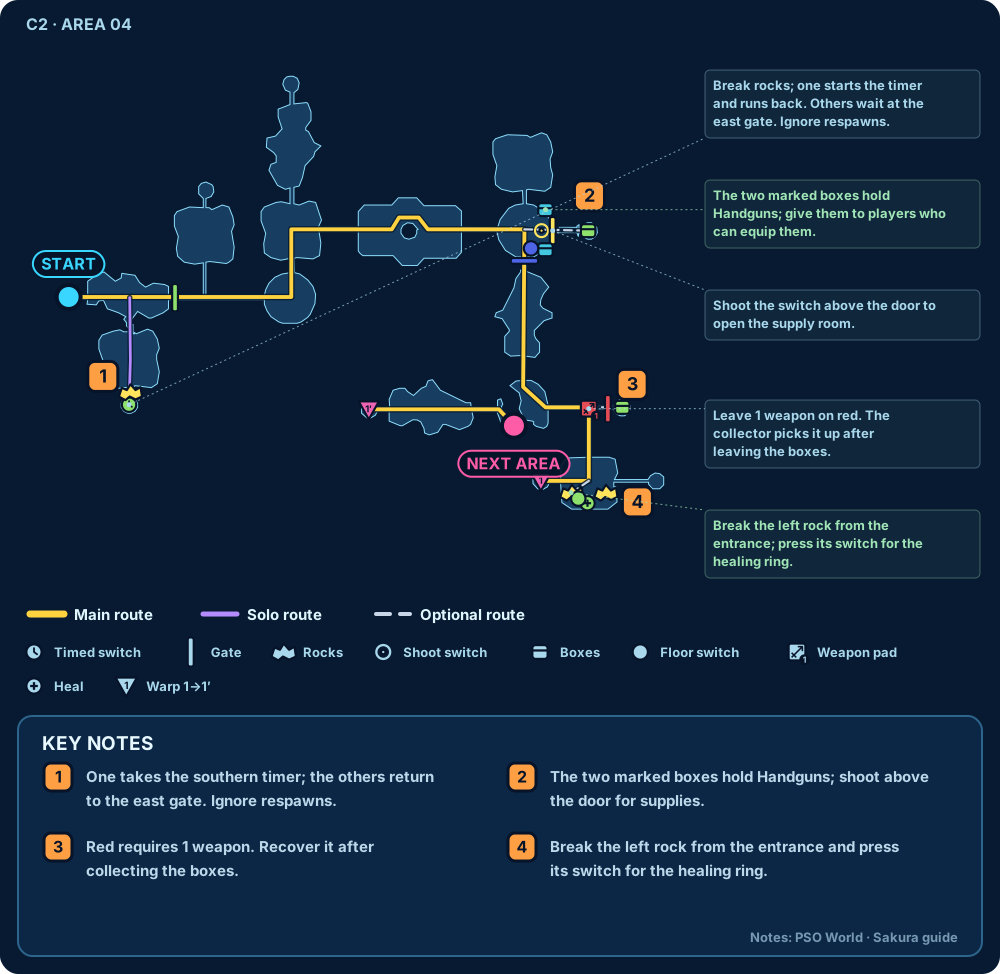
- The HU with the lowest current damage collects the side paths; the strongest player and the FO move on to the next area.
- An ordinary clear collects the fixed weapons and armour first; a TA team can take only the valuable fixed boxes and skip the other side paths.
STAGE 03
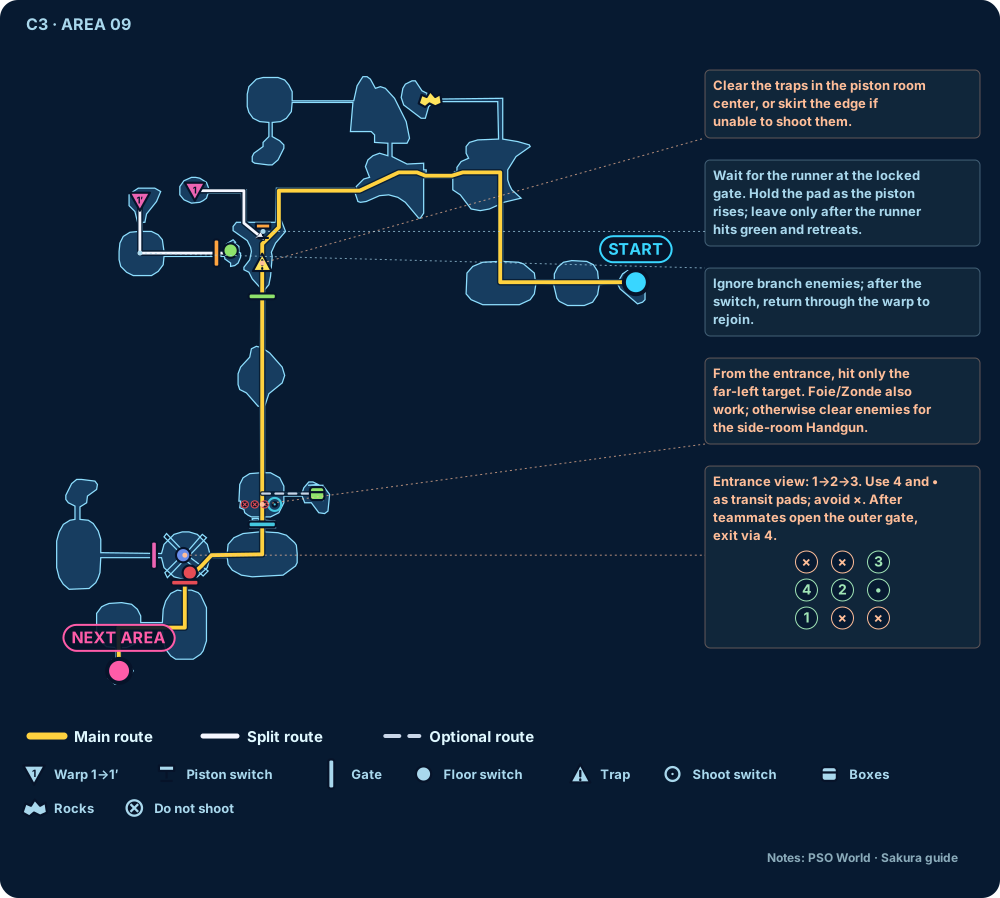
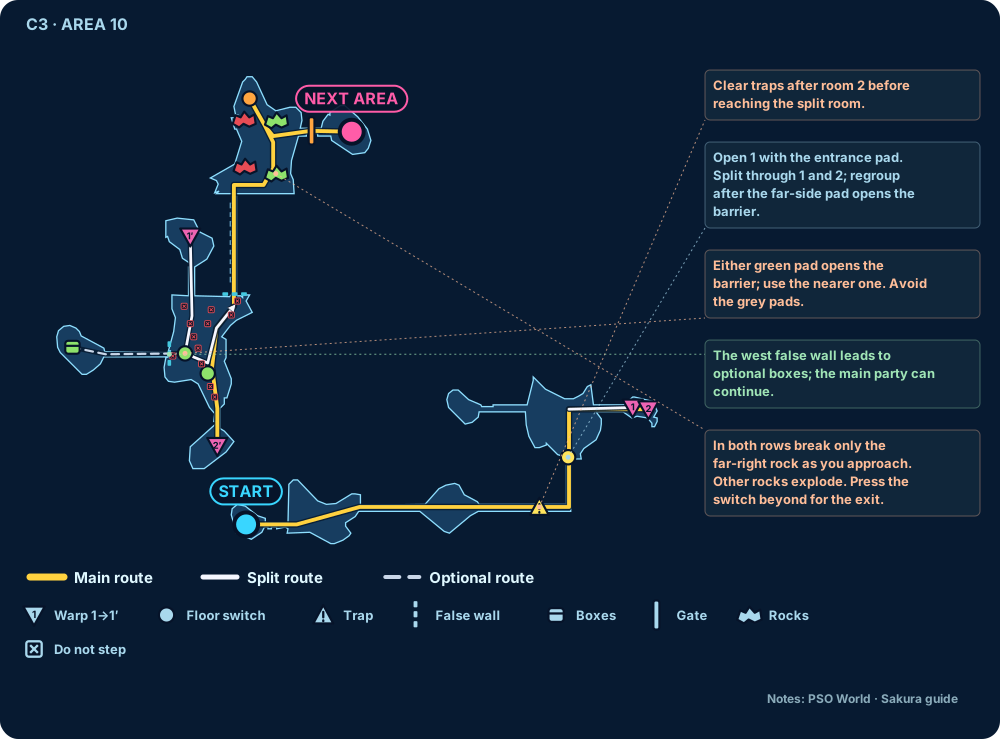
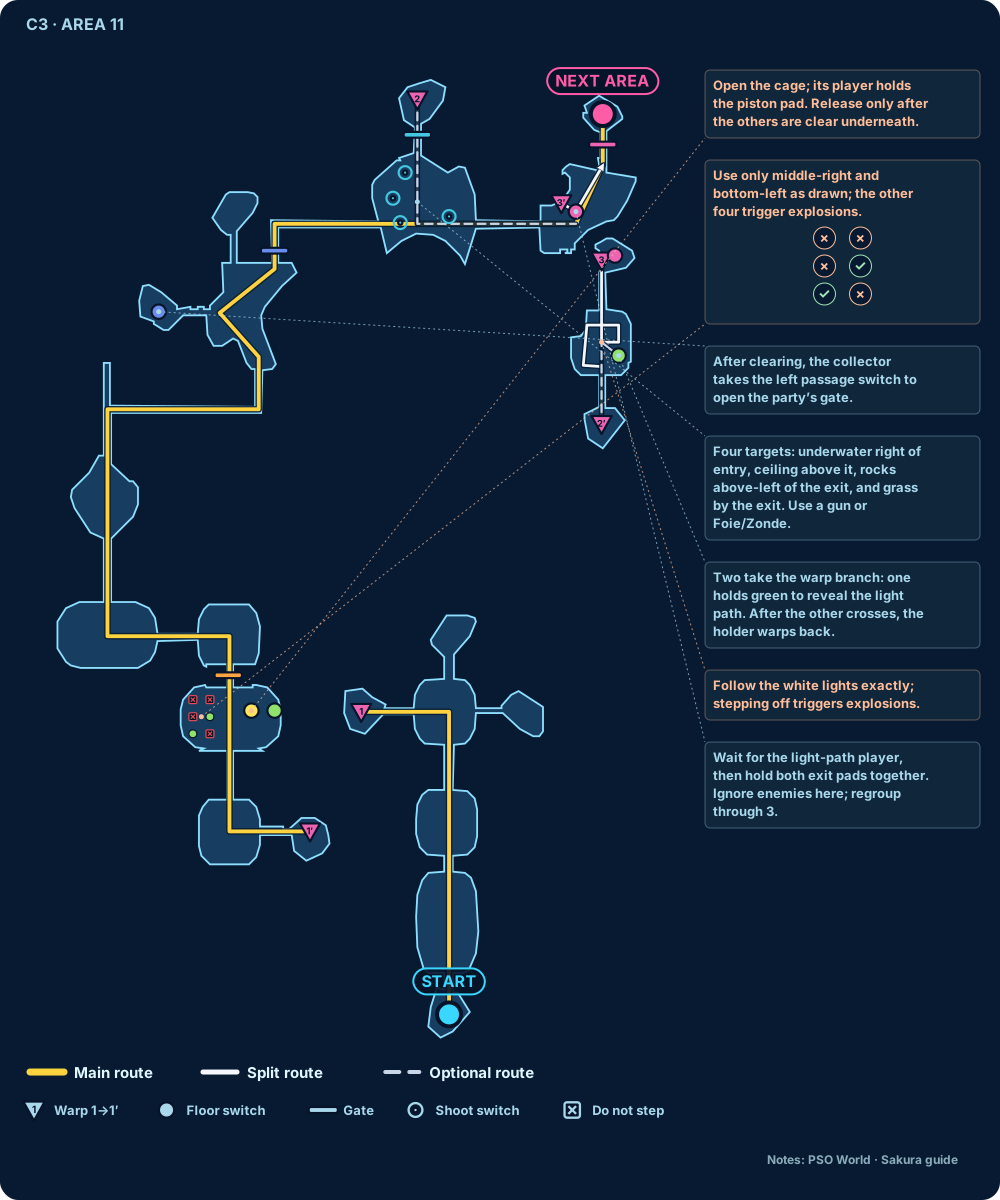
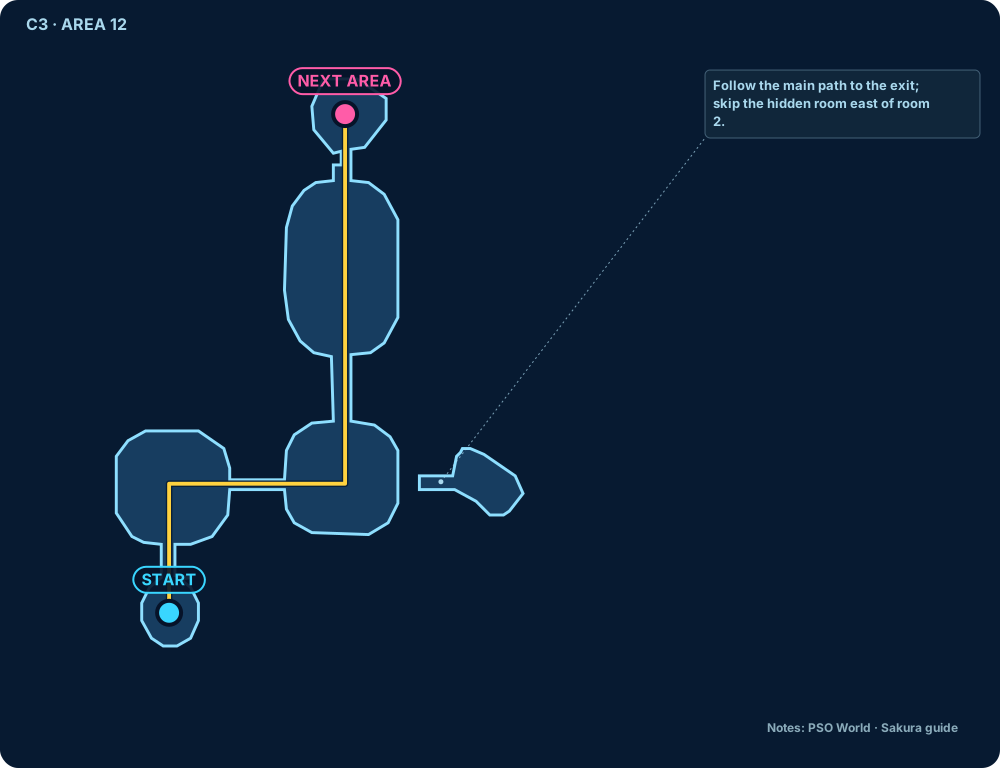
C3 Areas 09–13
Stage strategy and roles
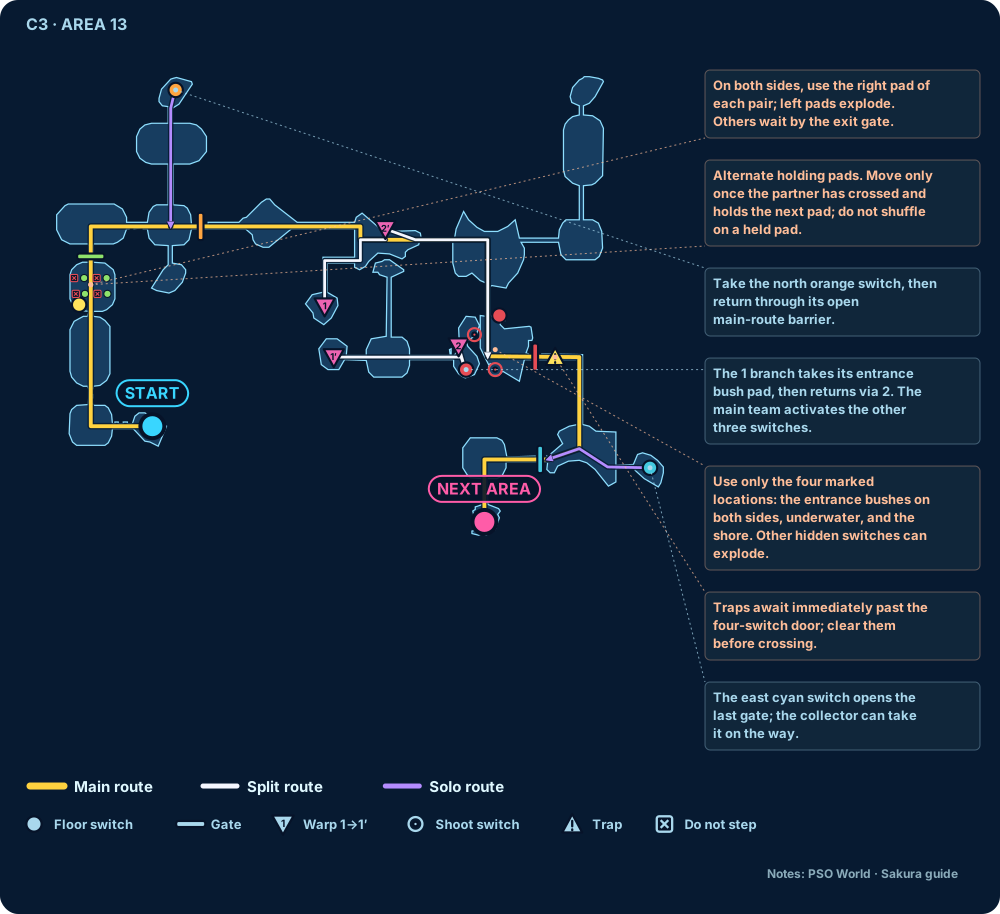
Stage goal: get used to sword combos, handling slimes and multi-player switches.
- HUs with a sword use
NNHas the baseline andNHHfrom behind or once accuracy allows. Whoever holds a strong one-handed sword handles the slimes first. - Do not blindly finish full three-hit combos on slimes; repeated misses make them split and add more enemies.
- In Area 9, one player enters the nine-switch puzzle and moves in the order and through the safe points shown on the map; teammates wait outside the door once through. Do not assume every grey switch is a trap.
- From this stage the FO keeps Shifta up steadily, but should not leave the main group just to refresh support.
STAGE 04
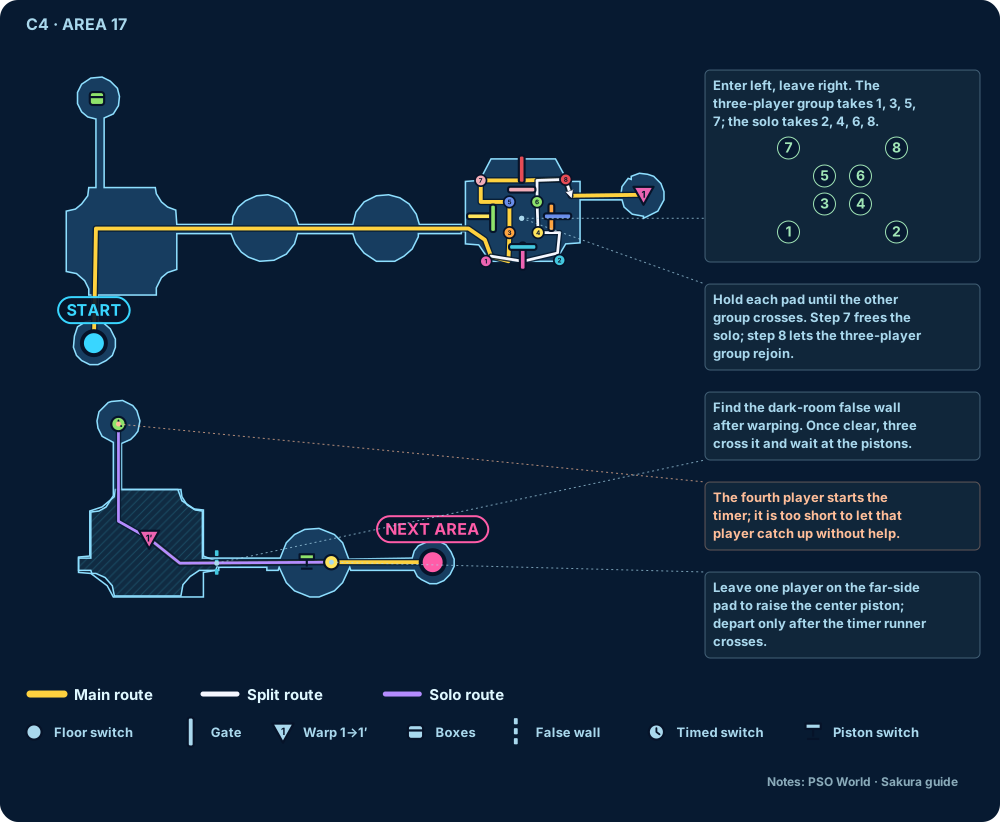
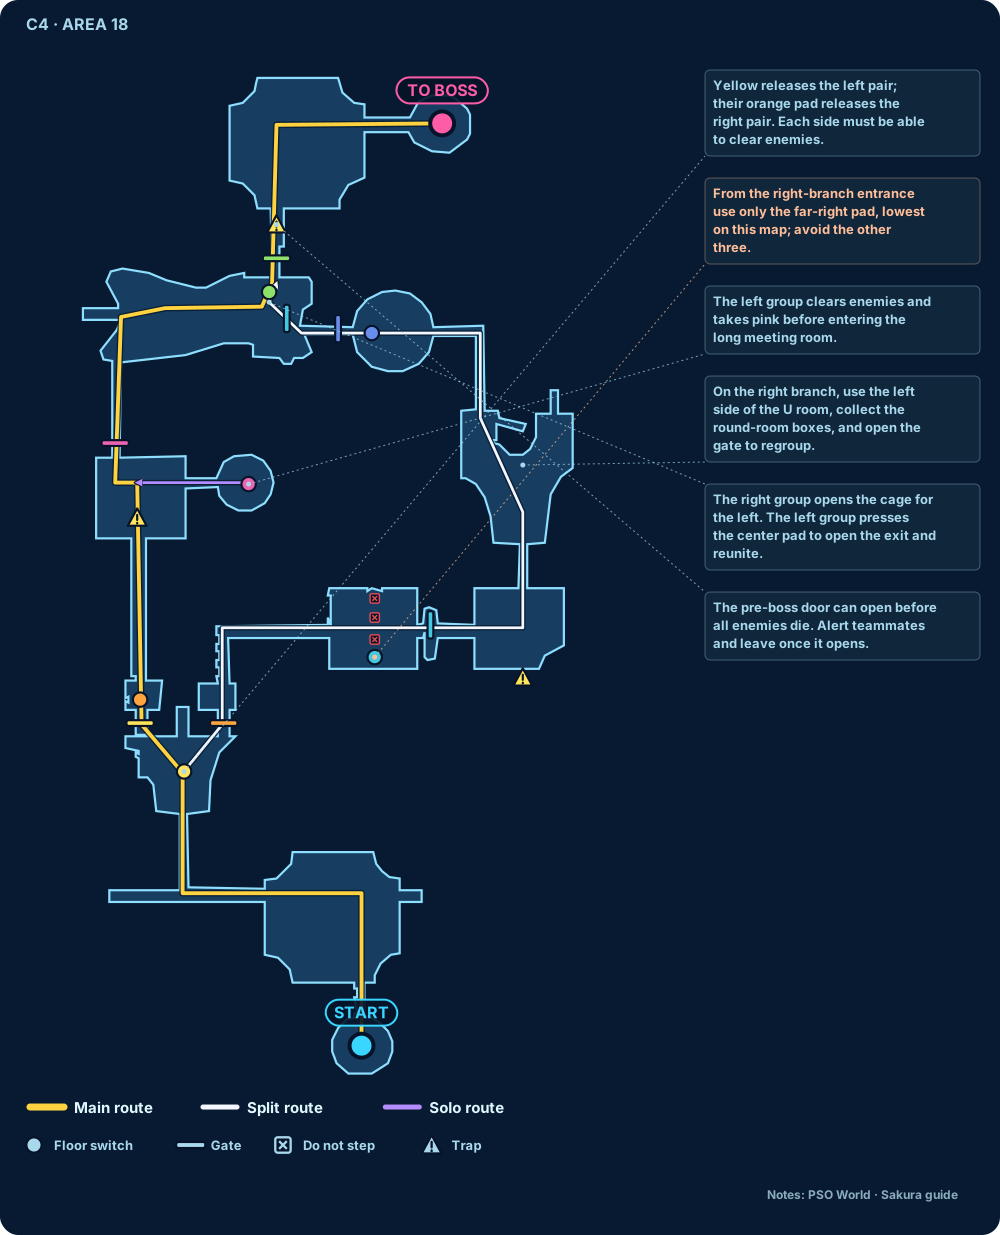
C4 Areas 14–18
Stage strategy and roles
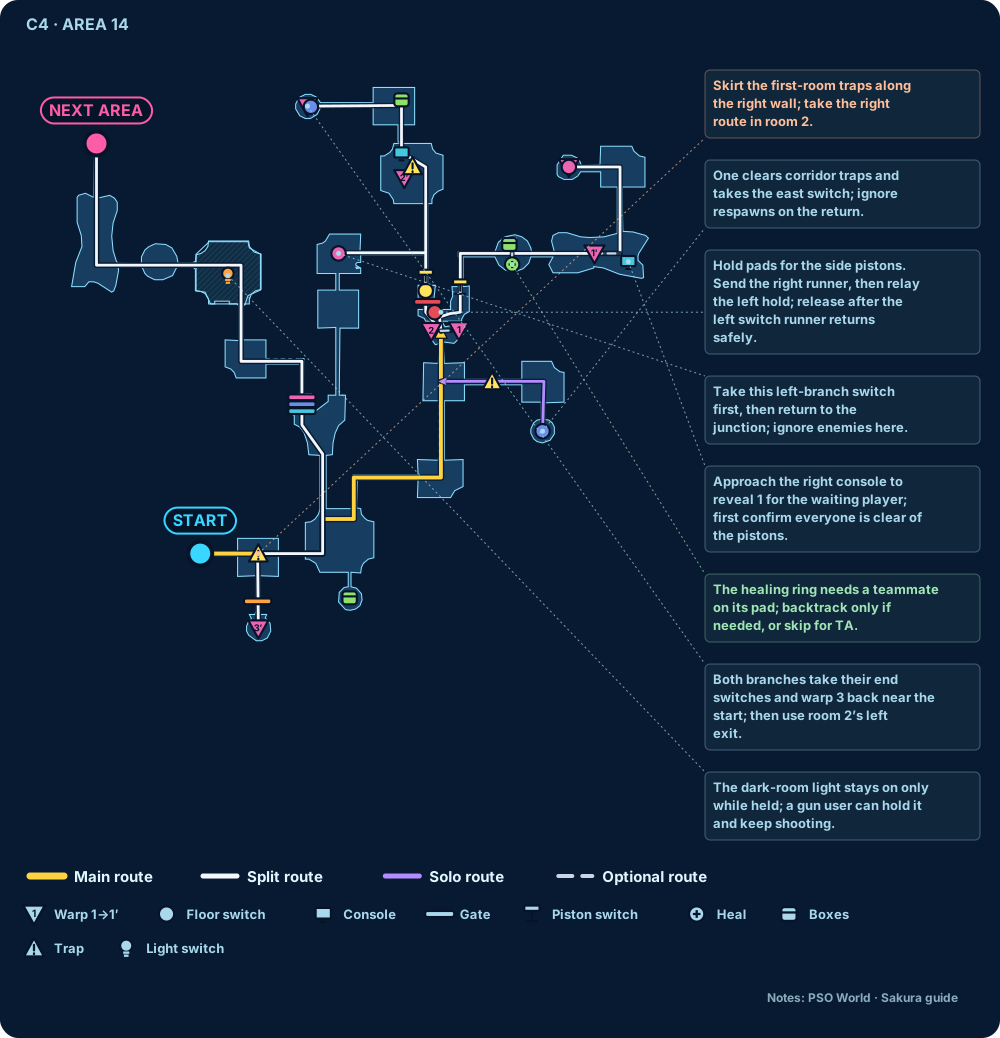
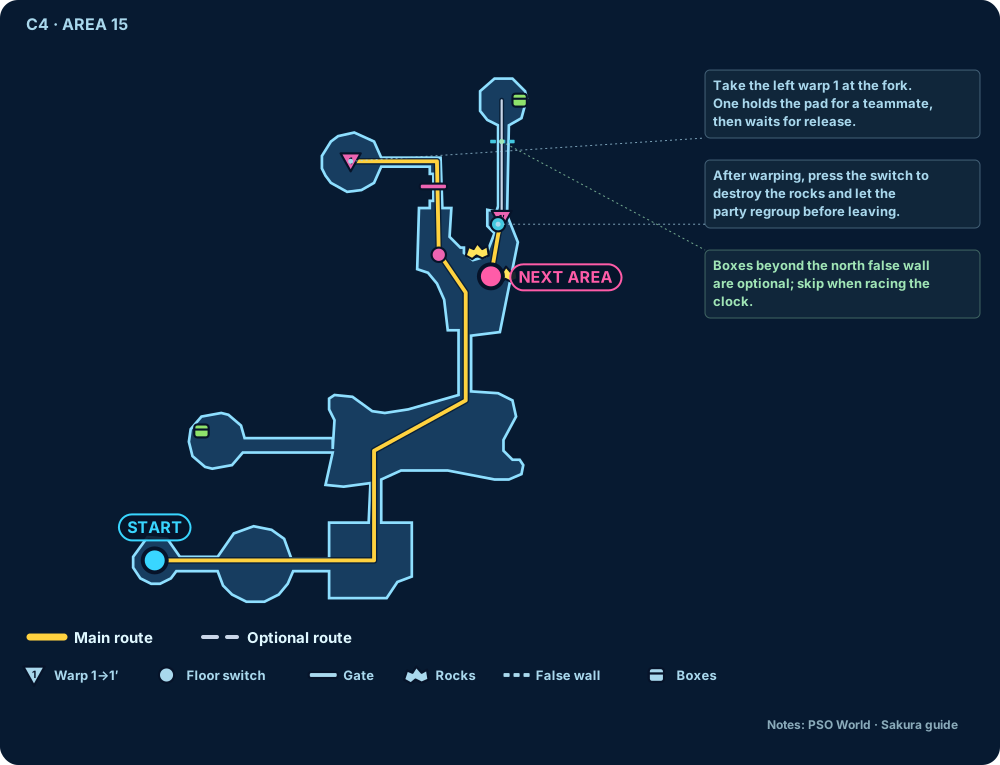
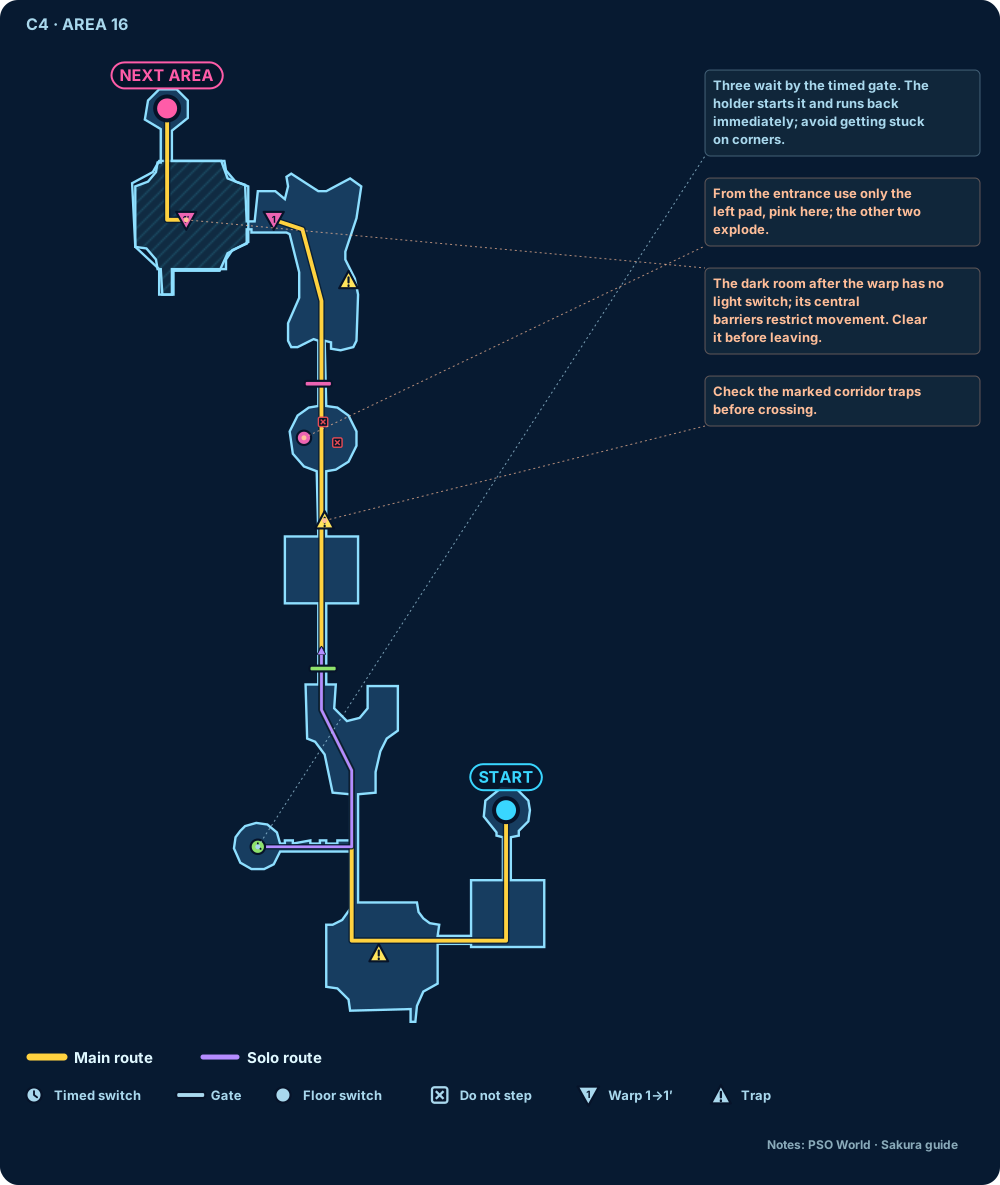
Stage goal: complete the multi-route switches as mapped, and have a reliable sword or high-attribute weapon ready for De Rol Le.
- In a 2:2 split, the FO goes with the stronger HU; the other pair finishes the switches first and does not linger on side paths.
- A Dim/Shadow weapon with Hit can try Pan Arms; otherwise the FO uses techniques and HUs should not interfere with weak attacks.
- De Rol Le: spread out on the ship so no single attack hits several players. When the boss is at the side of the ship, swords can pre-empt it; put spare recovery items somewhere easy to reach and share them.
STAGE 05
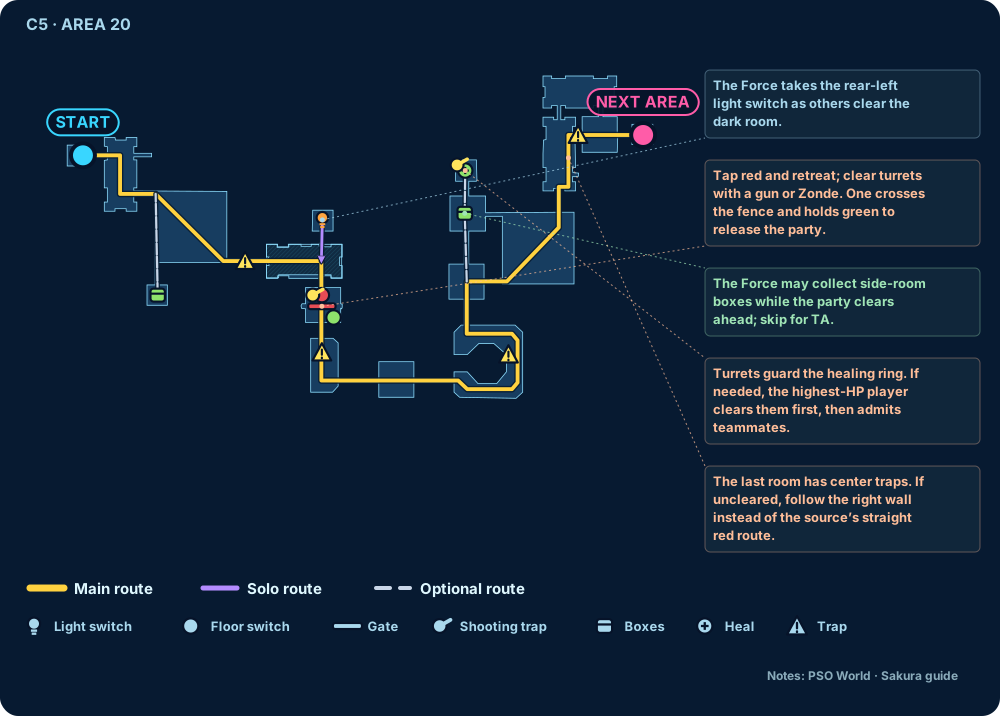
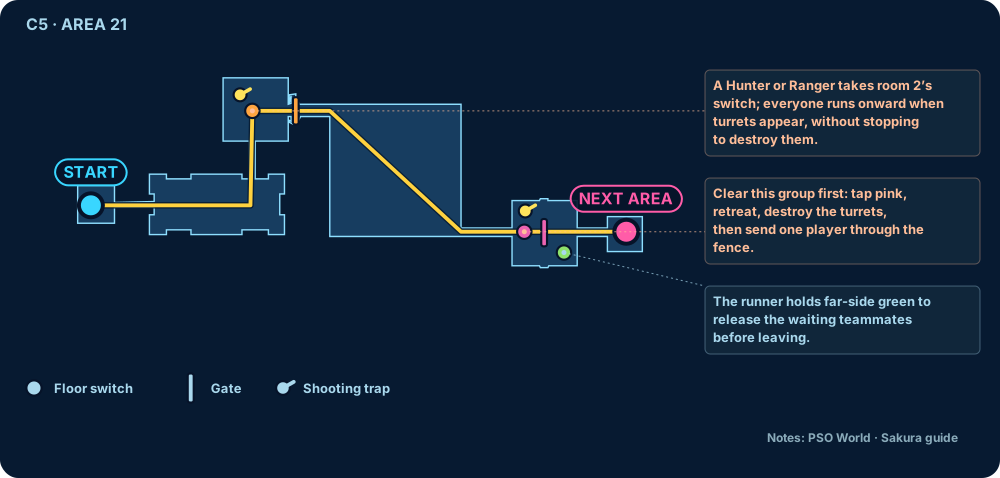
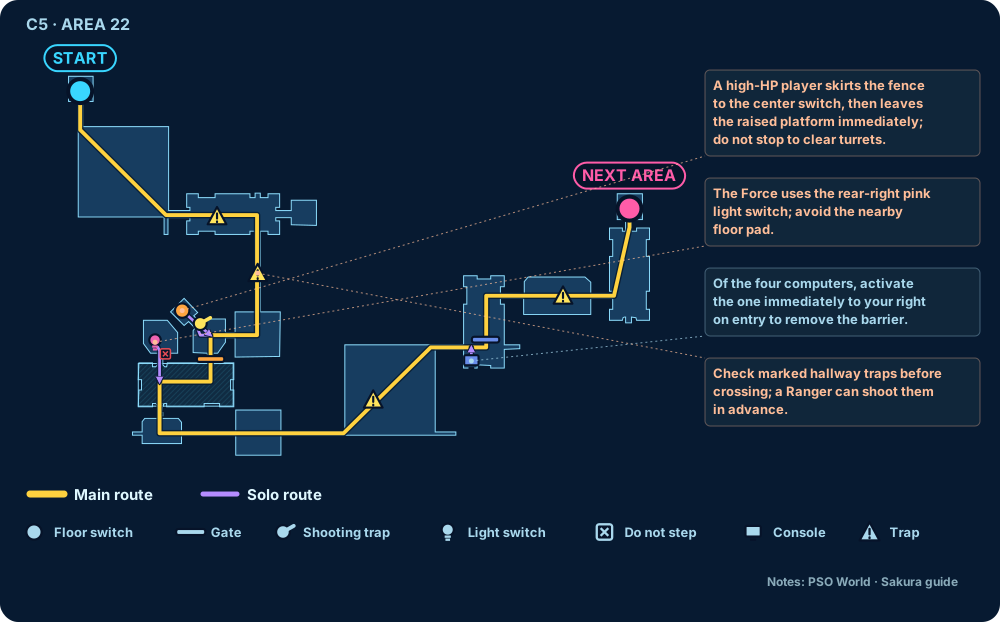
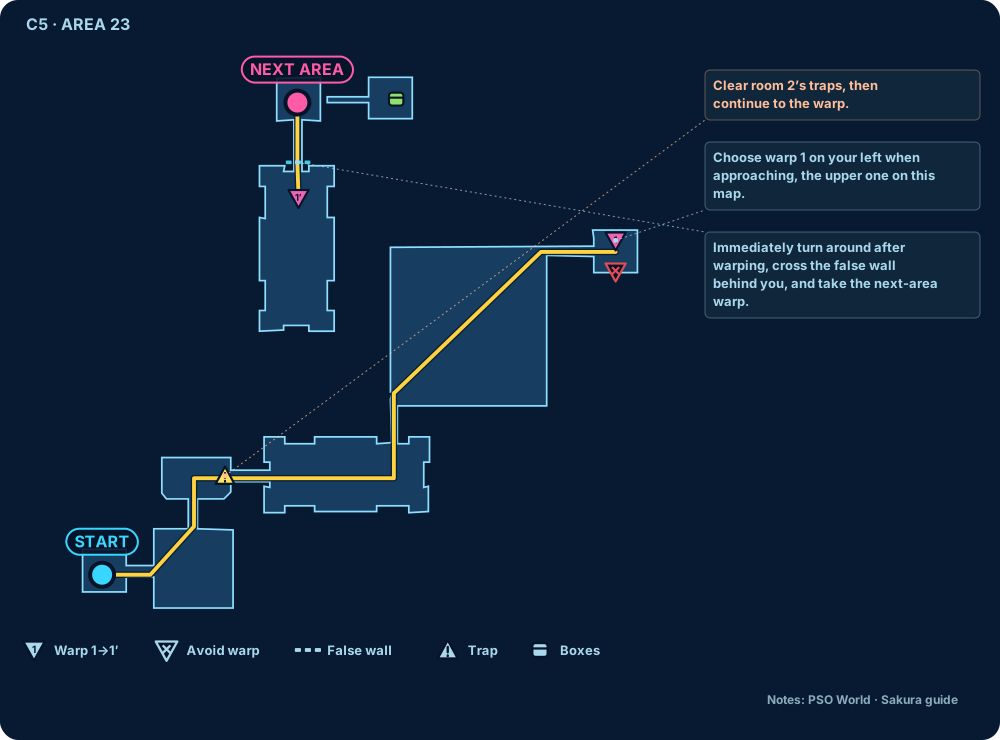
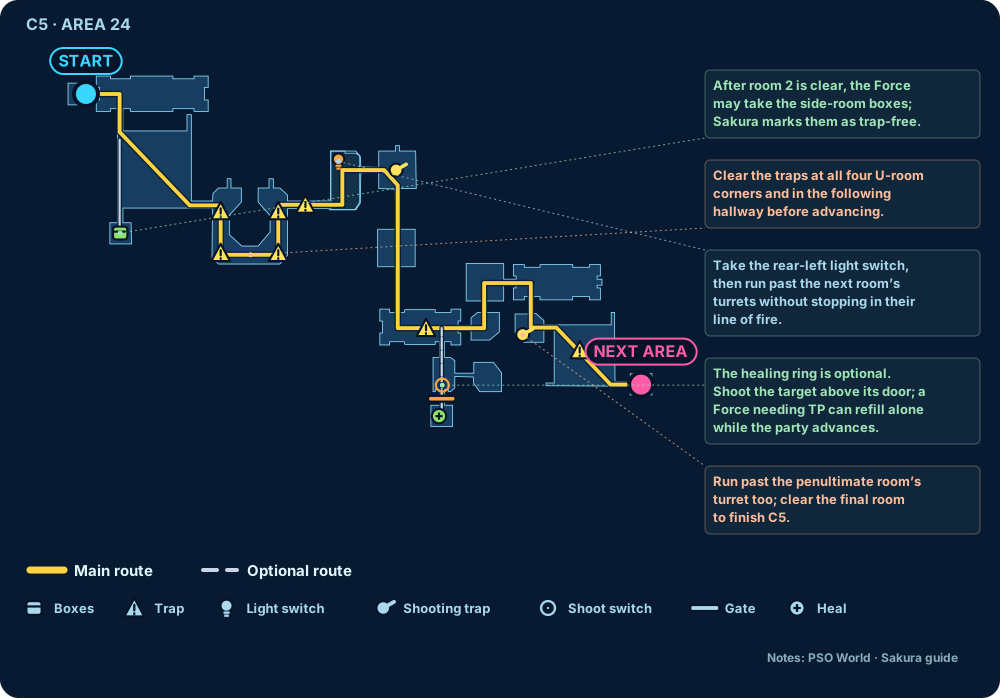
C5 Areas 20–24
Stage strategy and roles
Stage goal: start adapting to the Mines' high-evasion enemies, dark rooms and gun traps.
- Freeze or focus Sinow Beats first; do not go for full three-hit combos alone. High-attribute swords, Gizonde and high-Hit guns speed things up noticeably.
- The FO takes Sinows and Canadines first; side-path pickups go to the HU with the lowest current damage.
- For an ordinary clear, turn on the lights and clear the gun traps; only experienced TA teams push through in the dark while they can control the damage.
STAGE 06
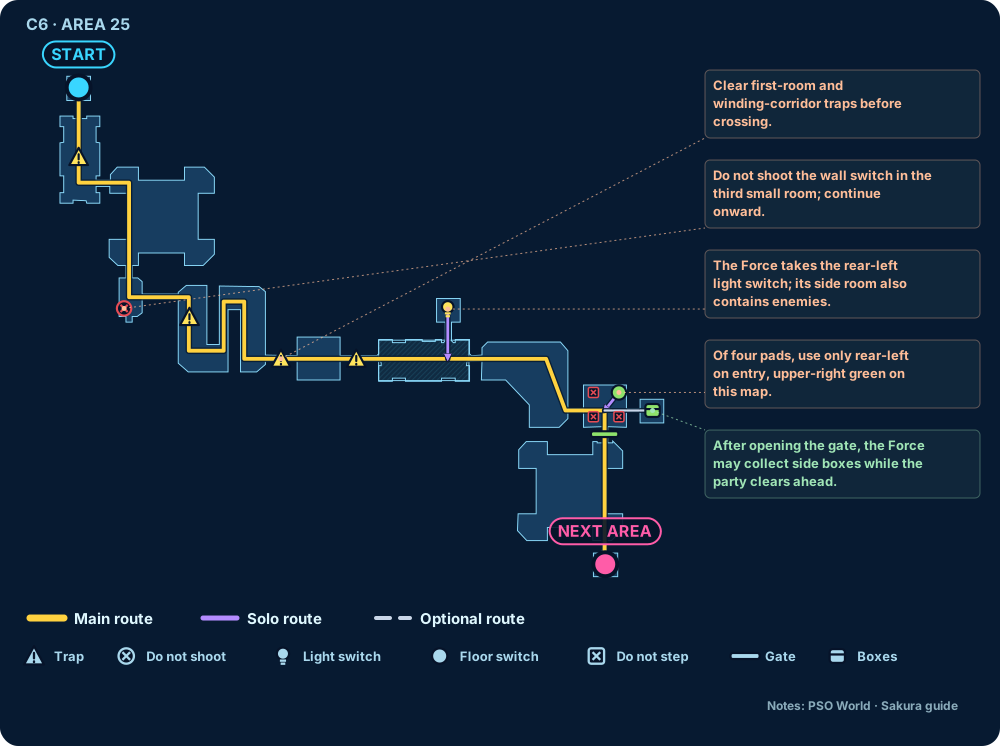
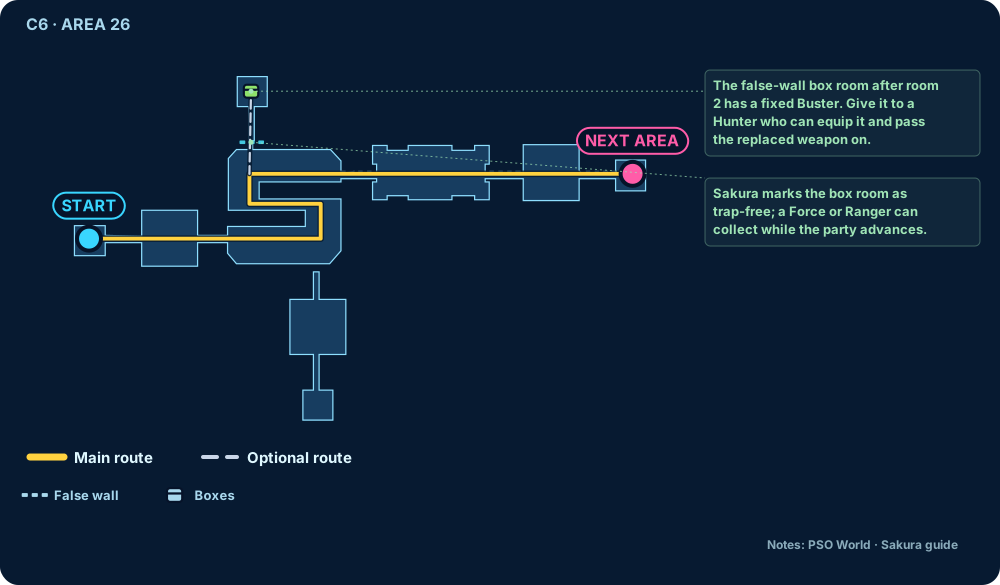
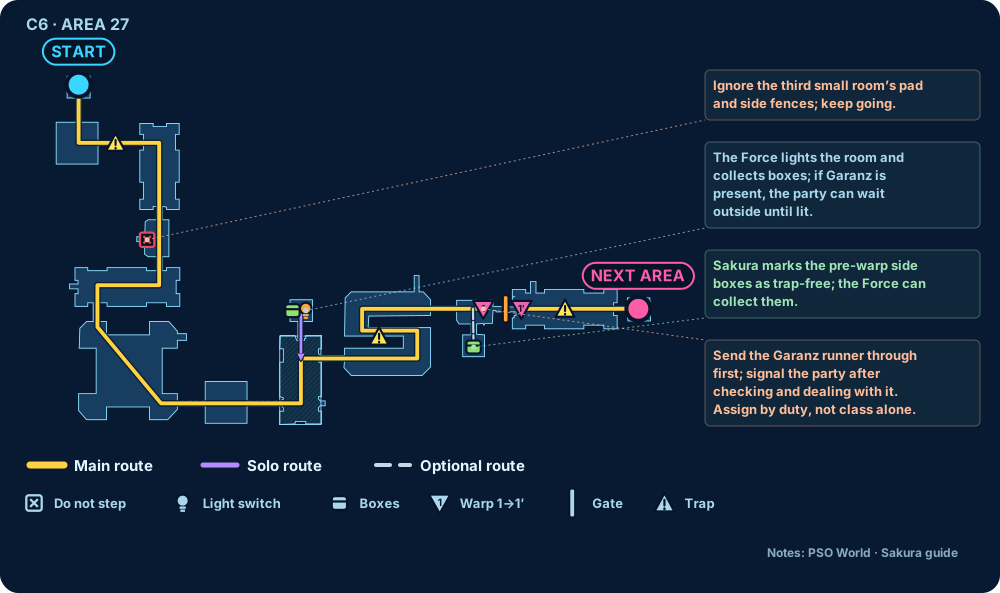
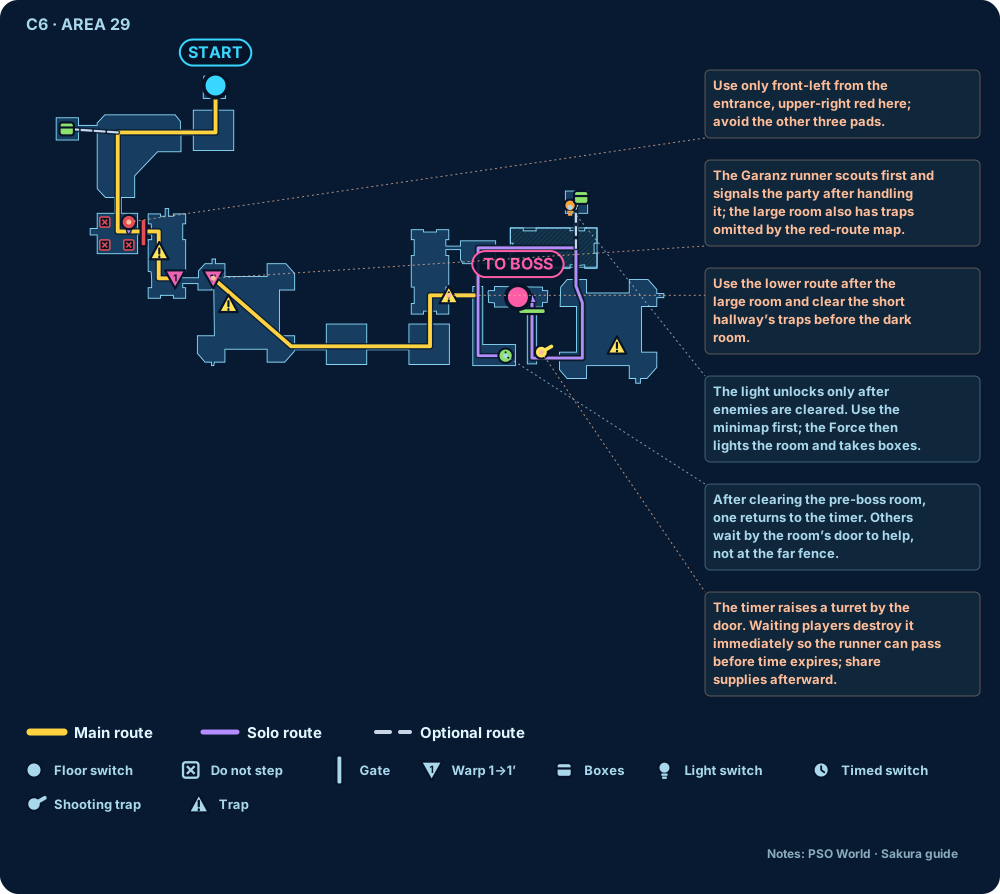
C6 Areas 25–29
Stage strategy and roles
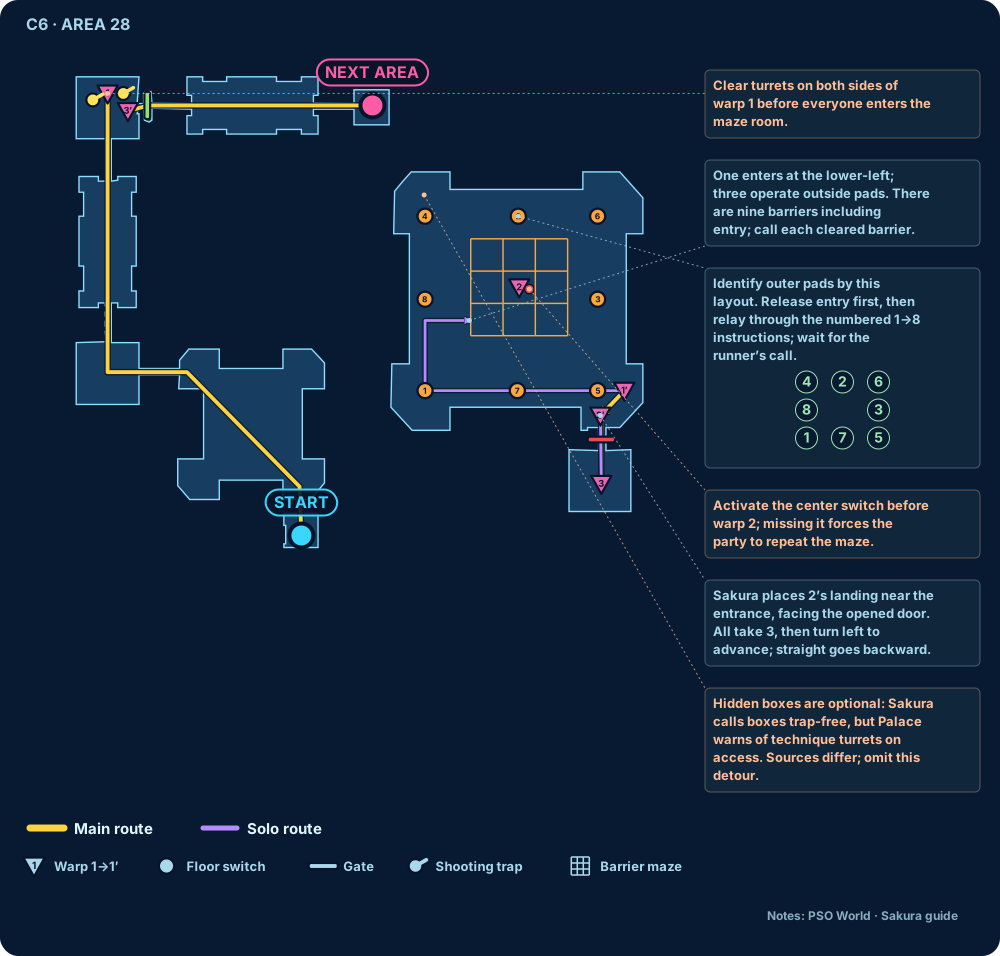
Stage goal: handle Garanz reliably while keeping item use under control, and work together on the large switch puzzle in Area 28.
- Freeze Garanz first, then attack from behind; if you are short of traps, do not circle for long, and keep the team's damage flowing.
- In Area 28, one player enters the maze and the other three step on switches in the order shown; each covers only the switches next to them, without crossing paths.
- Vol Opt: in the first form attack the red pillars first instead of wasting damage on the screens. Give high-attribute mechguns or guns to players with enough accuracy.
STAGE 07
C7 Areas 31–35
Stage strategy and roles
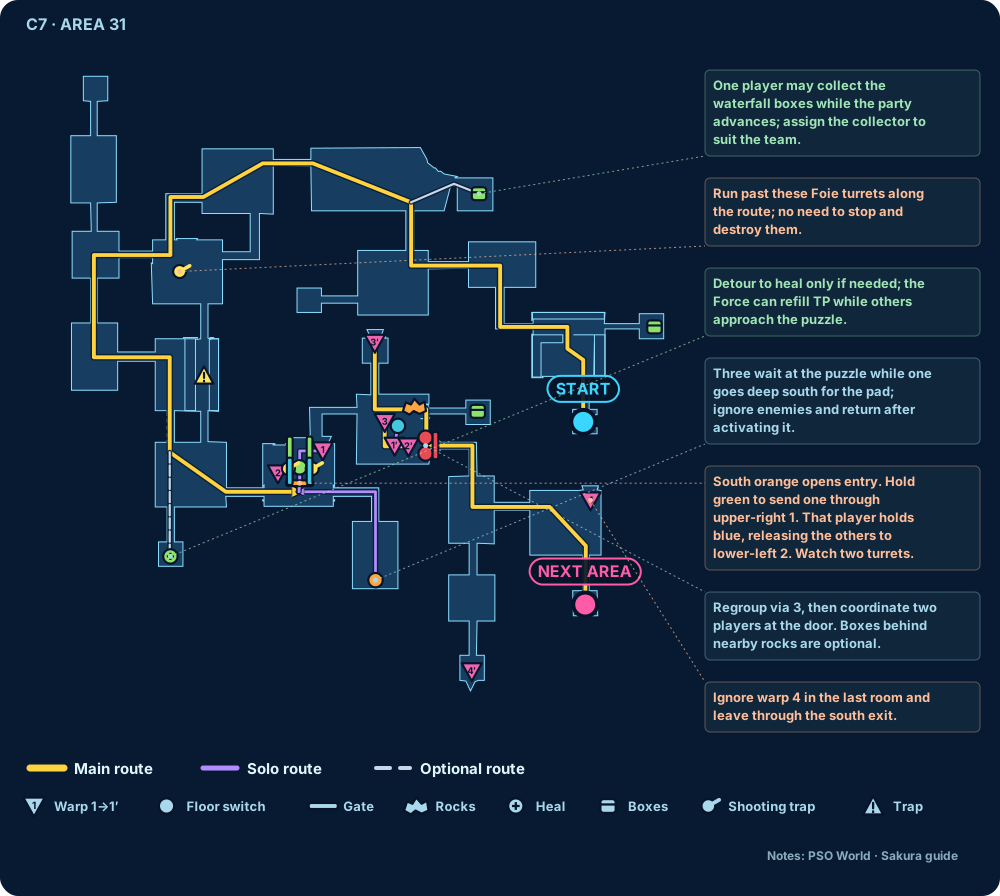
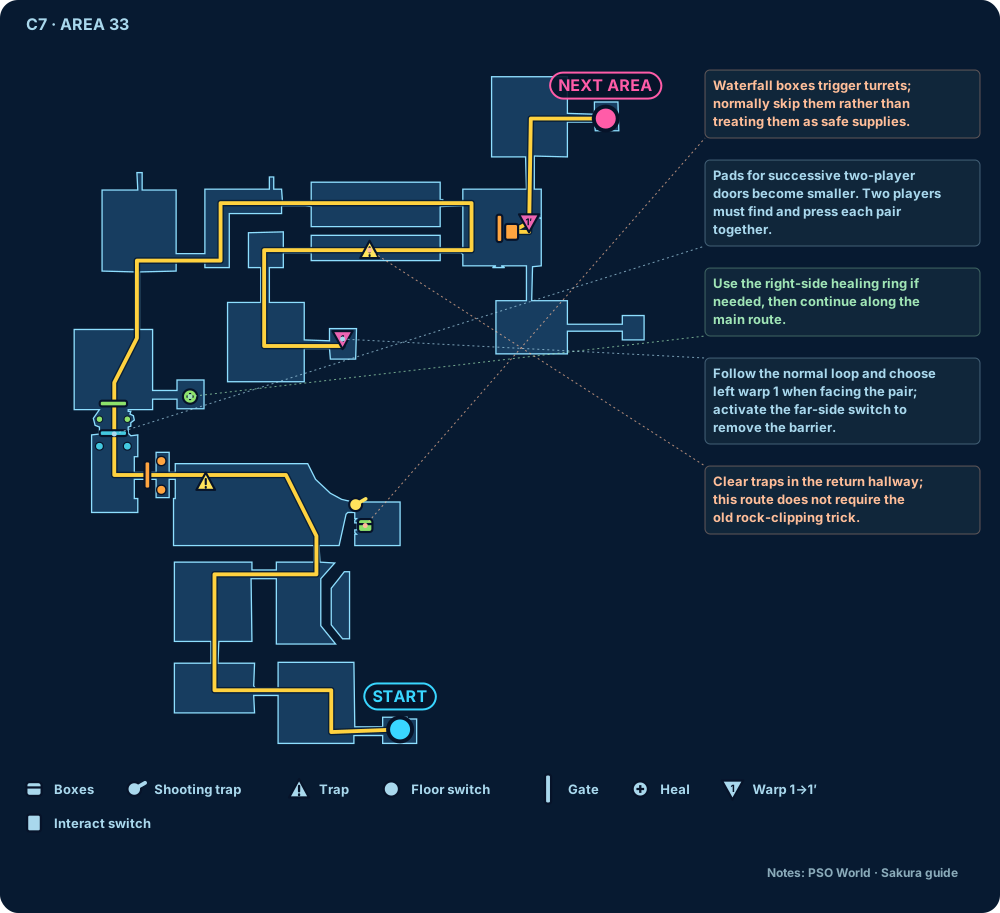
Stage goal: in the Ruins, focus on target priority, dark-room switches and managing the FO's TP.
- Take out Chaos Sorcerers and Delsabers first; HUs short on accuracy use a safe combo, and androids use Freeze Traps when several Delsabers appear.
- Until the HUs' weapons come together, the FO actively handles Delsabers and Dark Belras; once HUs have high-attribute weapons, each takes one Belra.
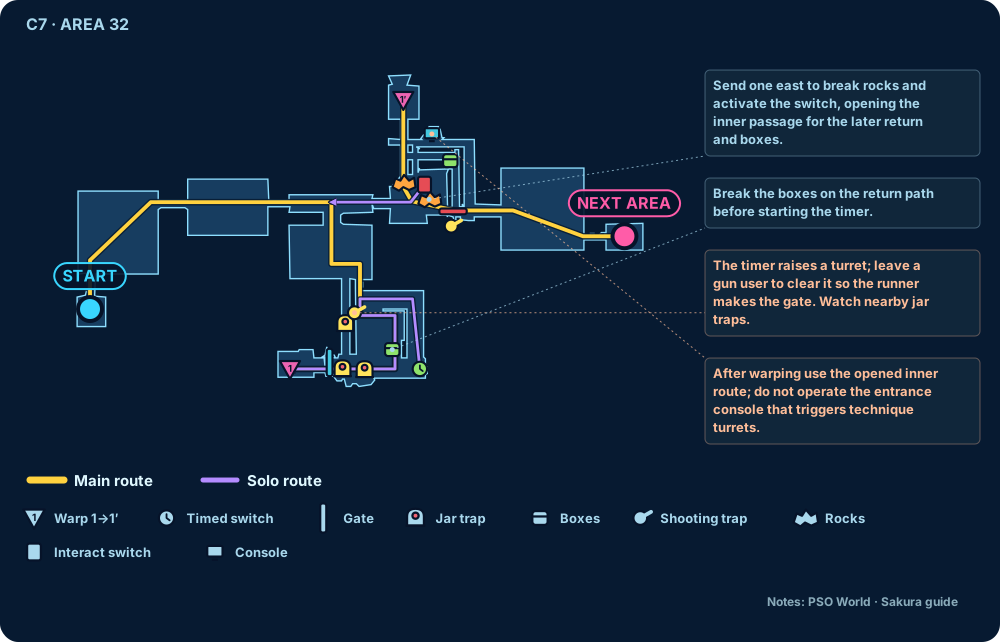
- After the timed door in Area 32, walk along the inside of the laser fences so you do not pass in front of the terminal and break the pickup route.
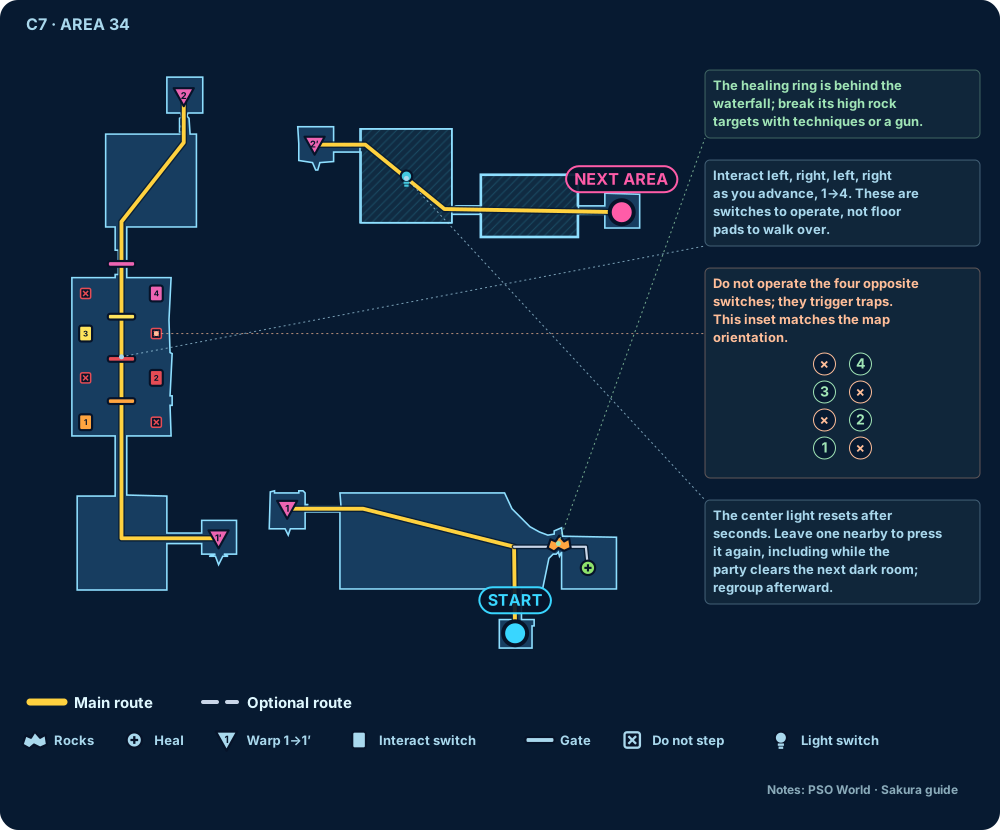
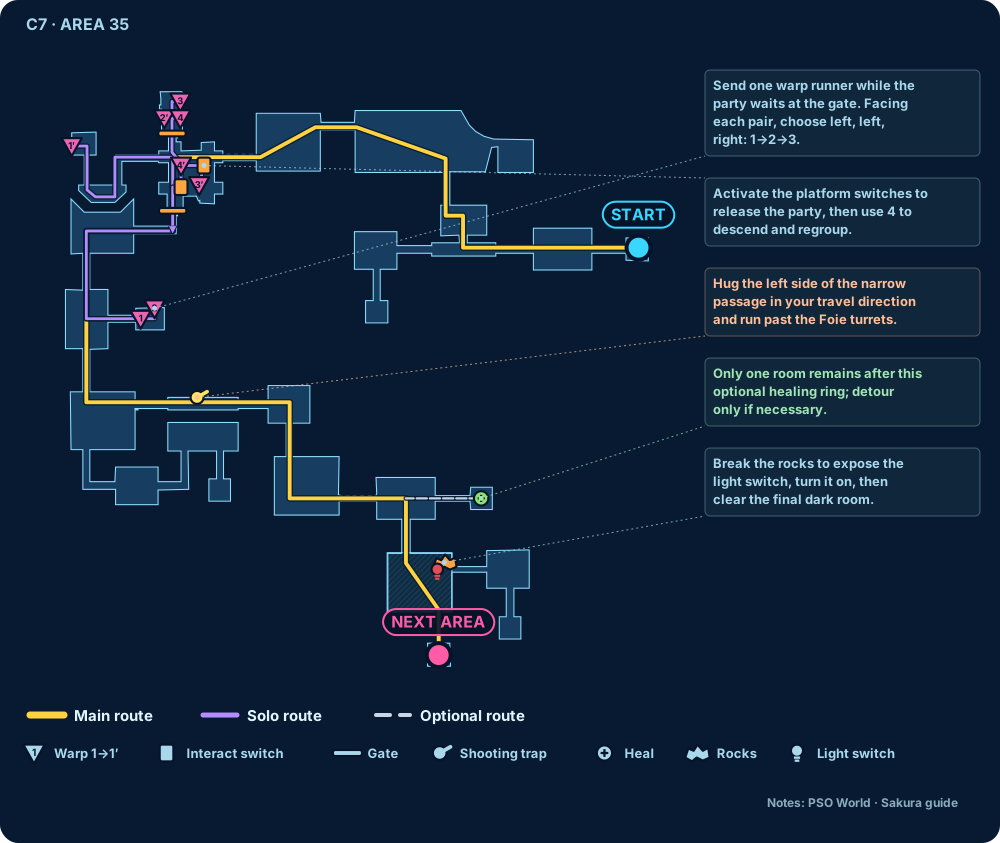
- Switch roles: in Area 34 press the four switches left, right, left, right in the direction of travel, and leave someone to keep re-pressing the lights; in Area 35 send one player alone to choose left, left, right for the chain of teleporters.
STAGE 08
C8 Areas 36–40
Stage strategy and roles
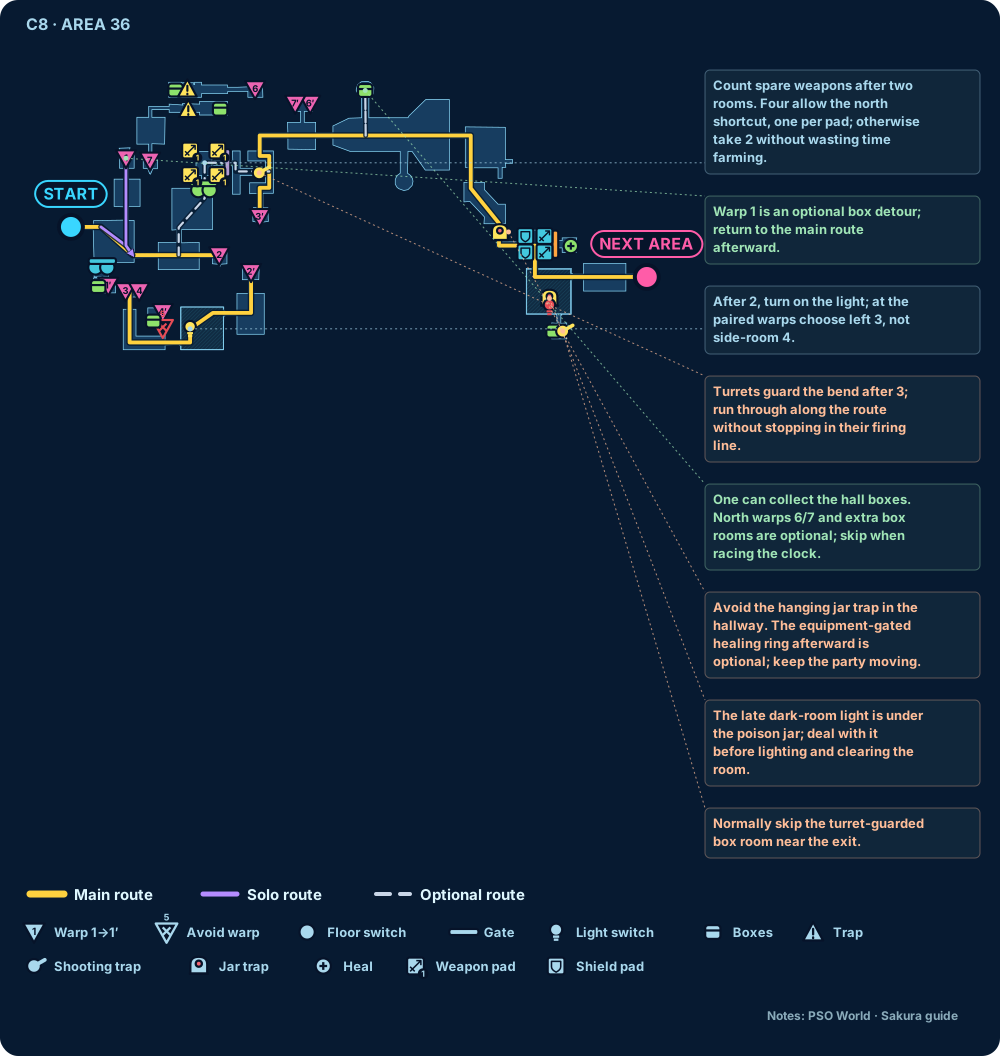
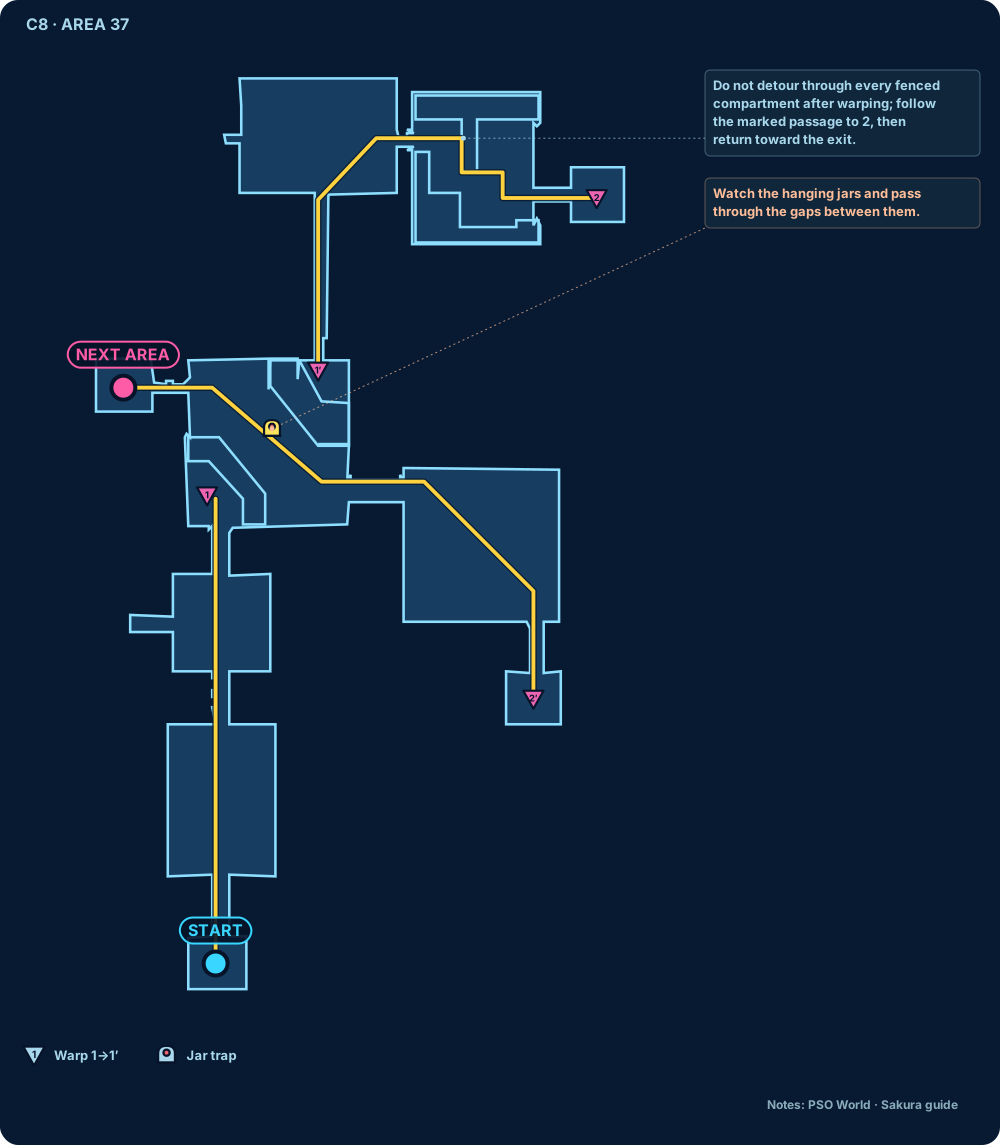
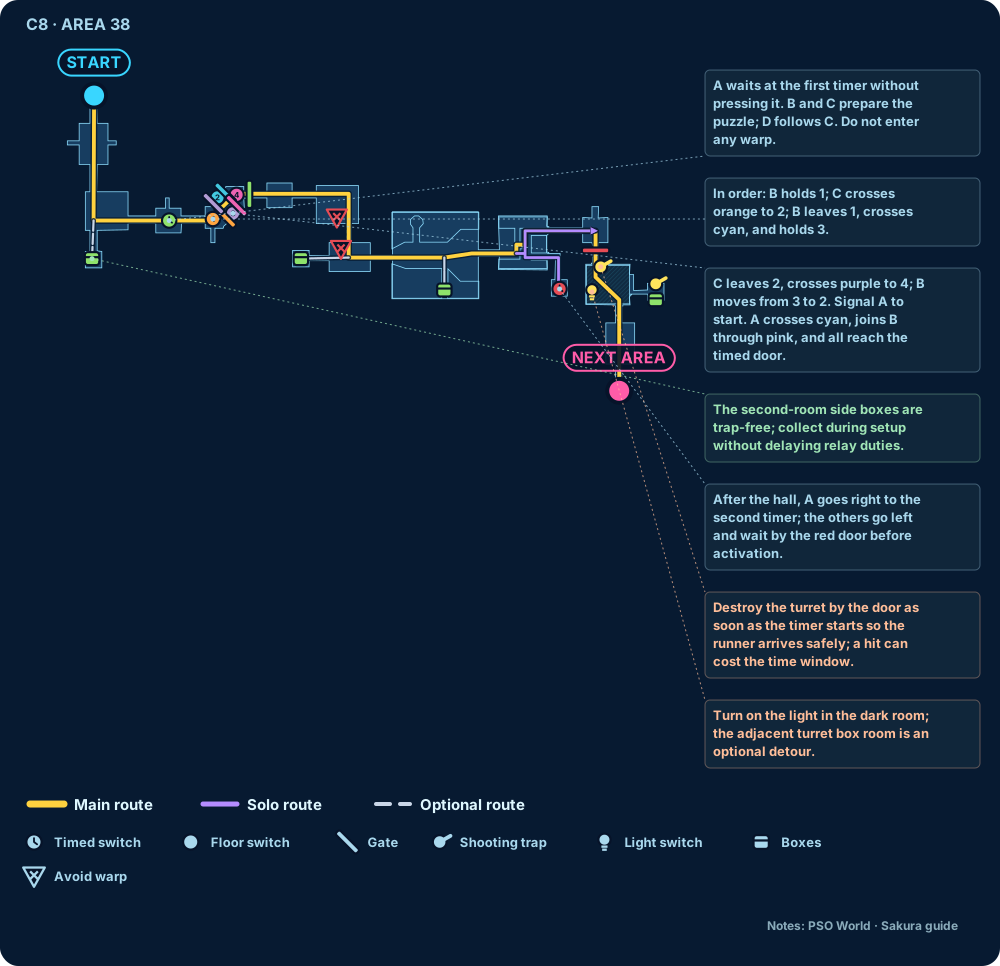
Stage goal: tell the optional shortcut apart from the mandatory weapon doors, and complete the timed relay and the Area 40 roles as mapped.
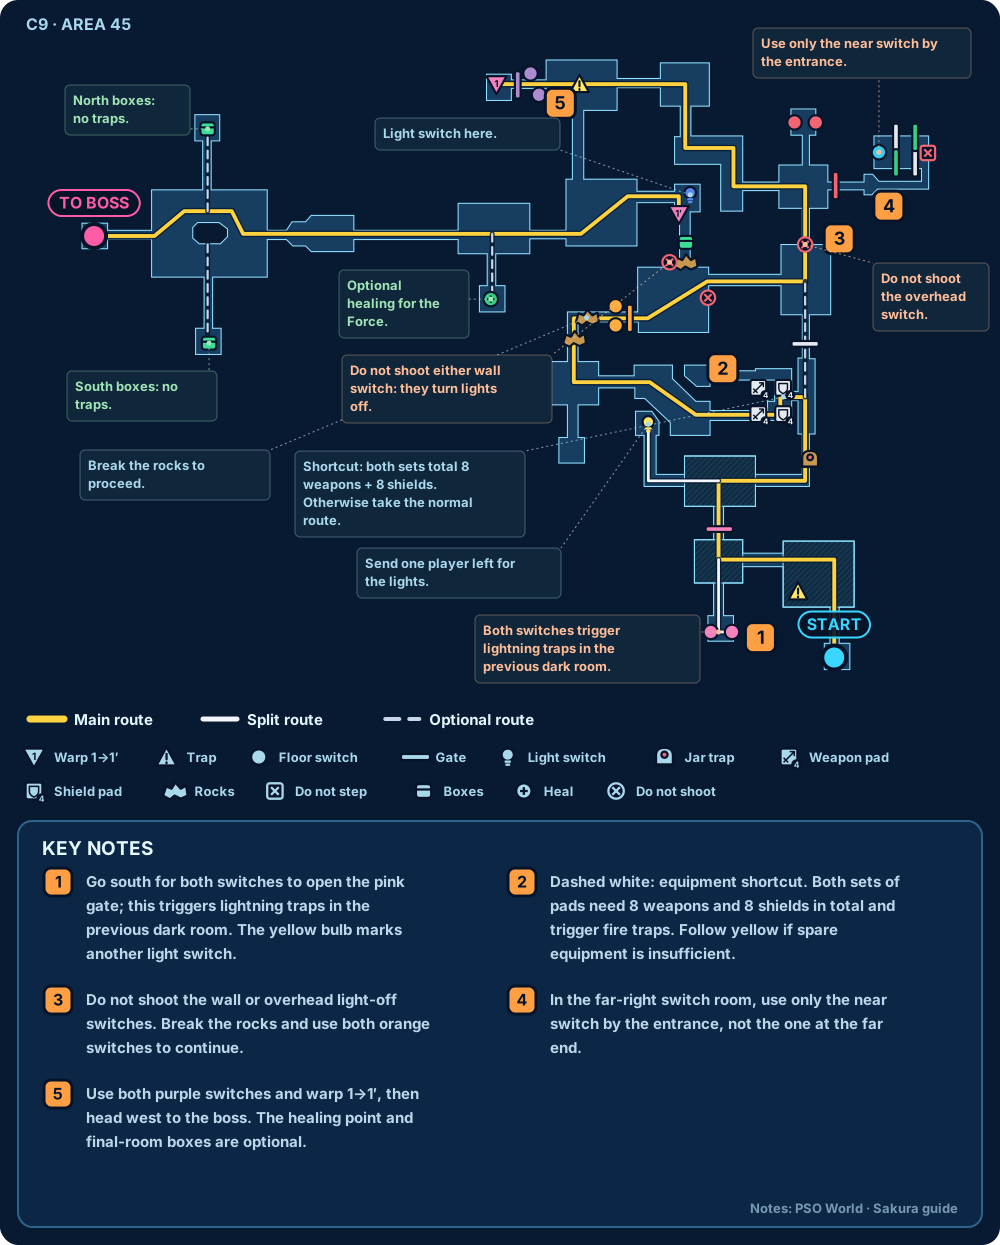
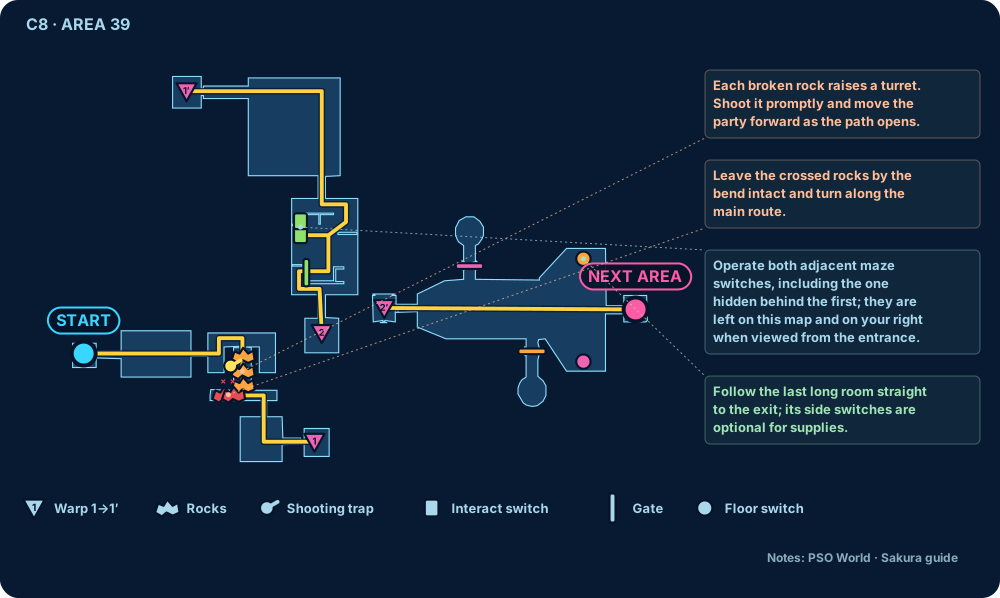
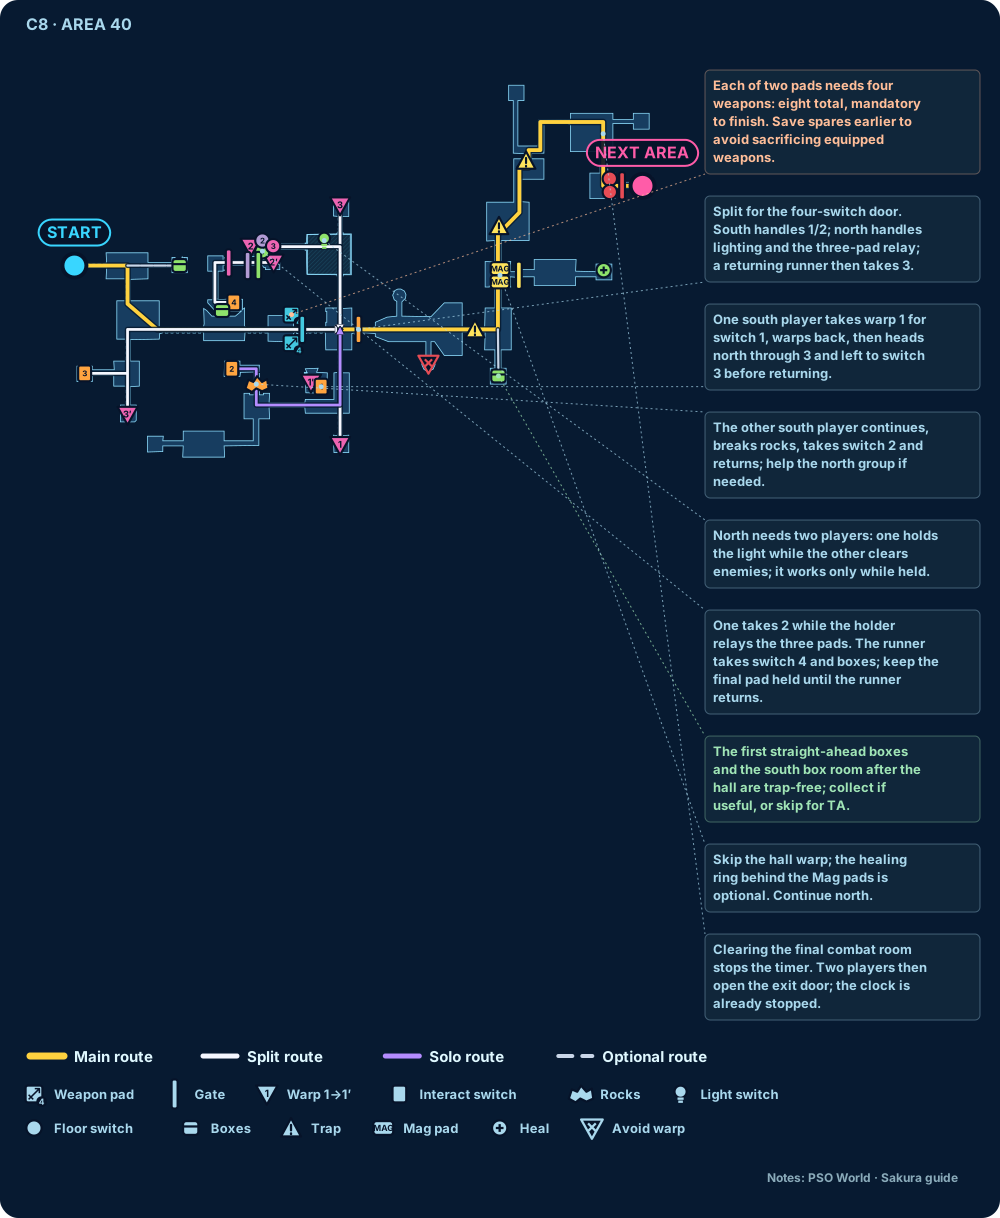
- The optional shortcut in Area 36 needs 4 spare weapons; the mandatory doors in Area 40 need 4 weapons on each of two switches, 8 in total, so set them aside in advance.
- Leave Chaos Bringers to a high-damage player alone; if you have a high-Hit gun, give it first to a HUcaseal or another character with enough accuracy.
- Area 40 splits into two groups as mapped: the south route takes 1 and 2, and at least two players on the north route cooperate on the lights and the three-colour switches; the south player who comes back to help then takes switch 3 via teleporter 3, and everyone meets once all four switches are done.
- In Area 38, finish setting up the relay before telling the timer runner to start; the second timed switch raises turrets, so the players left behind deal with them at once to protect the runner.
STAGE 09
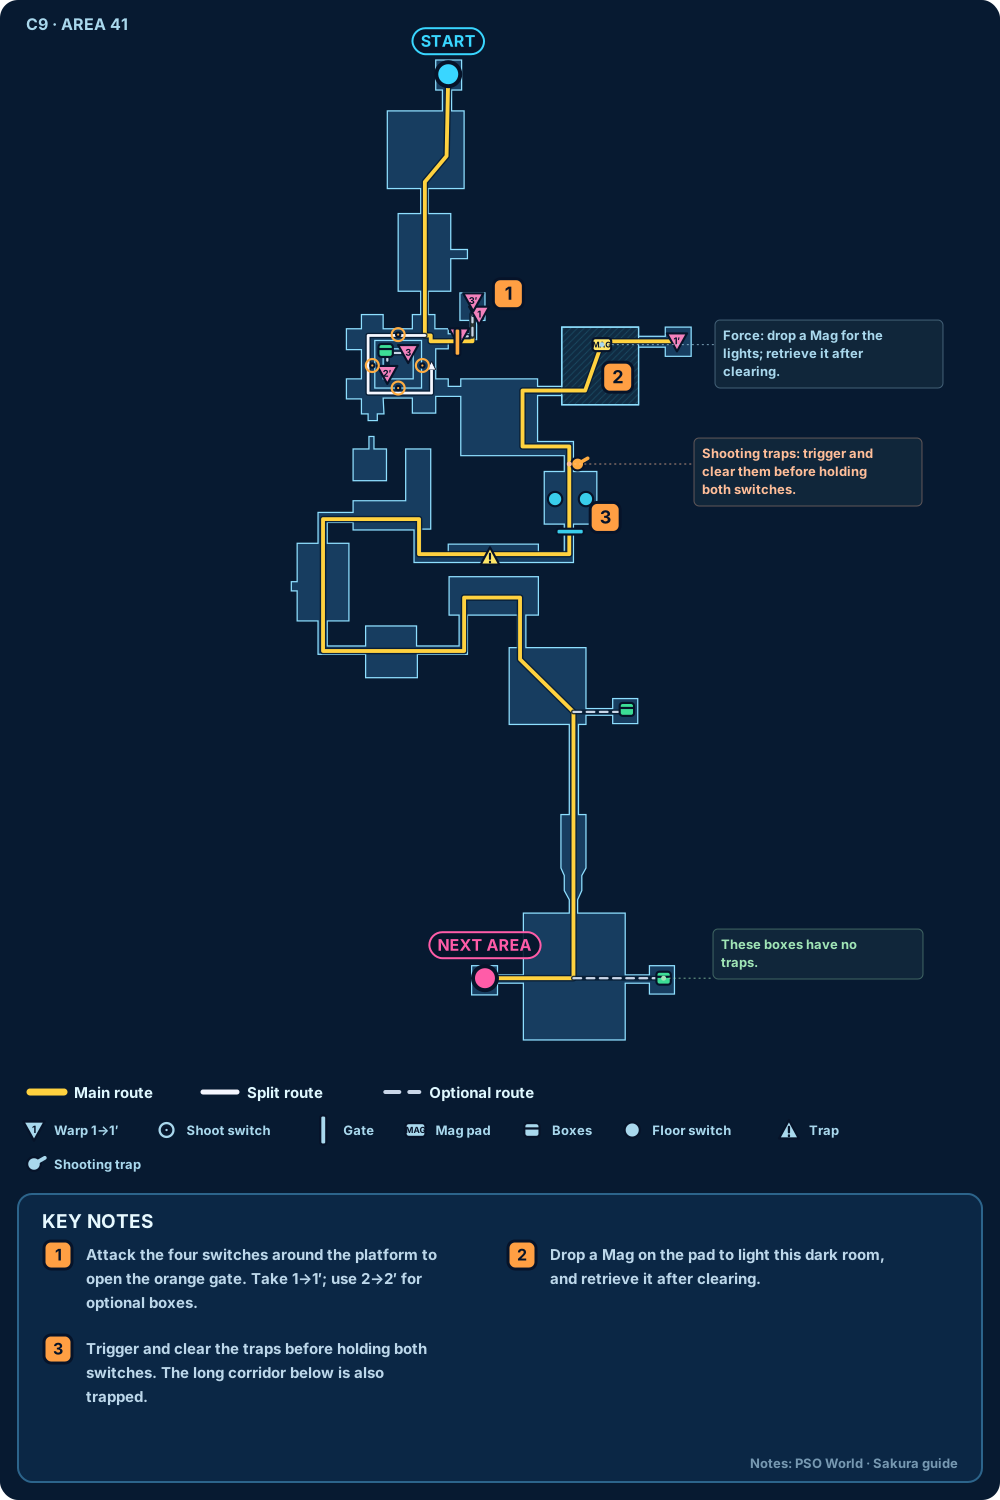
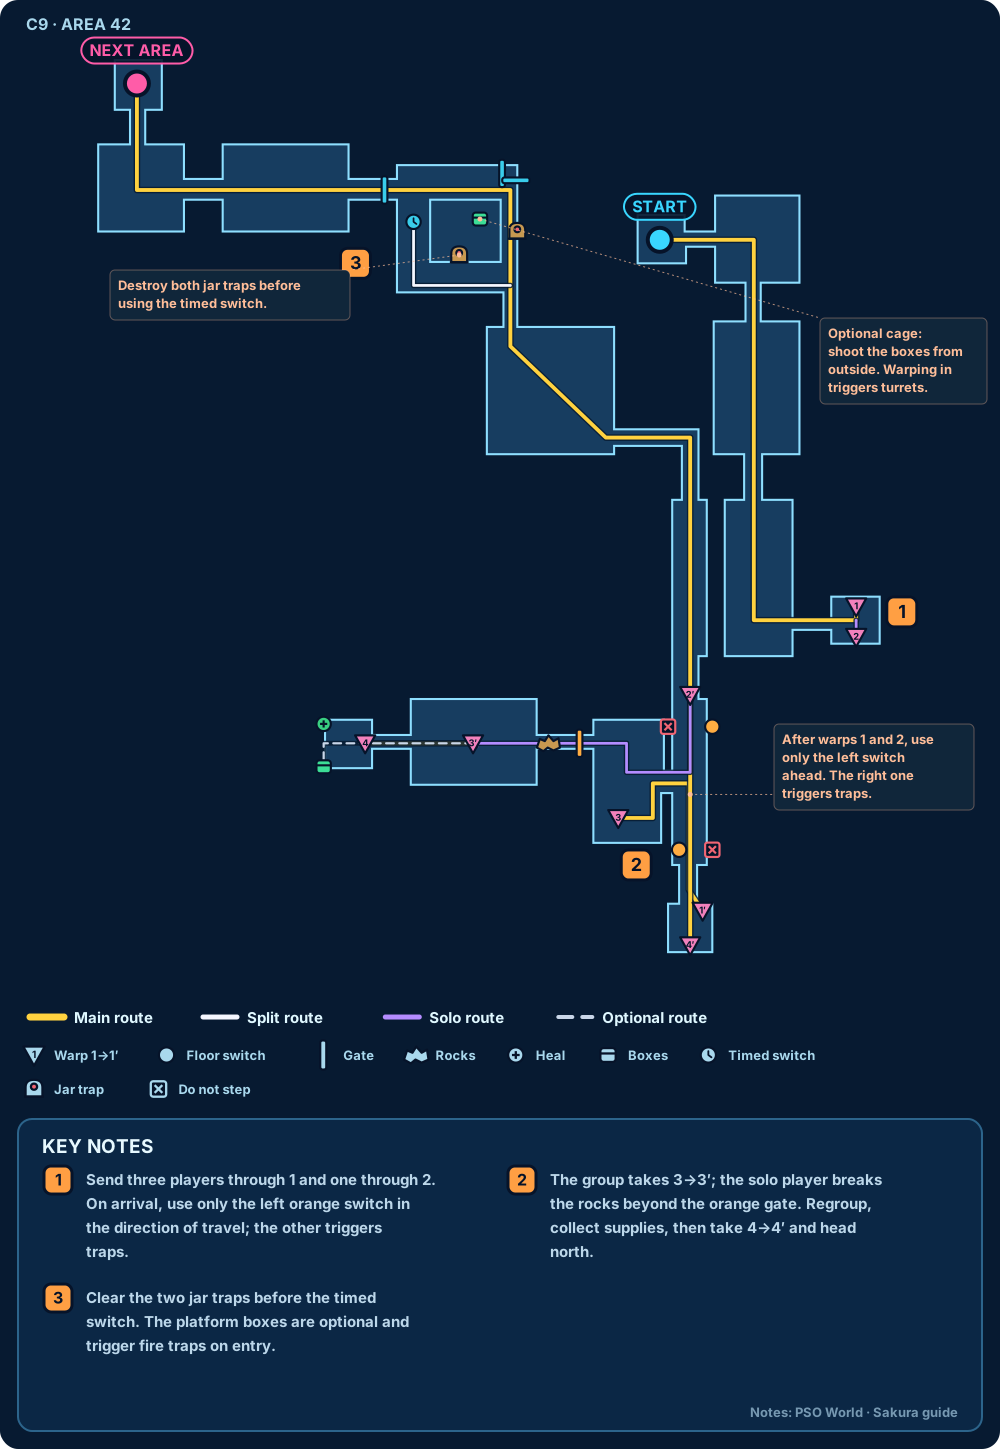
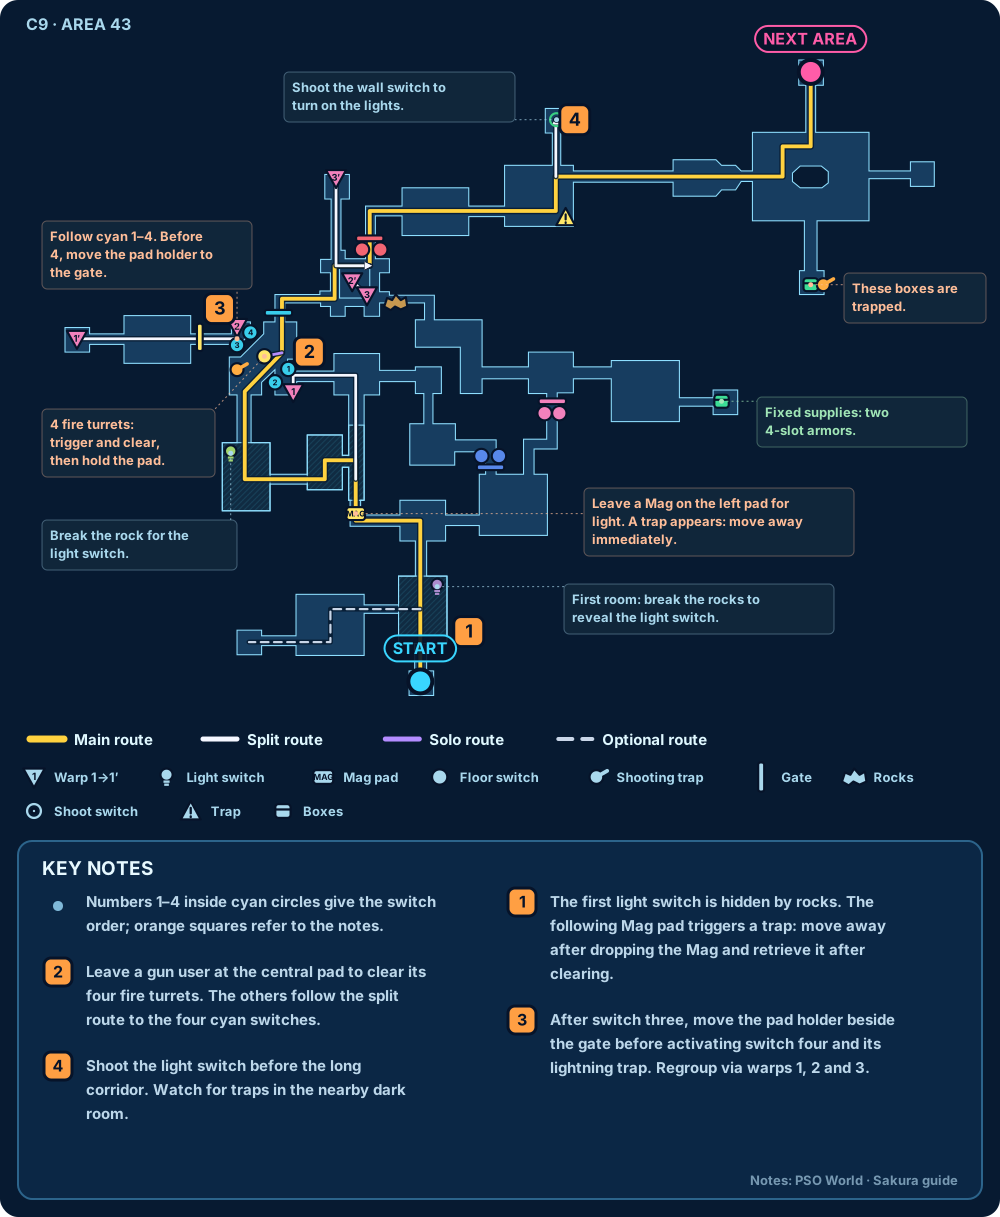
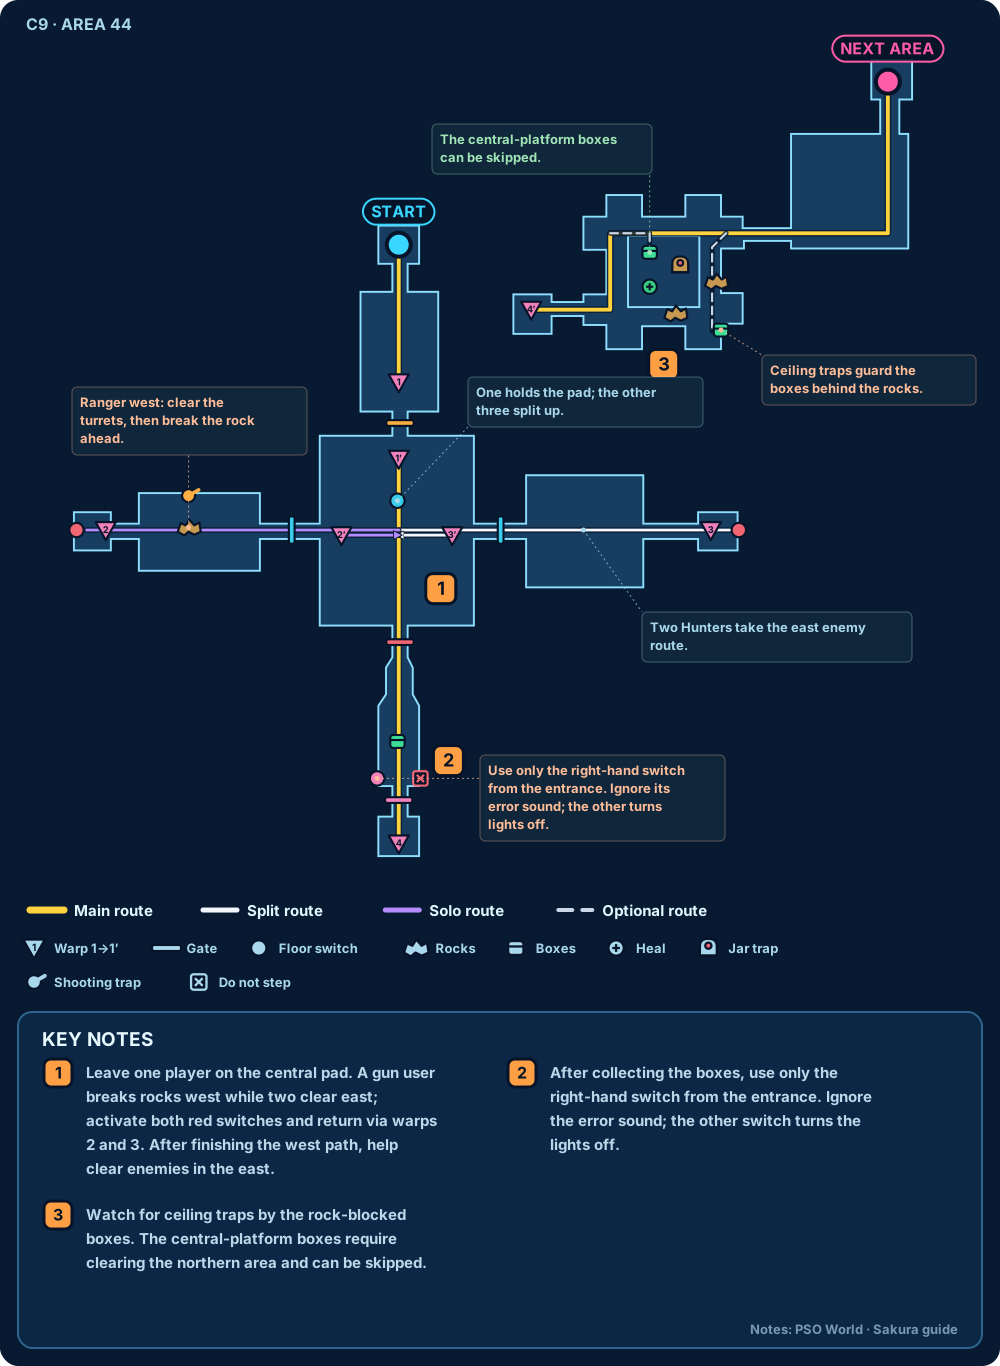
C9 Areas 41–45
Stage strategy and roles
Stage goal: prepare HP, dolls and high-attribute weapons for Dark Falz, and decide whether to take the resource shortcut in Area 45.
- In the Ruins, still take out Chaos Sorcerers, Delsabers and Dark Belras first; give any Grants you pick up to the FO.
- In the dark room of Area 41 the FO can drop a Mag to hold down a switch and then collect the resources. If you plan to take the Area 45 shortcut, keep 8 weapons and 8 shields throughout.
- Give all HP Materials to the FO first. Before the boss the HUs usually keep one doll each and give the rest to the FO, but a new team can split them more cautiously based on survival.
- Dark Falz: before entering, make sure the FO's HP can survive the key attacks; everyone stays spread out and uses their own recovery items. The FO keeps up Shifta/Deband and Jellen/Zalure, and uses Grants on the right form when available.