UPPER
EPISODE II · SEABED
All 8 map variants of the upper and lower Seabed, with recommended routes, per-map optimisations, enemy handling and alternative equipment.
ROUTE ATLAS
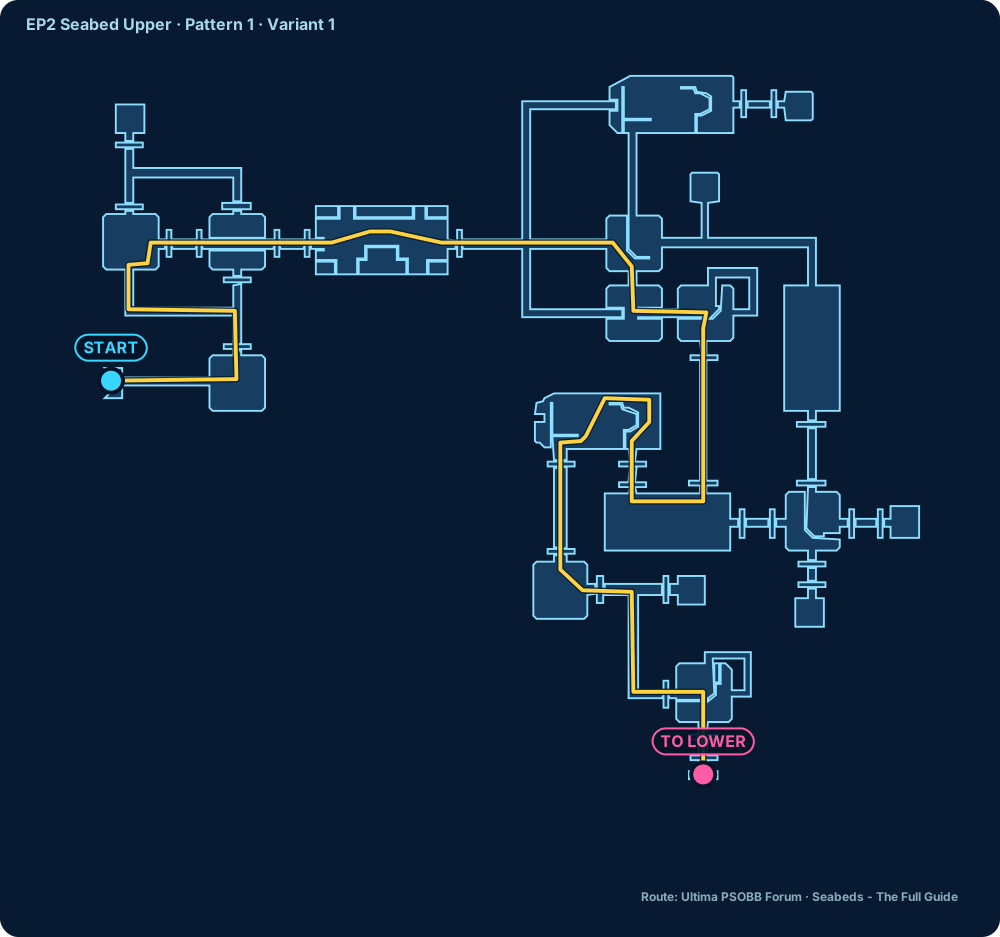
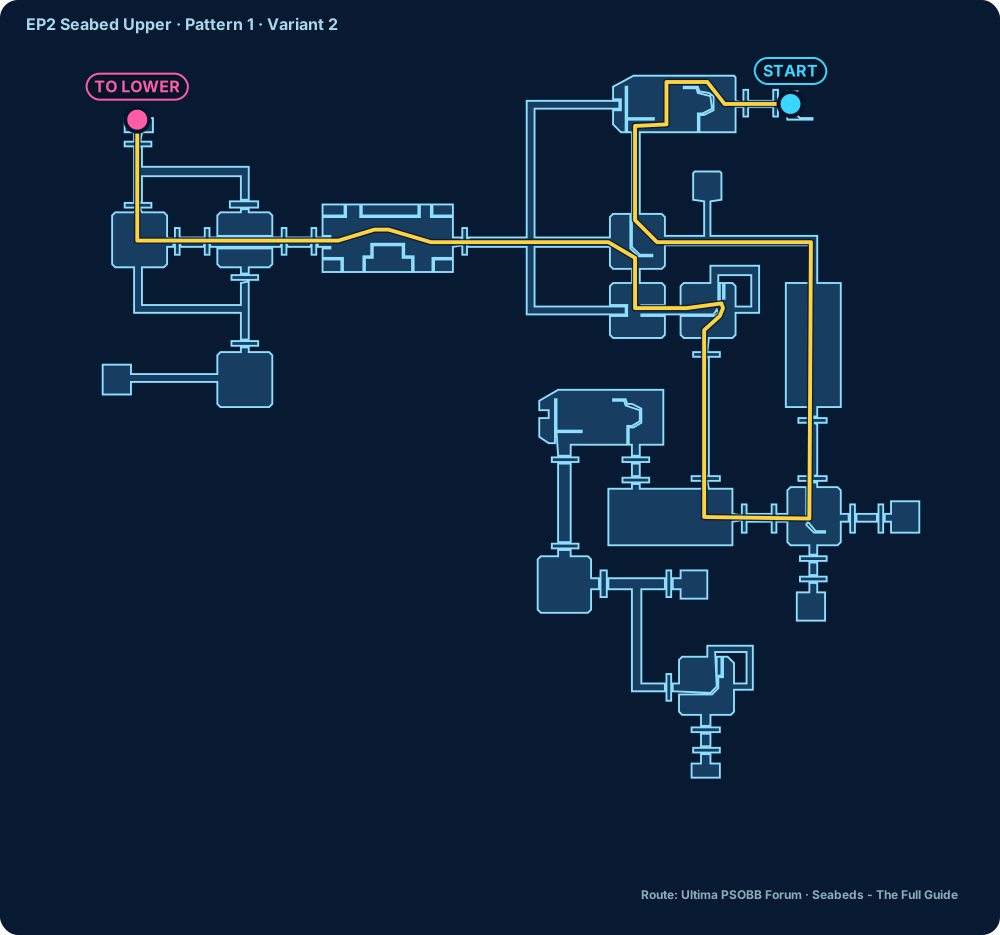
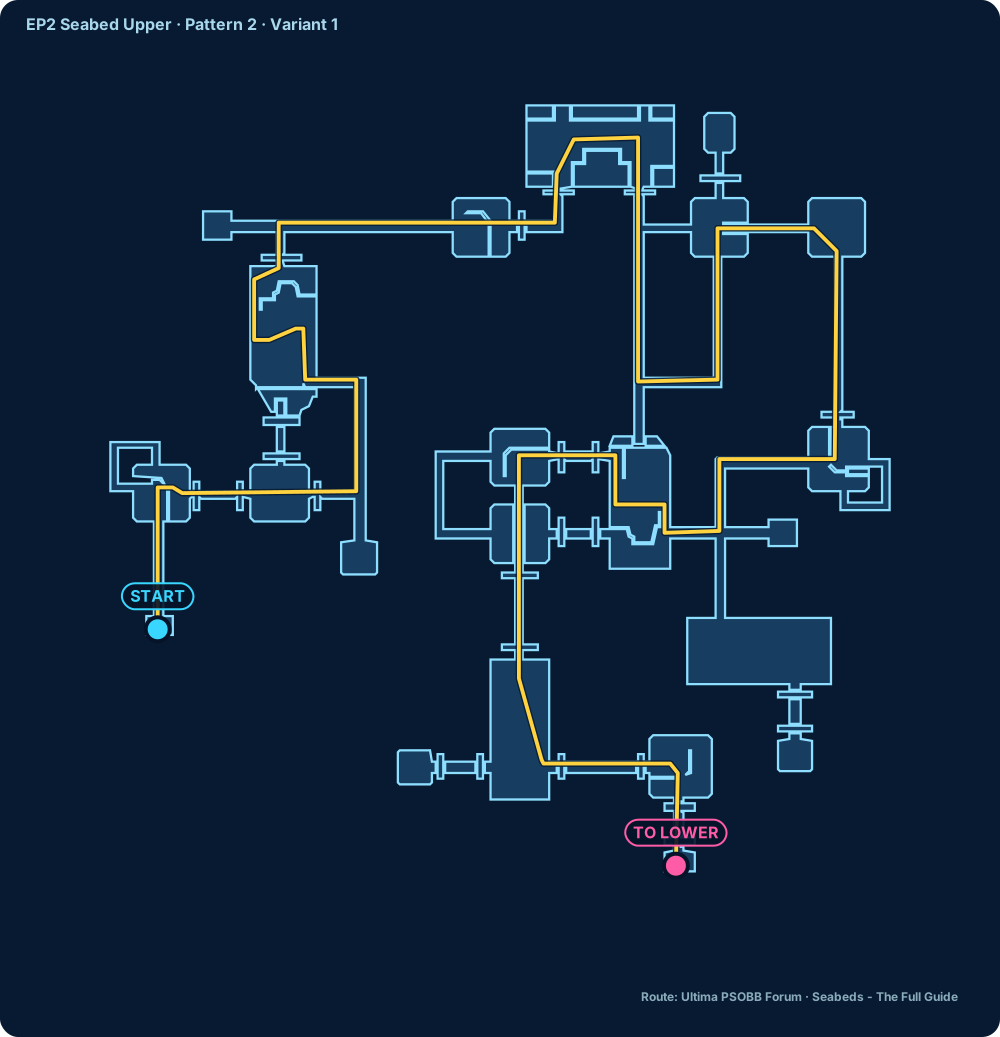
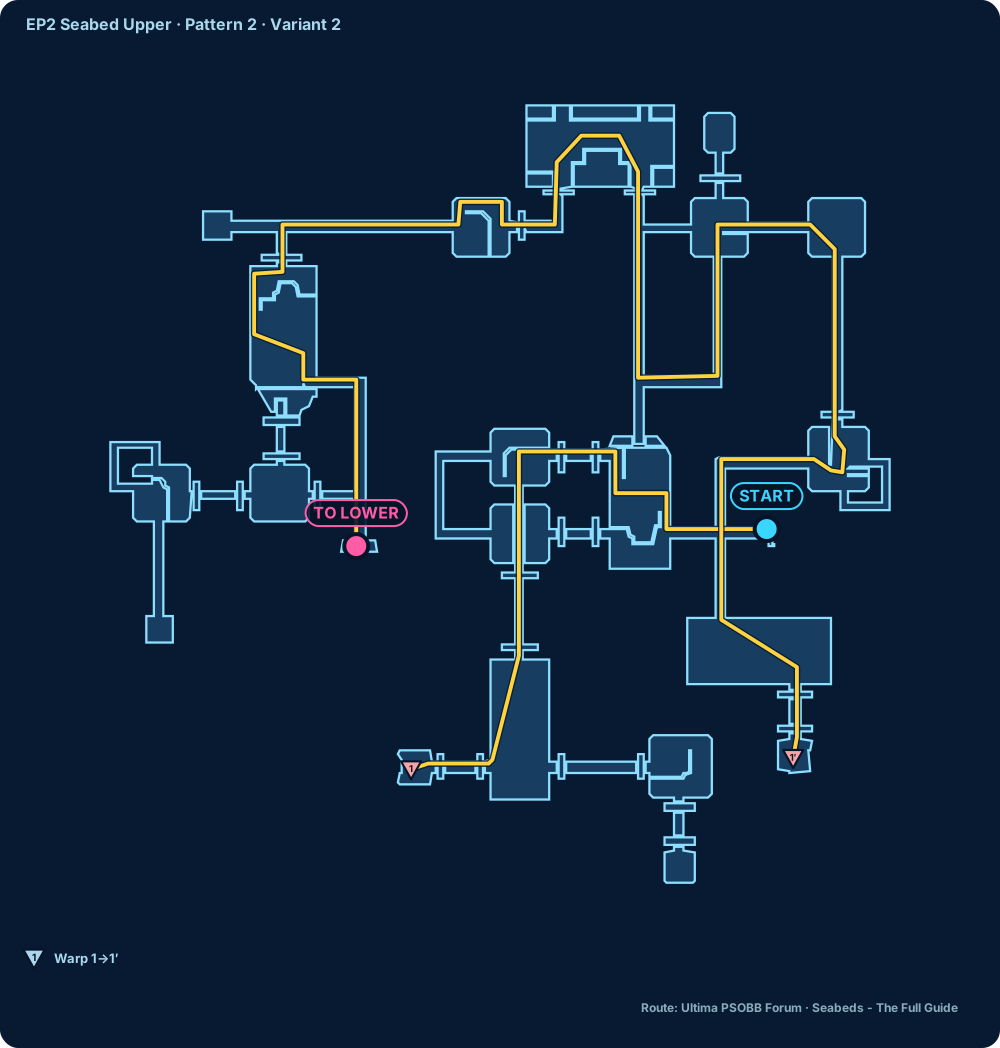
The yellow line is the recommended route; numbered triangles are paired warps (1 → 1′). Click a map to zoom in; "Route video" opens the matching run.
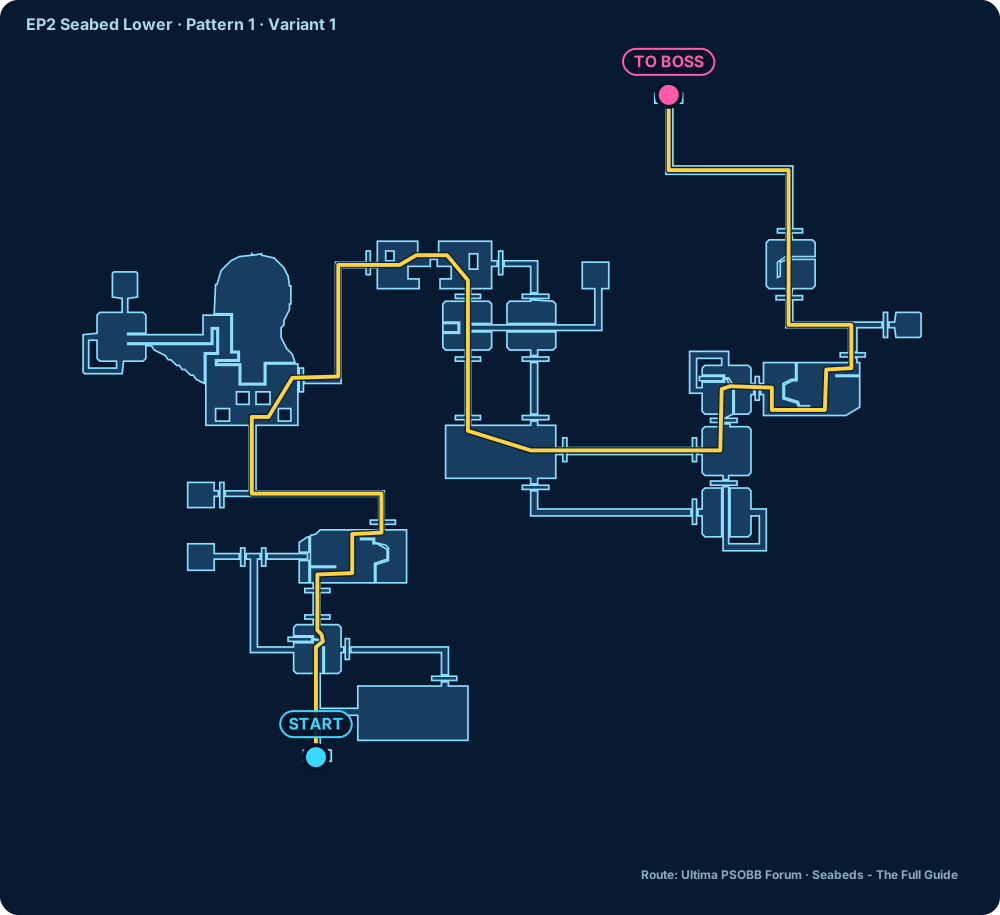
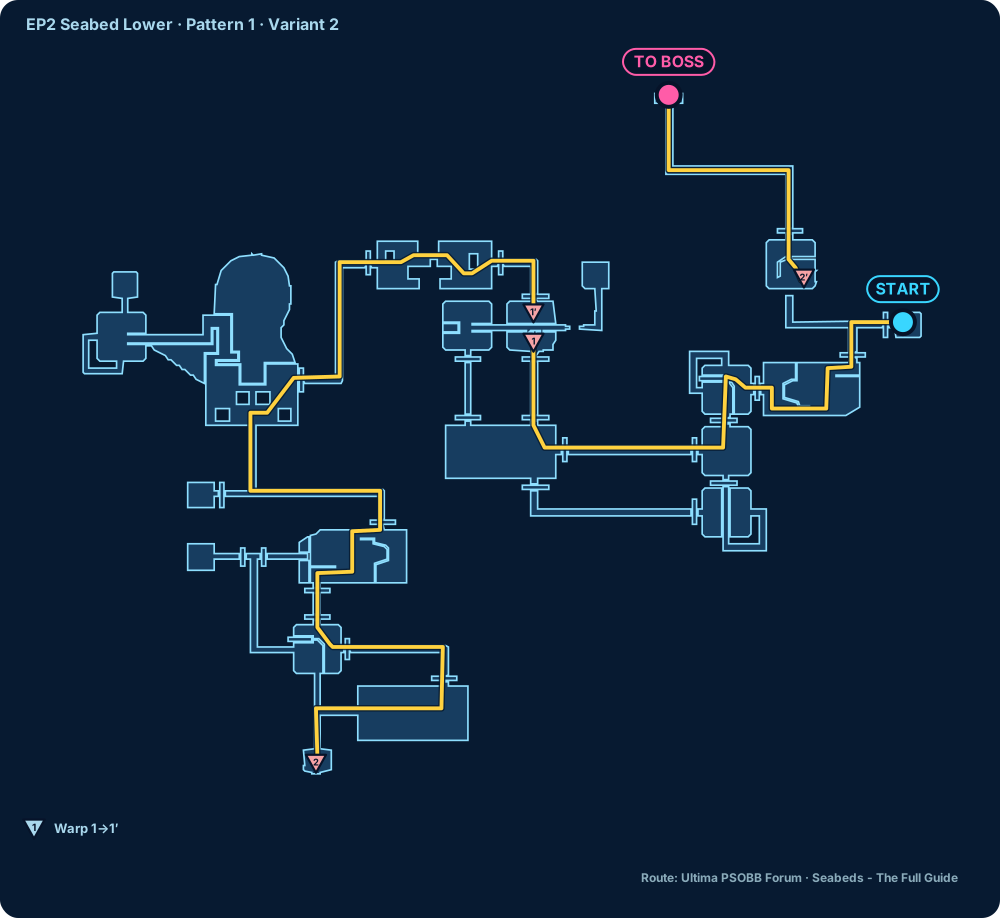
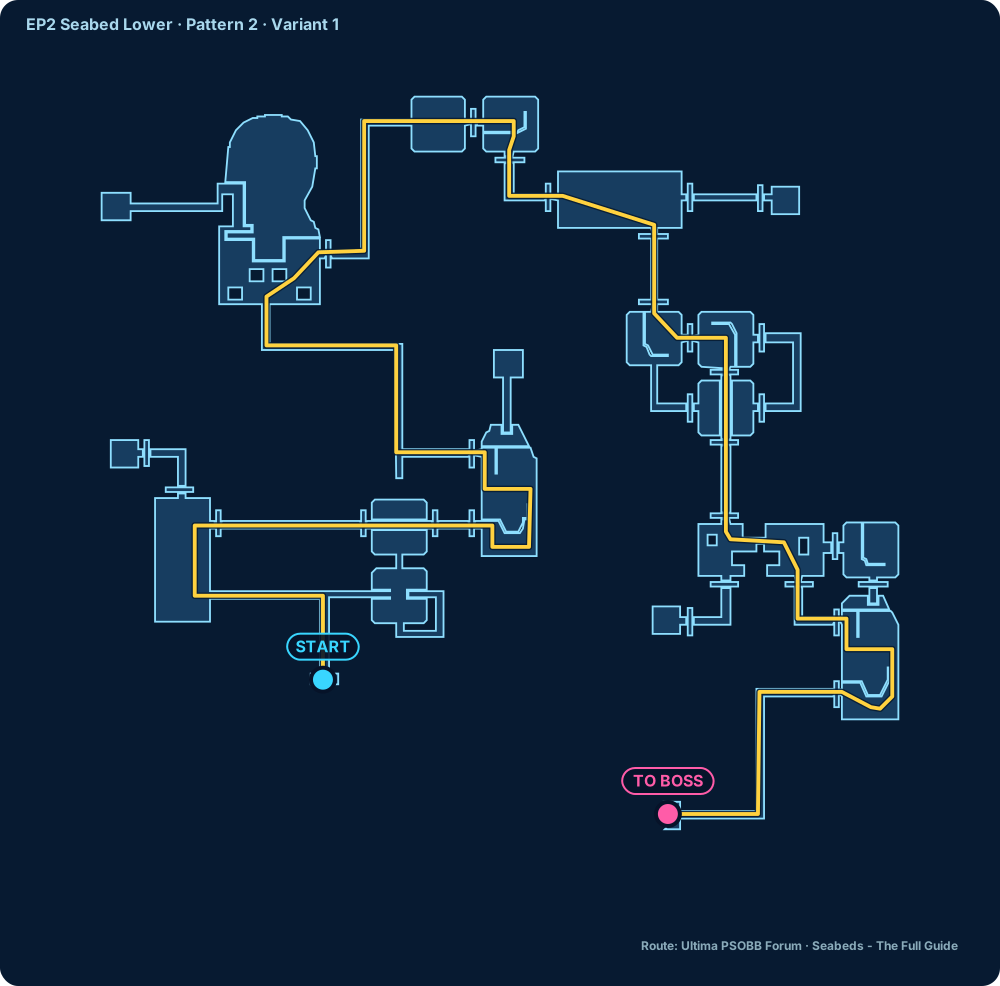
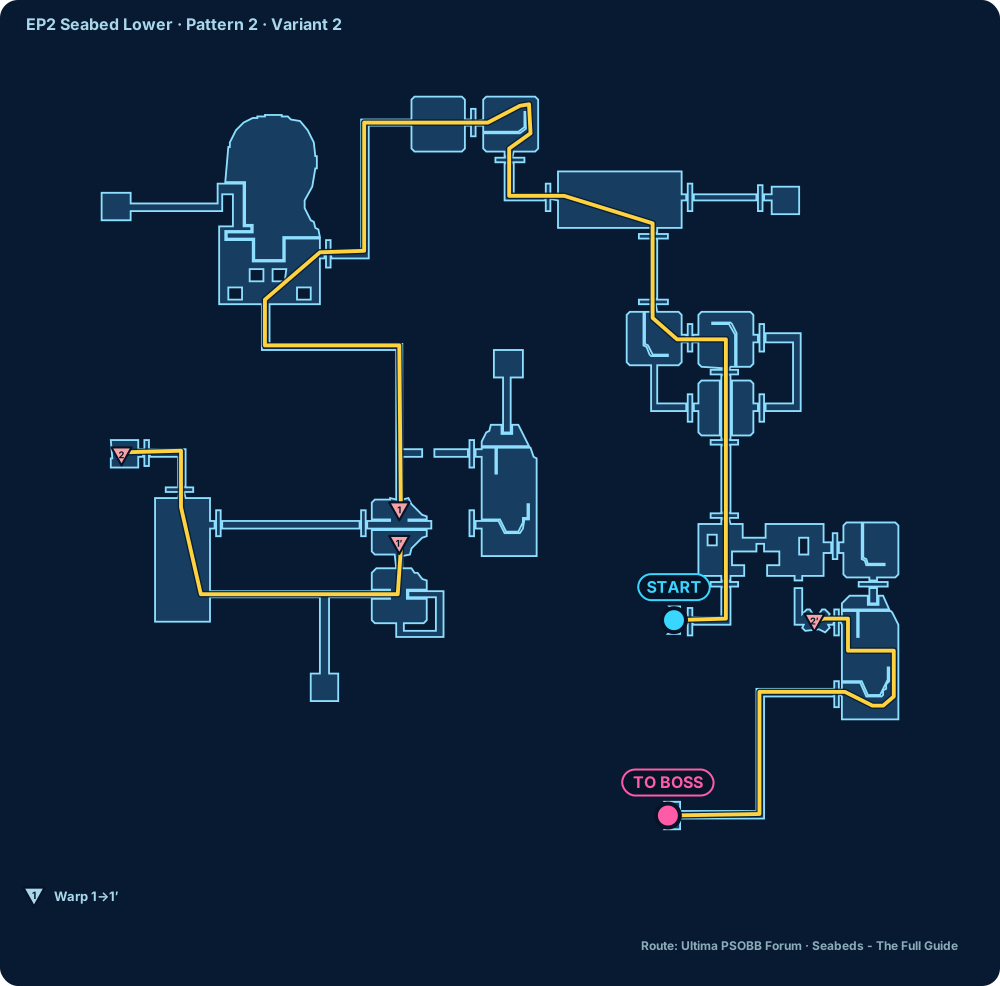
MOVEMENT
Use Photon Claw-type attacks first.
Sword-type attacks work, but need more precise positioning.
Katana-type attacks are usually the most reliable.
Any attack with a clear forward lunge, such as Sword, Partisan, Dagger, Claw or Katana, can make the jump. Watch the demonstration ↗
COMBAT
Hell Type/Shot with Hit, plus V502, is an efficient setup. Androids can freeze them first to lower their EVP, then use Hell.
When several surface at once, drop a Freeze Trap first, then set it off with a first hit that is likely to miss, so they can't use their hit invincibility to dodge the freeze.
Turn the camera away from a Morfos before it spawns and keep it off screen to avoid most of its lasers. Double-Morfos waves can't always be blocked this way; keep the one you can't hide on screen and kill it first.
Learn their spawn lines first, then handle them quickly with freezing, Demon's or a high-Machine weapon. Hunters can also use Serene Swan.
A high-Machine mechgun can kill them before they act. Turn on Advanced Effect and set Maps graphics to maximum, and the reflections on water and glass show their cloaked pounces.
Use Shot's centre lock to hit several targets at once. Power Maser goes through walls, hits ceiling traps and never misses because of a trap's swaying.
LOADOUT
| Role | First choice | Alternatives and notes |
|---|---|---|
| Crowd control | Frozen Shooter, Twin Blaze, Freeze Trap | Androids should use traps proactively to lower risk and EVP. |
| Hell | Hell Type/Shot + Hit, Asteron Striker, Kiss of Death | A Hell S-Rank Needle is cheaper; a Hell Laser depends most on positioning. |
| Group damage | DARK METEOR or Arrest Needle with high Machine/Dark | BARANZ LAUNCHER is the second choice and needs freezing. |
| Single target / boss | Psycho Ravens with high Machine/Dark/Hit | For Olga Flow's first form, a Rianov 303SNR-5 with high Dark also works. |
| Support | Zalure S-Rank Launcher, Macho Blades | For lowering boss defence and keeping Shifta/Deband up. |
| Trap removal | Power Maser | Up to ten targets, instant hits, goes through walls and never misses. |
VARIANT NOTES
Timestamps refer to the route videos above. These are additions and corrections to the videos, not steps you must follow.
0:10 After stepping on the middle trigger, go straight to the door position.0:35 From the ramp corner, hit both Dolmolm at once with TypeSH/SHOT or Yasminkov 7000V.0:54 On entering the bridge, stand right behind the Recobox and lock onto them together.1:59 Only the three southern Recobox are needed; the eastern ones are optional.2:17Correction: the purple Dolmdarl and the Dolmolm are the same wave, so kill order does not affect when the Sinows appear.2:40 Ignore the Recobox at first and run to the north-centre of the room to trigger the Deldepth.4:20 Stand in the south-east corner for the first wave, then at the door for the second.0:17 You can combo the first Sinow to death before the second one attacks; no freeze needed.0:39 When the Dolmdarl appear, you can move to the door before shooting.2:13 Drop any trap in the centre of the room so you can lock onto all four ceiling Recobox at once.5:36 Turn back as soon as you reach the bottom of the ramp, and you can handle every Dolm together from the north side.0:36 Use the free Confuse Trap as a safety margin in case Hell misses.0:45 Unless you use DARK FLOW, turning off the poison is usually not worth the detour.1:22 The Sinow Zoa that drop in can be comboed to death before they move.2:24 Step forward and handle both Dolmdarl in one Yasminkov 7000V combo.3:23 The Delbiter spawn line is in the middle of the east half of the room, so you can stand closer to the door.4:27 You can ignore the Recobox and lure both Sinow Zoa to the centre to freeze them together; faster but riskier.5:03 Use a trap or a Recon as the centre lock point to hit two Recobox per attack.5:57 Kill just one Recobox, then clear the four traps with a single Power Maser shot.2:27 Hug the corner by the door and deal with the Delbiter before leaving.3:50 Take the north and south Recobox first; the other two don't spawn Recon.5:02 Standing by the door on the west side lets you handle the Delbiter directly, without Twin Blaze.5:56 One Power Maser shot clears the traps.3:45 Use the camera trick on the Morfos; no freeze needed.5:07 Stand on the centre line of the east corridor, the furthest point of the Delbiter spawn, then freeze and kill them.6:50 Run to the lower door and drop a Freeze Trap behind the right-hand Zoa, so the Zele joins the other two and you handle them together.0:24TypeSH/SHOT can hit both Morfos at once.1:27 Ignore this Morfos; you usually won't get a shot off before it leaves view.4:59 Use Power Maser to clear the traps.2:30 Don't kill the Recobox first; go straight ahead to trigger and handle the Zoa.5:03 Move to the door while the Sinows jump.5:35 After the ramp, stand in the centre of the upper platform to cover all four enemies at once.6:01 You can dodge the jump attacks in the middle of the corridor; at 6:10, turning left makes the Dolmolm spawn sooner.0:10 Keep to the centre.4:15 You can wait for the Zele behind a pillar the Zoa can't reach, killing a Recobox to clear the way at the same time.5:43Yasminkov 7000V's auto-targeting and higher ATA suit this spot better.PACE
These numbers come from Ultima and are only a guide to route pace, not hard targets for Ephinea.
The search interface could not download. Reload this page to try again.